Welcome!
We are glad to have you on the team! Below are sections of information that we think will be helpful for you on your first few days using the technology that is provided to you by CCAC's IT department. On the right-hand side, is also a table of contents to help you quickly navigate to information you may need.

Account Information
NetID Username
Your NetID Account will allow you to access all of CCAC applications and systems using your NetID username and password to log in.
Example of a Username
Person's Name: John Doe
Username will be 1st letter of first name and full last name. A number may follow if it is a common username.
Example: jdoe02
Password Criteria
Password Criteria for an Employee Account
Your password is required to meet the following criteria:
- At least 15 characters
-
Password must contain characters from three of the following four categories:
- English uppercase characters (A through Z)
- English lowercase characters (a through z)
- Base 10 digits (0 through 9)
- Non-alphabetic characters (for example: !, $, #, %)
- Cannot include a period (.), space ( ), comma (,), or less than or greater than brackets (< or >)
- Cannot include any Unicode character that is categorized as an alphabetic character but is not uppercase or lowercase. This includes Unicode characters from the Asian languages
- Cannot reuse the last 6 passwords
- Password must not contain your account name or parts of your full name that exceed two consecutive characters
Password Information
- Password will need changed: every 180 days
- Account lockout: 10 authentication failures within 1 minute results in account lock out for 10 minutes
- You will not be able to change your password less than 2 days since you last changed it
ITS Suggestion - Use a Passphrase!
A passphrase contains symbols and numbers to replace certain letters and can be a complete or incomplete phrase and can also contain spaces. The length and complexity of the passphrase make your account more secure resulting in less required password resets. The more characters your passphrase has, the stronger it is. To make your passphrase strong by replacing letters with numbers or symbols, such as replacing the letter ‘a’ with the ‘@’ symbol or the letter ‘o’ with the number zero.
Examples:
- It was a bright cold day in April - Itw@s@brightcoldd@yin4
- The key to faking out the parents is the clammy hands - Th3k3ytof@kingoutthep@rentsisthecl@mmyh@nds
- In the town where I was born - Inth3t0wnwh3r3Iw@sb0rn
- I would like to run 5 miles a week - !wouldl!k3torun5m!lesaweek
Personal Account information
You can reach out to Human Resources to have your information updated, or use CCAC Self-Service to update your information. You can update your address, email, phone number and more through the CCAC Self-Service.
Profile Picture
Profile Picture Standards
Requesting a Headshot from CCAC Marketing
- It is highly recommended that you request a CCAC headshot by reserving a time with Marketing
- If you need your headshot added to the CCAC website, use this form
- More information regarding headshots and the CCAC website can found in the Help Center
Taking a Professional Profile Photo
- Use a recent photo of yourself.
- Wear appropriate attire. Refrain from wearing bright white, strong colors, tight patterns, or large reflective jewelry.
- Take a photo with the right expression.
- Keep your head straight.
- Avoid distracting backgrounds.
- You should be the only subject.
- Take the photo in soft, natural light.
- Do not use the CCAC logo, seal, icons, ect.
Setting Up Your Profile Photo
- Crop the picture from the top of your shoulders to just above your head so that your face fills the frame.
- You face should take up at least 60% of the frame
- Use a high-resolution image (400x400 pixels)
 How to Add Your Profile Photo
Add a Profile Picture from the Outlook Application - CCAC's Help Center (This will also update Webex)
Adding a Profile Picture to your CCAC Zoom Account - CCAC's Help Center
1st Time Account Setup
Your account will have a default password, this password will need changed the 1st time you log into a CCAC application/device.
Default Password Schematic
xX#######
- x Represents the lower-case first letter of your first name
- X Represents the upper-case first letter of your last name
- ####### Represents your 7-digit Colleague ID #
Example password for John Doe, with Colleague ID of (0000001): password: jD0000001
Best Practice
Setup your account on-site using a CCAC device that is connected to the CCAC network.
This can be either through a desktop computer or CCAC laptop.
On-Site
Once logged in with your username and default password, Windows will automatically prompt for the password change. You will need to create a new password that meets CCAC password requirements. Use the “Password Criteria” tab above for the list of requirements.
Off-Site
Go to the MyCCAC Hub at my.ccac.edu to sign in. You will enter your username and default password. It will provide a prompt to change the password. Next you will need to create a new password that meets CCAC password requirements. Use the “Password Criteria” tab above for the list of requirements.
Accessing and Logging In
Single Sign-On (SSO)
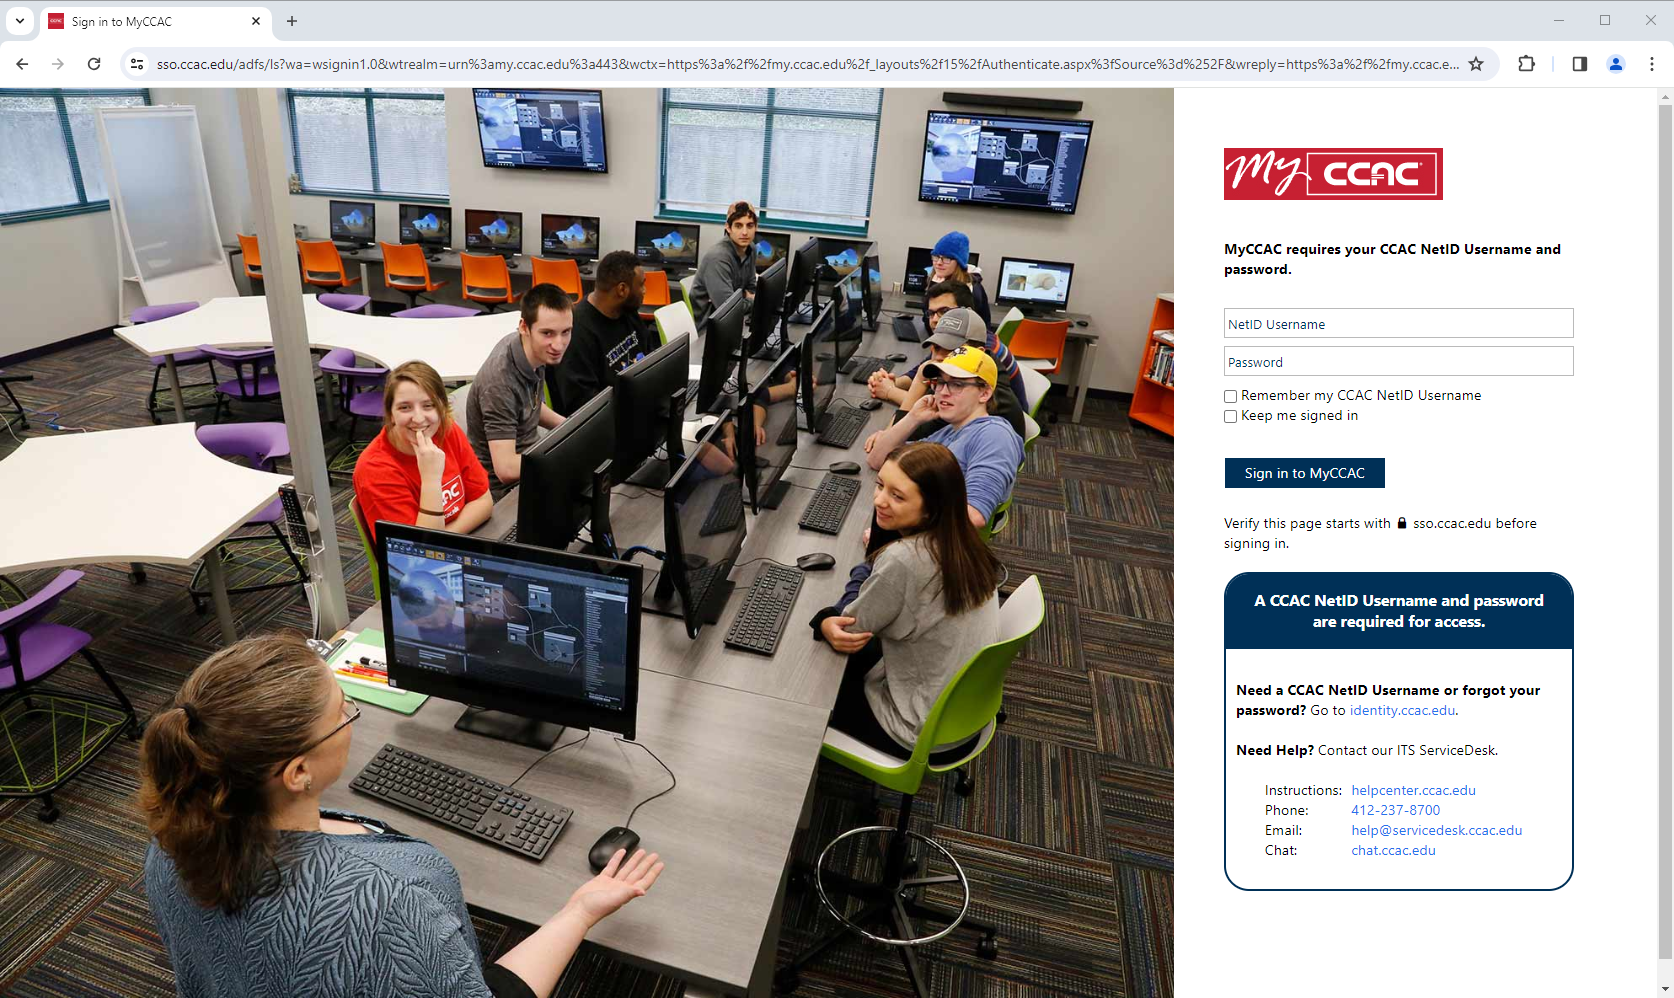
CCAC uses single sign-on for almost all of our applications. Single sign-on is an authentication system that allows you to log in with your CCAC NetID account to most of the CCAC applications and systems. Single sign-on allows you to log in once and access services without re-entering authentication factors.
When logging into an application look for a button that says “Single Sign-On” or “SSO”, then you will be taken to our SSO sign on page.
Multi-Factor Authentication (MFA) Setup
For an added layer of security, certain CCAC applications or systems may prompt you to use Microsoft Multi-Factor Authentication to confirm that you are logging into your account.
How to log in using Microsoft MFA
Please make sure you have set up the Microsoft Multi-Factor Authentication before trying to log in
If you have not yet setup the Microsoft Multi-Factor Authentication there are instructions available in the Help Center article titled Adding Multi-Factor Authentication (MFA) to your account using Microsoft Authenticator.
The latest instructions on how to sign in using Microsoft Multi-Factor Authentication are available directly on the Microsoft website.
- Go to any website or application that requires authentication, such as https://m365.cloud.microsoft/
- Enter your CCAC Email address and click Next

- Enter your CCAC Password and click Sign in

Verify your identity using the Microsoft Authenticator app

- Tap or Click the popup on your phone saying ‘Approve sign-in?’.
- Enter the number shown on the computer screen into the phone
- Tap or Click Approve on your phone
- If you are using a computer that only you have access to, you can click Yes when asked if you would like to "Stay signed in?"

- You will then be redirected back to the site you were trying to access.
Verify using a text message
Microsoft will be removing this authentication option
Beginning February 1, Microsoft will no longer allow phone call or text message authentication for MFA. You will need to use the Microsoft Authenticator method to verify your identity when signing in.

- You will get a text message saying “U
- se verification code xxxxxx for Microsoft authentication”.
- Enter the numbers shown in your text message where it says Code on the login page on the computer
- Click Verify
- If you are using a computer that only you have access to, you can click Yes when asked if you would like to "Stay signed in?"
- You will then be redirected back to the site you were trying to access.
Office Equipment
Laptop
As a new employee, you will be assigned a CCAC Laptop. You will need to sign the laptop agreement to use your CCAC provided laptop. You will log into the PC using your CCAC NetID account.
CCAC ITS department has developed an upgrade cycle for devices. This means ITS will replace your device, it is not guaranteed all files will import onto the new device. If the device is failing or should need to be restored to the CCAC base image, your files will not be recovered.
Best Practice
At the End of Your Shift, restart (not shutdown) your PC at the end of your shift. Restarting your PC will allow it to delete the stored memory, etc. within Windows. Also, our systems will install updates and patches to your device while no one is logged in. If you are logged in, the system will not do updates.
Docking Station
Reconnecting your Laptop to your Docking Station
Laptop is Off
- Plug the docking station cable into the laptop
- Press the power button on the docking station
- The laptop will turn on (this may take up to 20 seconds)
Video
Laptop is On
- Plug the docking station cable into the laptop
- The laptop will begin to recognize the devices attached to the docking station (this may take up to 10 seconds)
Desk Phone and Voicemail
Many frequently asked questions about your desk phone can be found here: Desk Phone List of Articles
Many frequently asked questions about your voicemail can be found here: Voicemail List of Articles
Setting up your voicemail
Setting up a voicemail
Office Desk Phone
- Press the Messages Key

- You will be prompted to enter your PIN, 1234 and then #
- You will be asked to record your name, greeting, and to change your PIN
- Your greeting and PIN number are now setup
Off Campus
- Dial your 10 digit office number
- Press * when you hear your voicemail message begin to play
- Enter your 4 digit extension
- You will be prompted to enter your PIN, 1234 and then #
- You will be asked to record your name, greeting, and to change your PIN
- Your greeting and PIN number are now setup
Printing
Many frequently asked questions about your desk phone can be found here: Printing (Print Management) List of Articles
User Guide for Print Management
Printing From A CCAC Computer
Windows
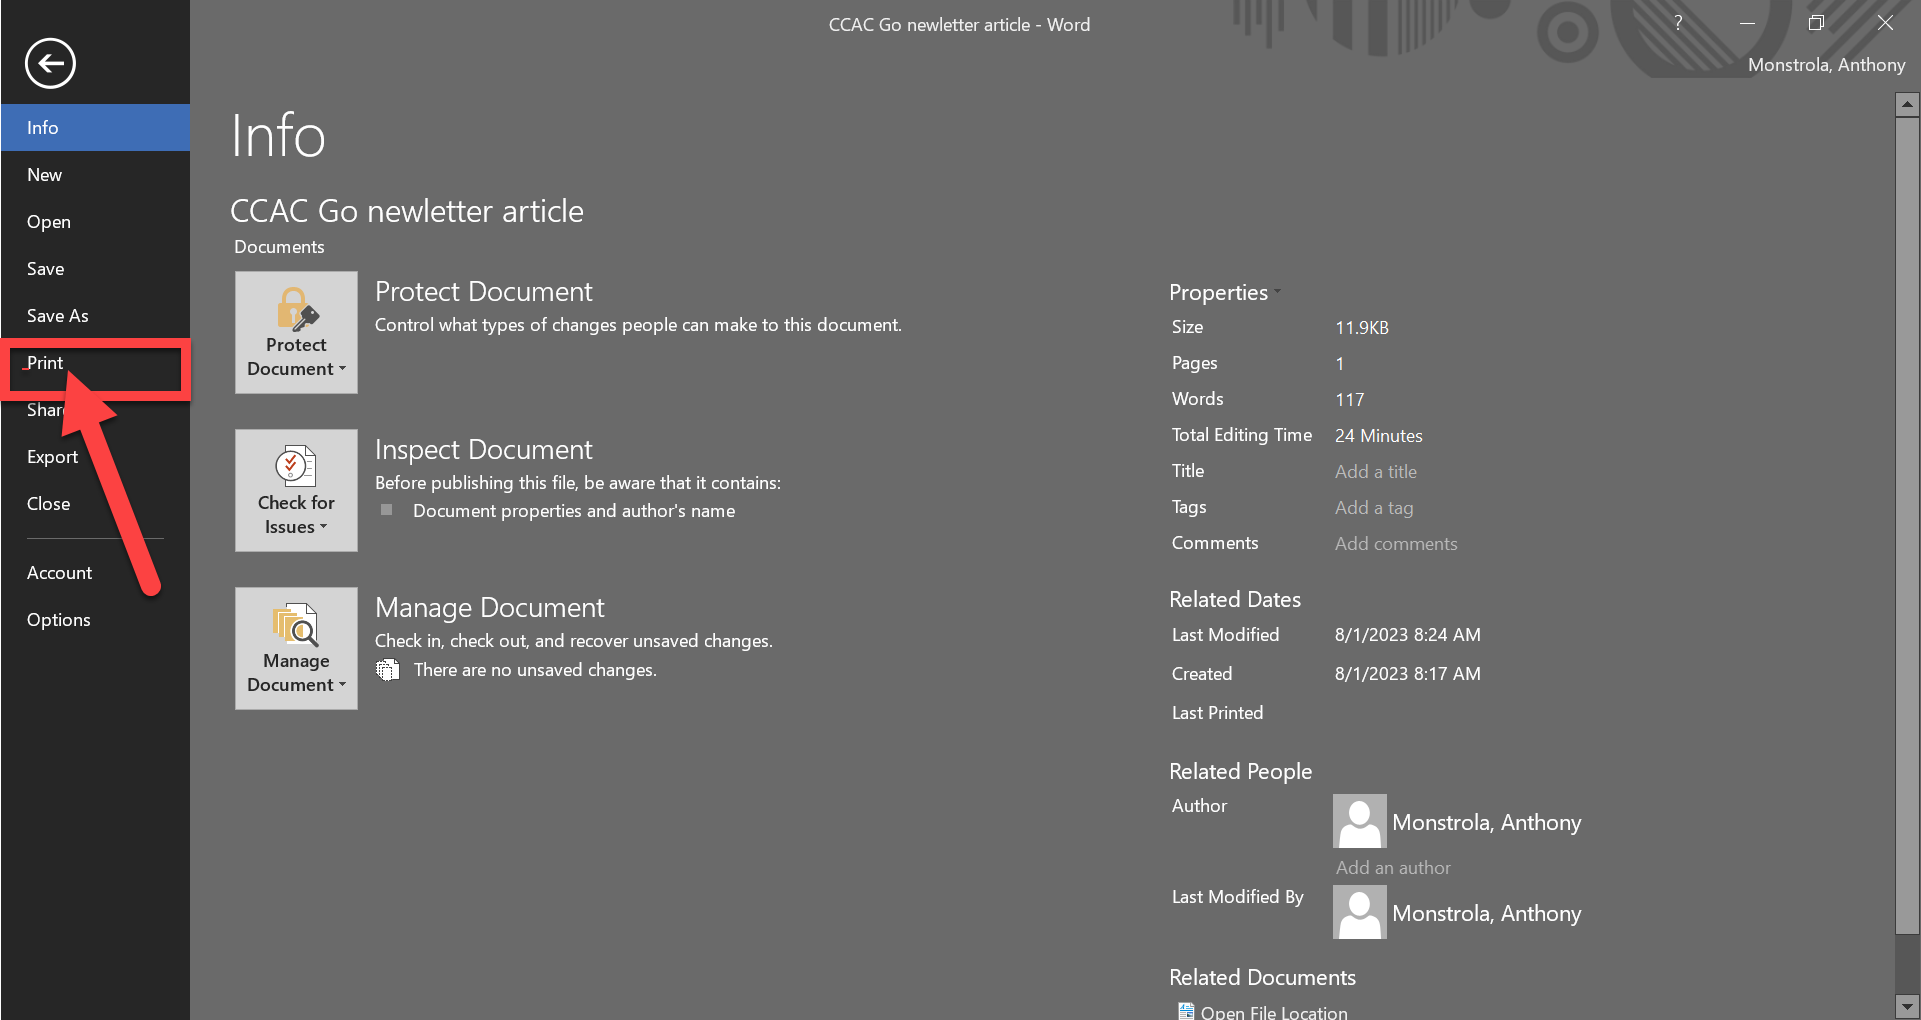
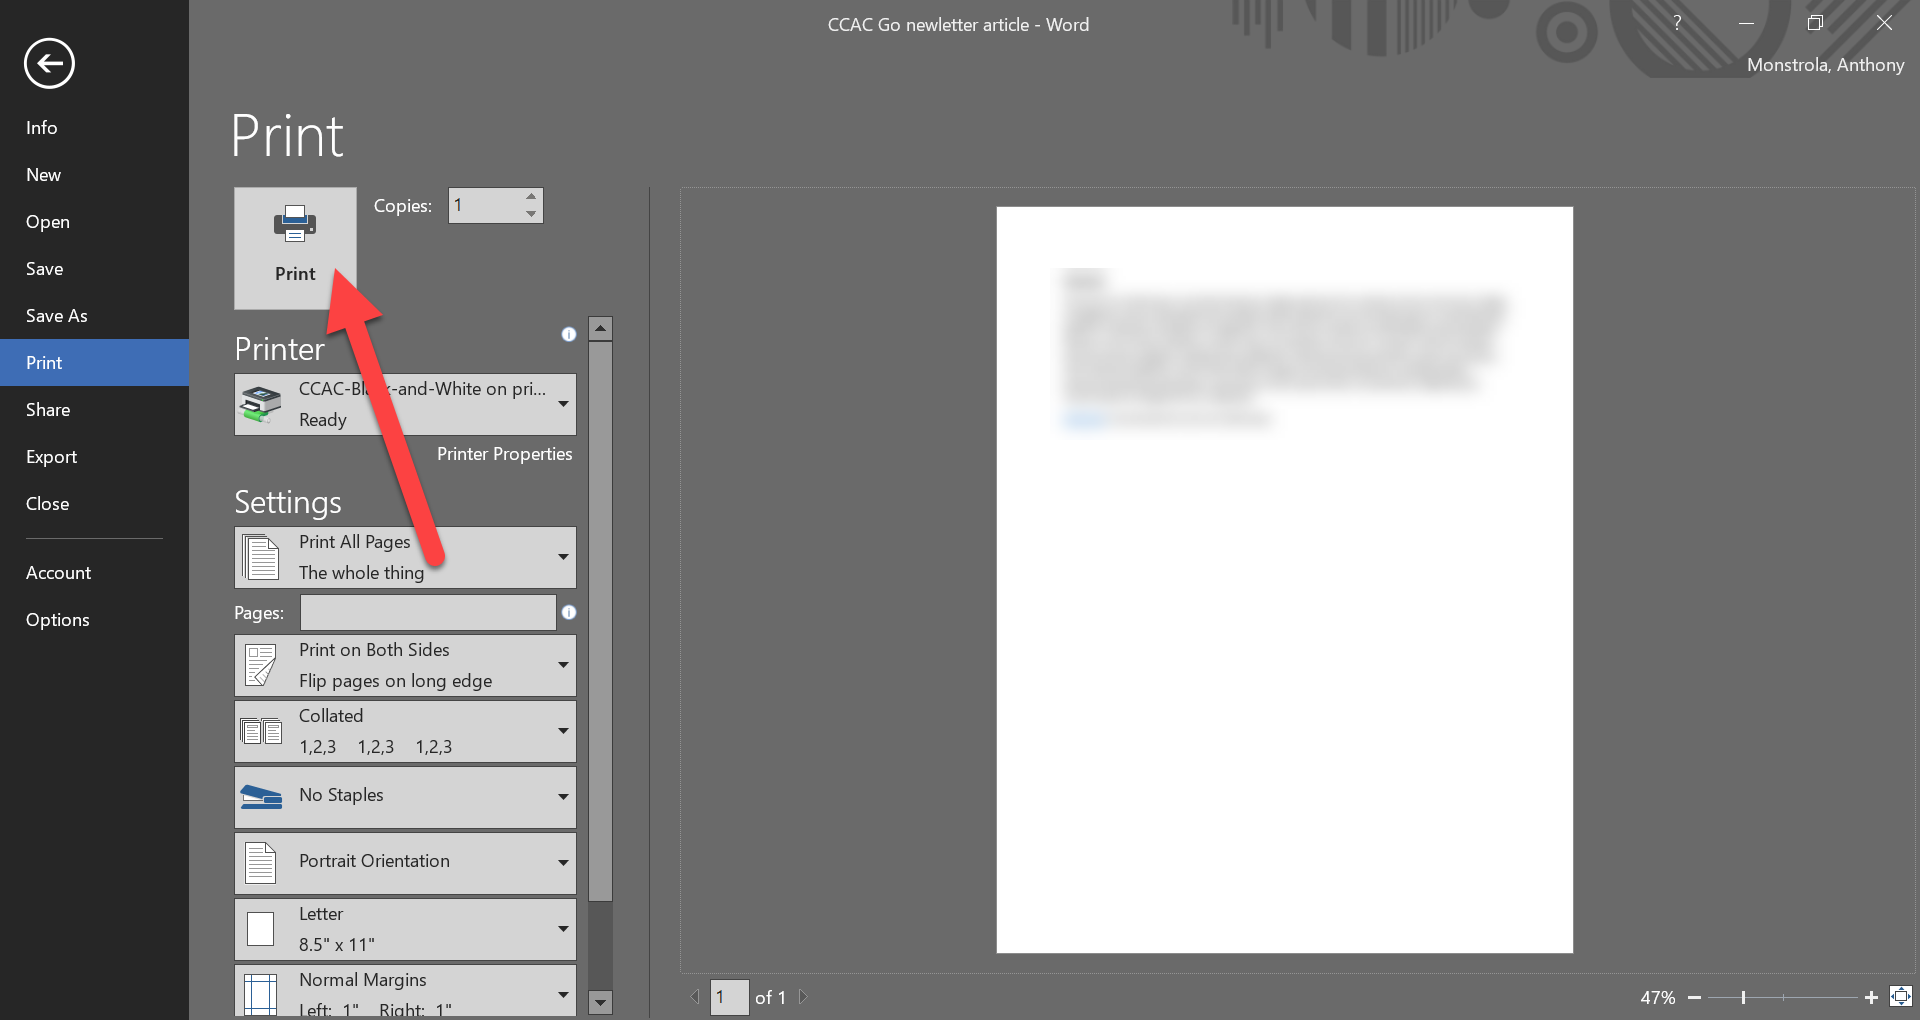
- Click File

- Click Print
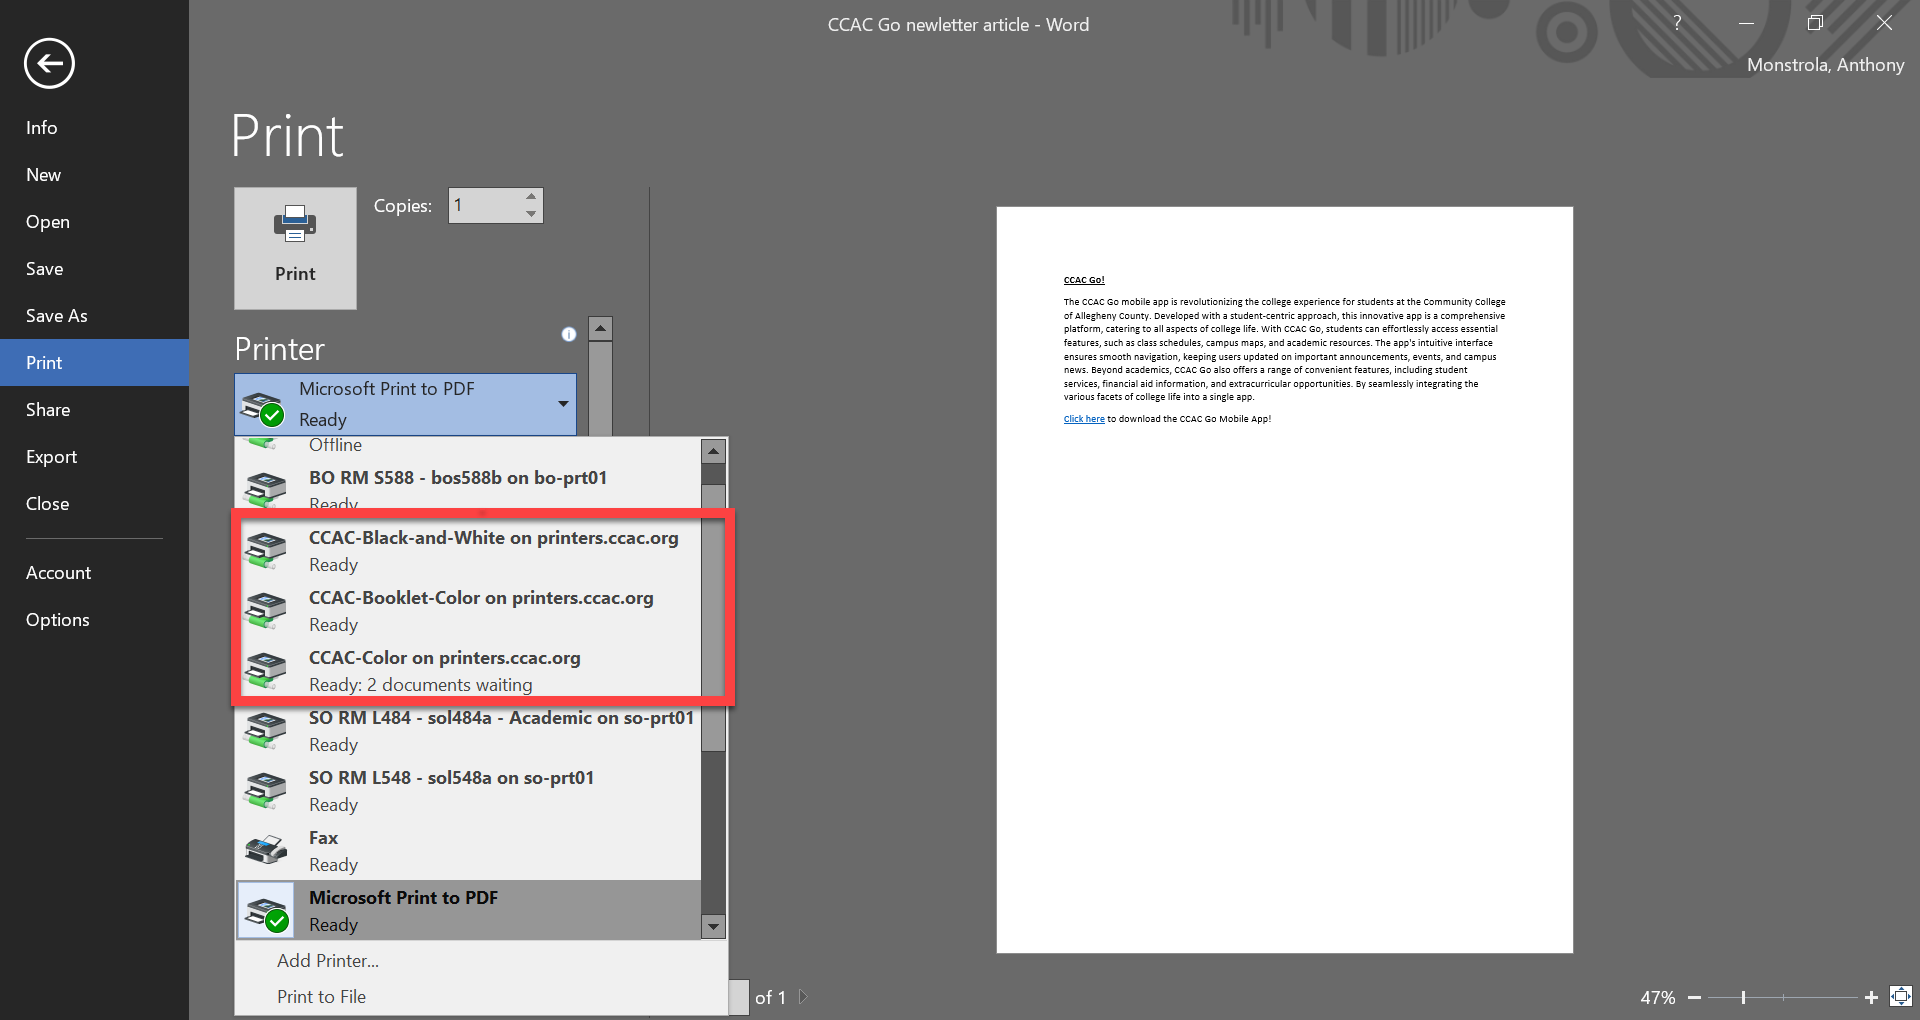
- Select Printer in the drop-down
- CCAC-Black-and-White on printers.ccac.org
- CCAC-Color on printers.ccac.org
- CCAC-Booklet-Color on printers.ccac.org (only certain users will see this option)
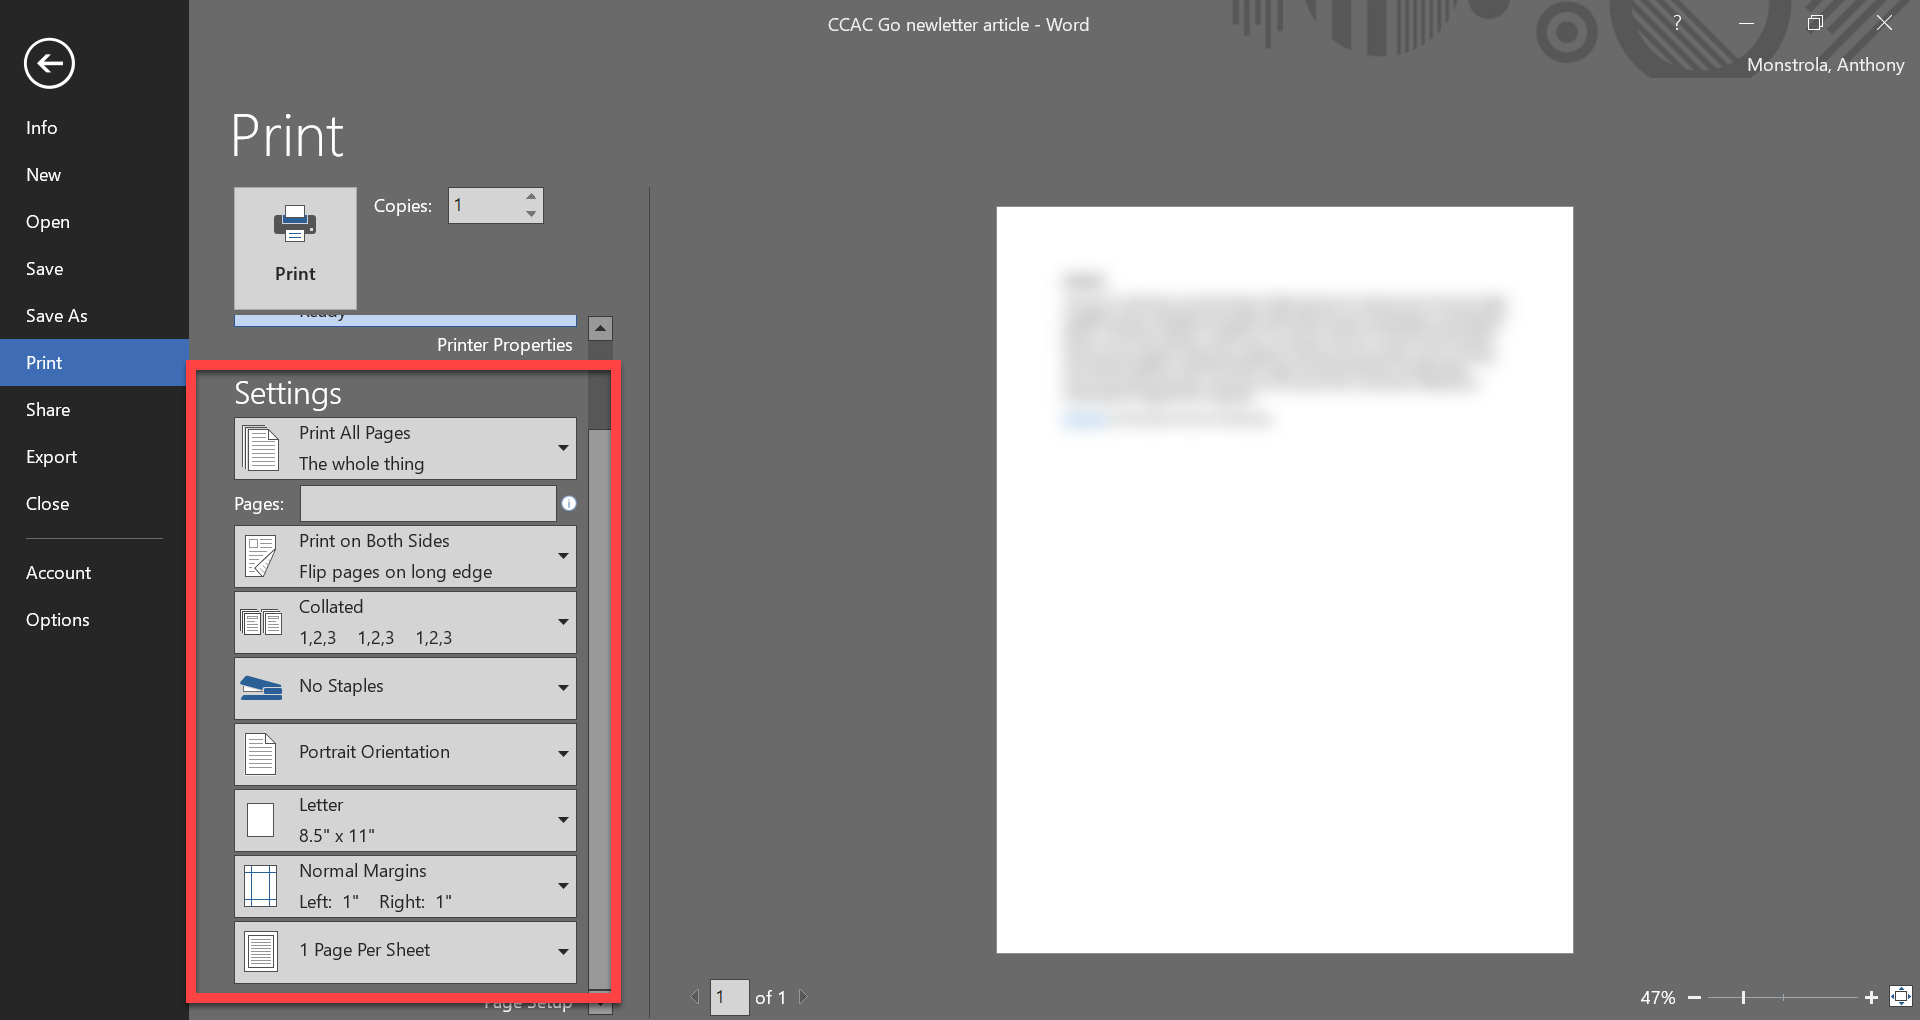
- Adjust other printer settings to your needs
- Click Print
- After clicking print, your print job will be in a queue
- You will have to physically walk to the printer to release the job
MAC
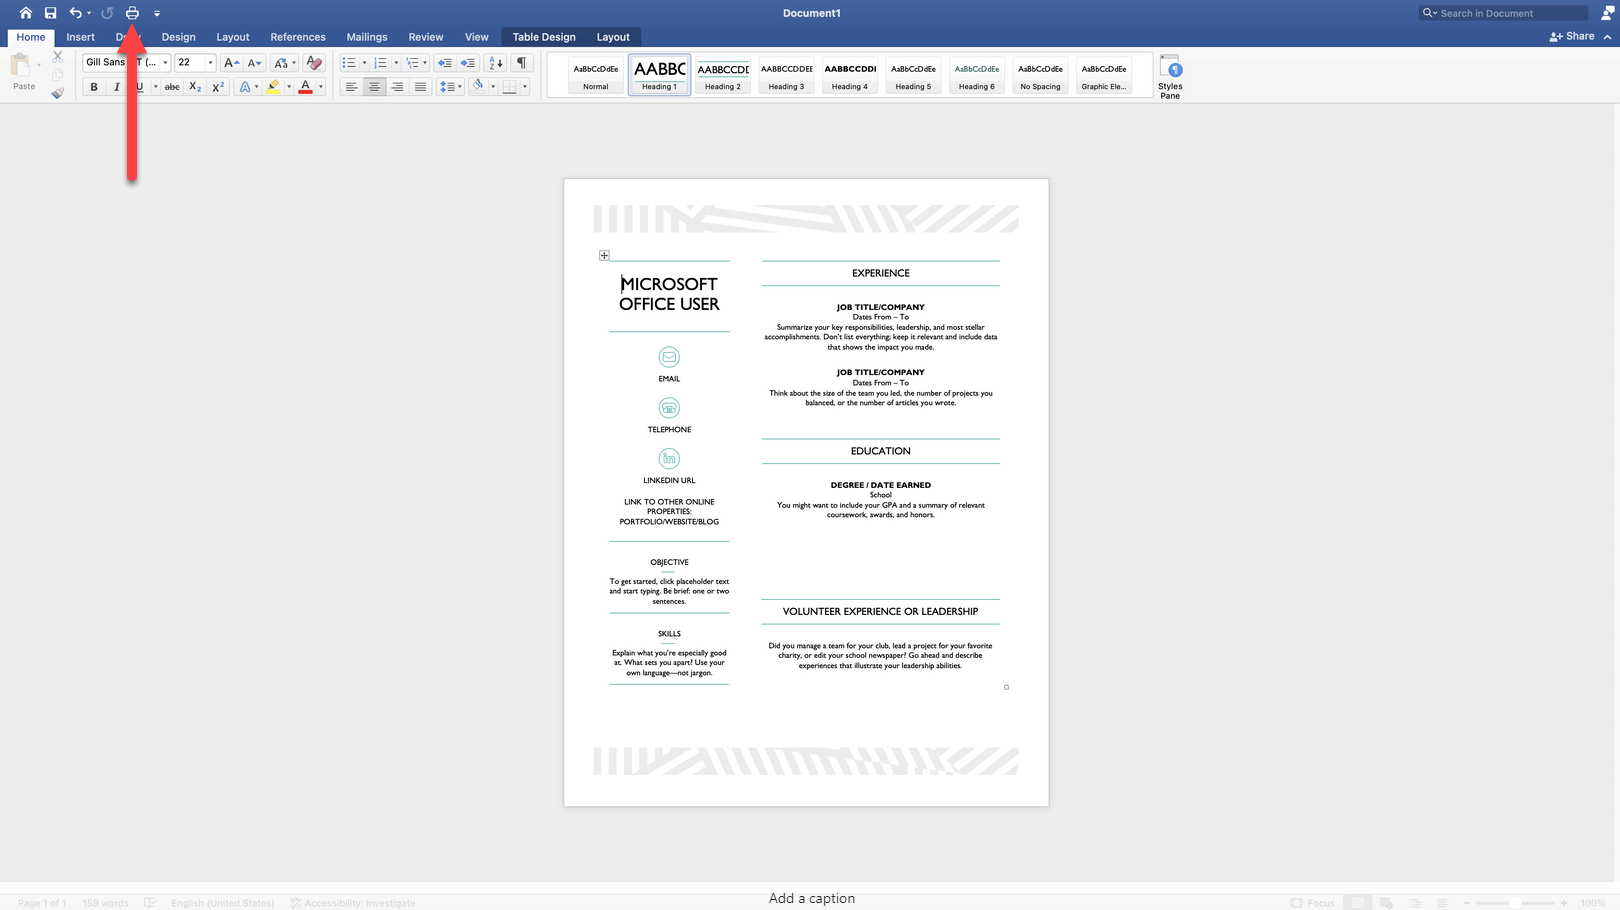
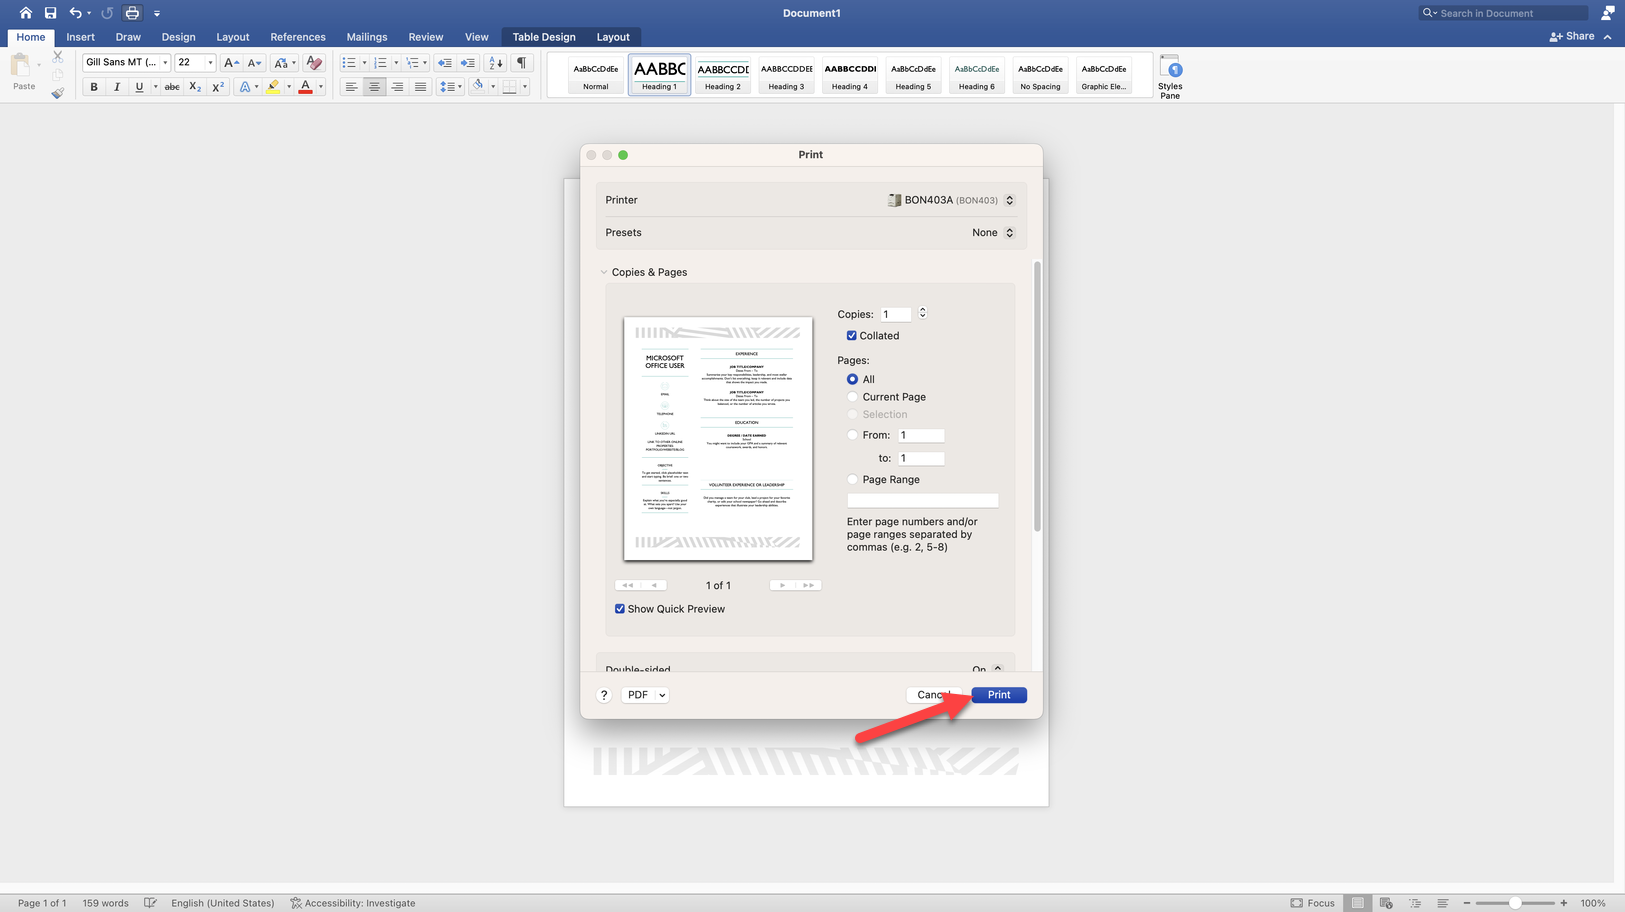
- Click on the printer icon
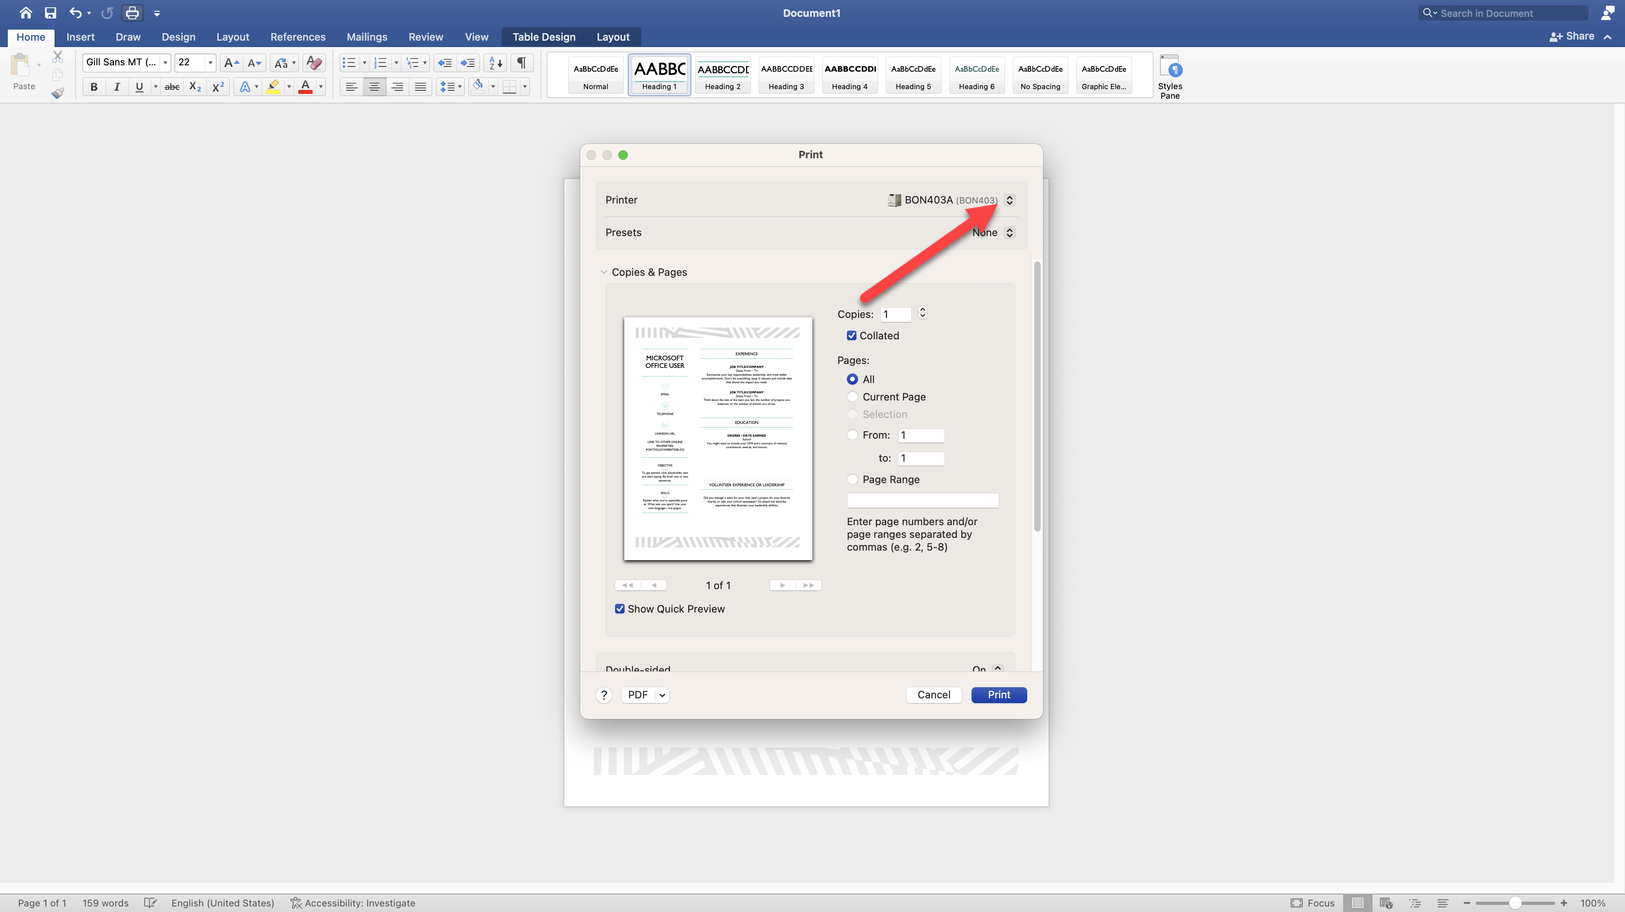
- Select Printer in the drop-down
- CCAC-Black-and-White on printers.ccac.org
- CCAC-Color on printers.ccac.org
- CCAC-Booklet-Color on printers.ccac.org (only certain users will see this option)
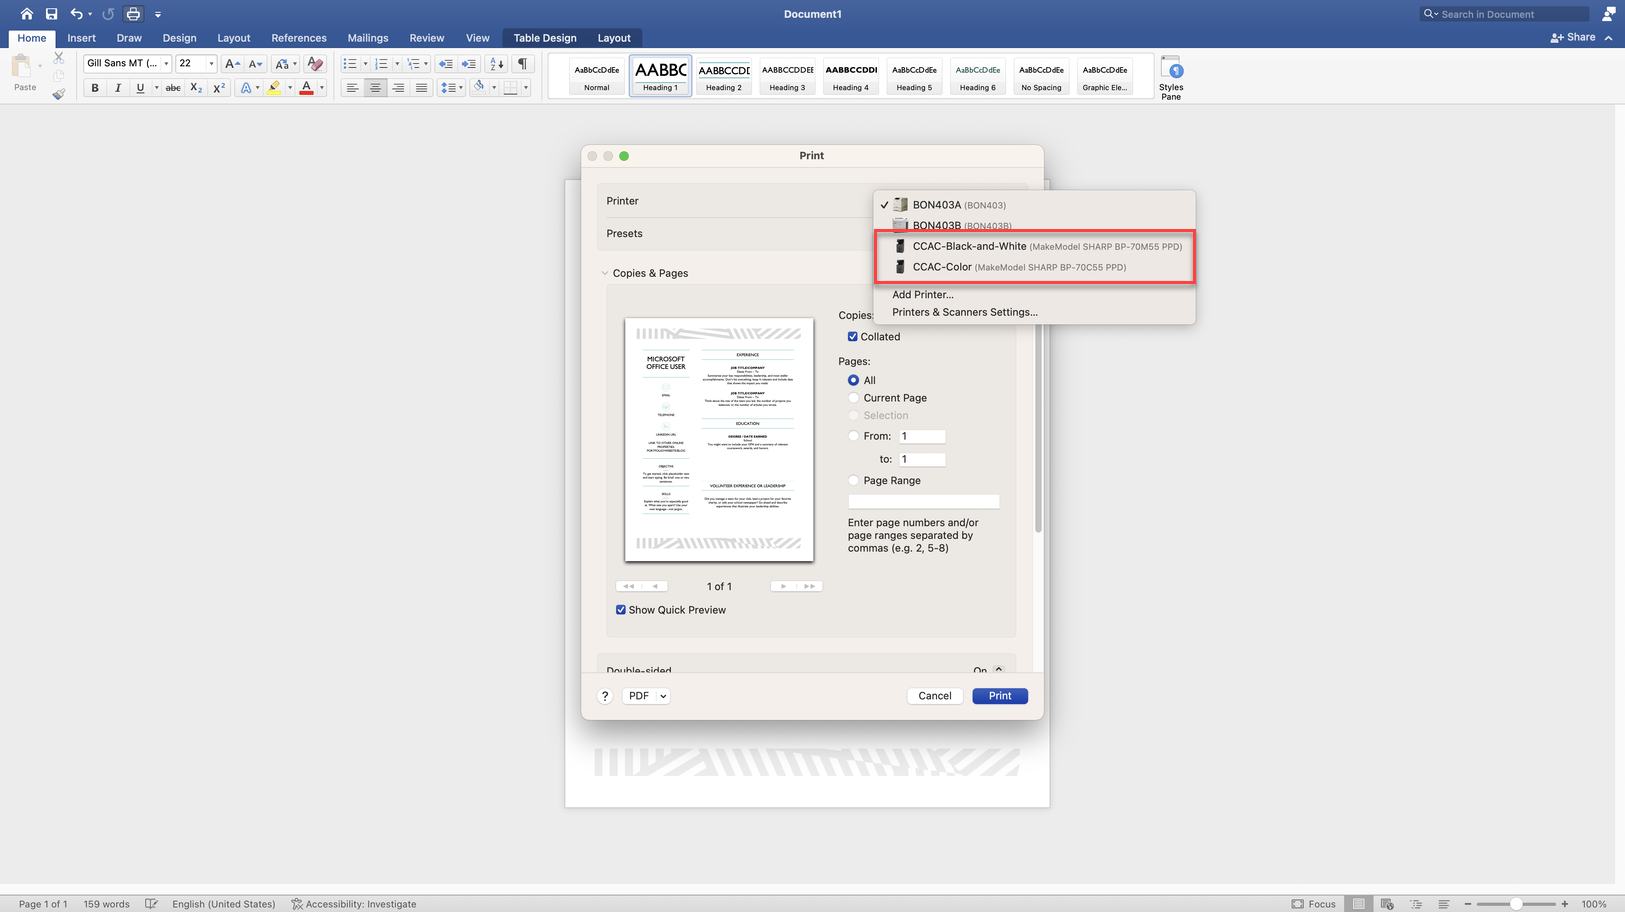
- Adjust other printer settings to your needs

- Click Print
- After clicking print, your print job will be in a queue
- You will have to physically walk to the printer to release the job
Standard Office Equipment and Technology Standards
Saving Files
Information
CCAC Laptops are owned and managed by CCAC. Data should never be stored on the physical device, see below on when and where to store files and information. The college uses OneDrive, as it's cloud storage solution. You should never store any CCAC files or information on another cloud account, personal cloud or storage device.
Personal Identifiable Information (PII) Compliance
Due to Personal Identifiable Information (Any representation of information that permits the identity of an individual to whom the information applies to be reasonably inferred by either direct or indirect means) all information related to CCAC should be stored on a CCAC approved storage system.
Personal Information
CCAC Laptops are owned and managed by CCAC. You should never store personal information, log into personal accounts or connect and sync your personal accounts to a CCAC device.
CCAC ITS department has developed an upgrade cycle for devices. This means ITS will replace your device, it is not guaranteed all files will import onto the new device. If the device is failing or should need to be restored to the CCAC base image, your files will not be recovered.
Personal Files - OneDrive
OneDrive allows you to store your files within a secure CCAC cloud service. You can upload, edit, share, and remove files. Many frequently asked questions about OneDrive can be found here: Microsoft OneDrive Articles
Uploading a File(s) to Microsoft OneDrive
How-To Directions
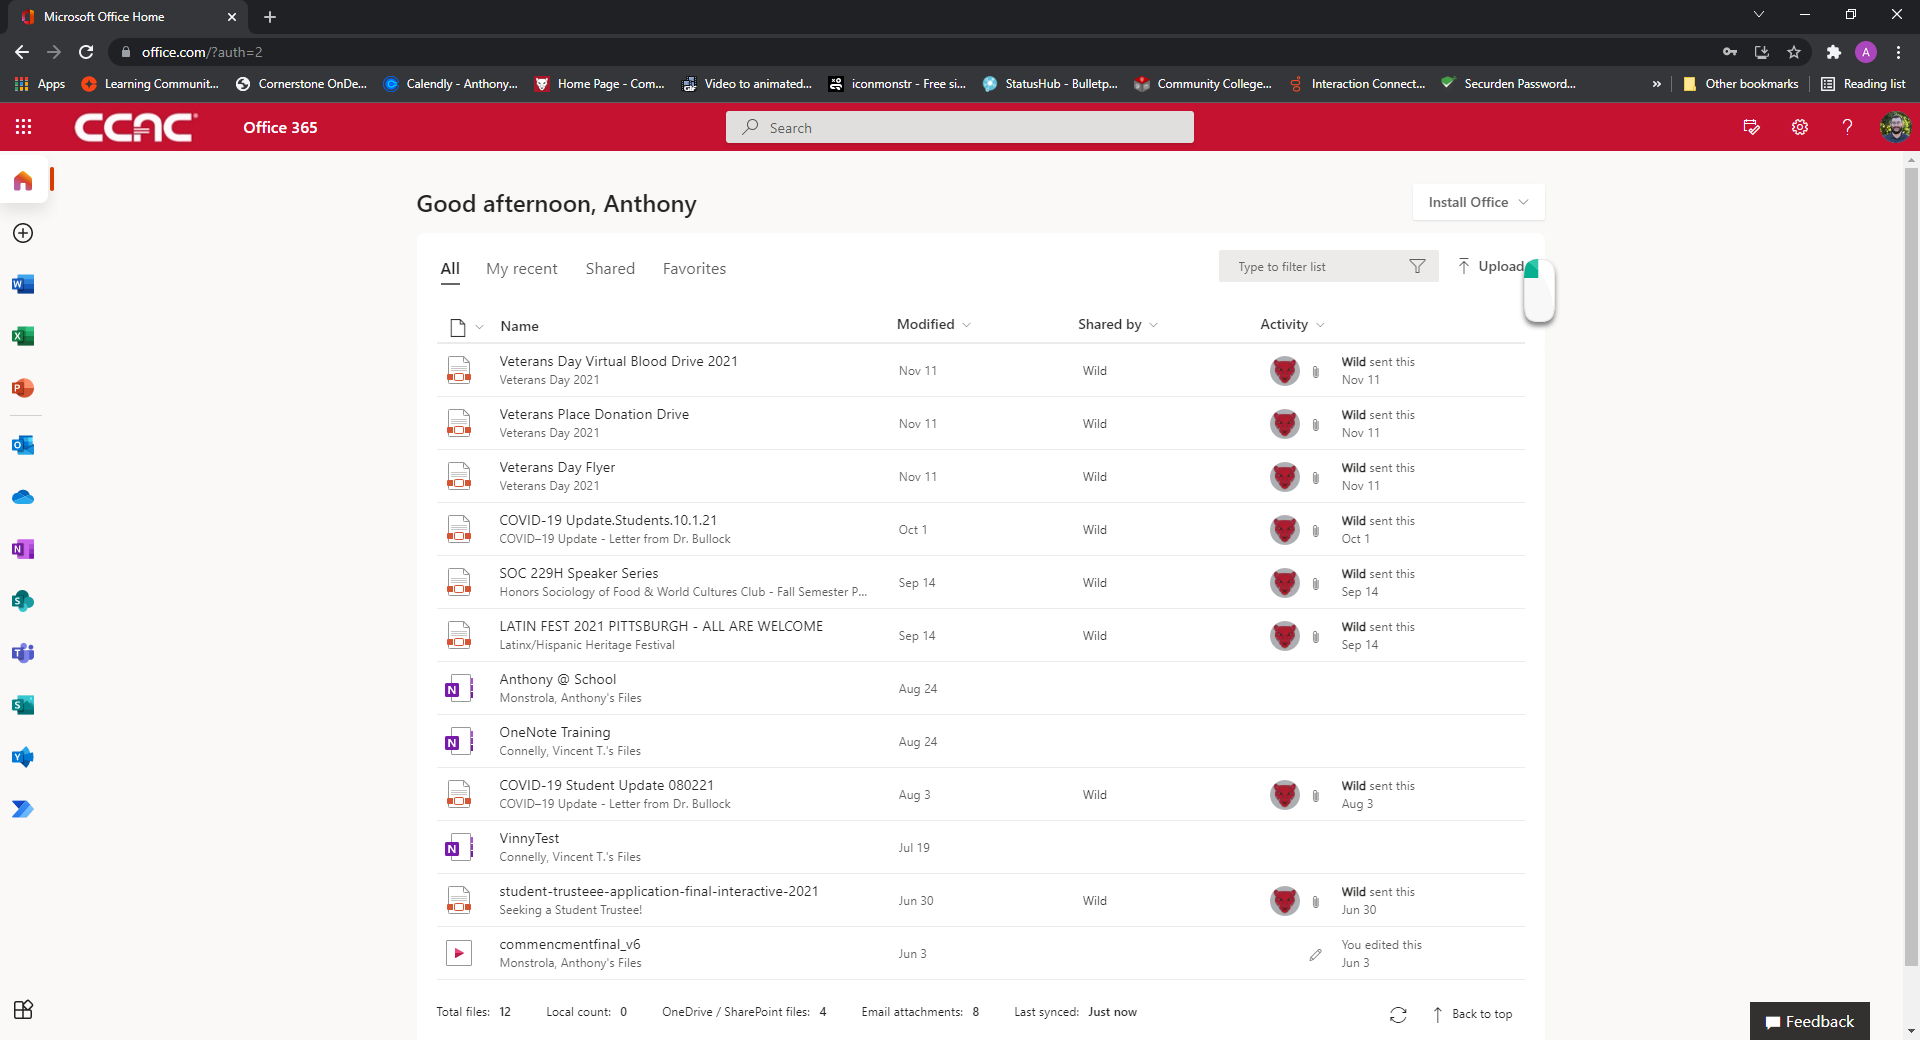
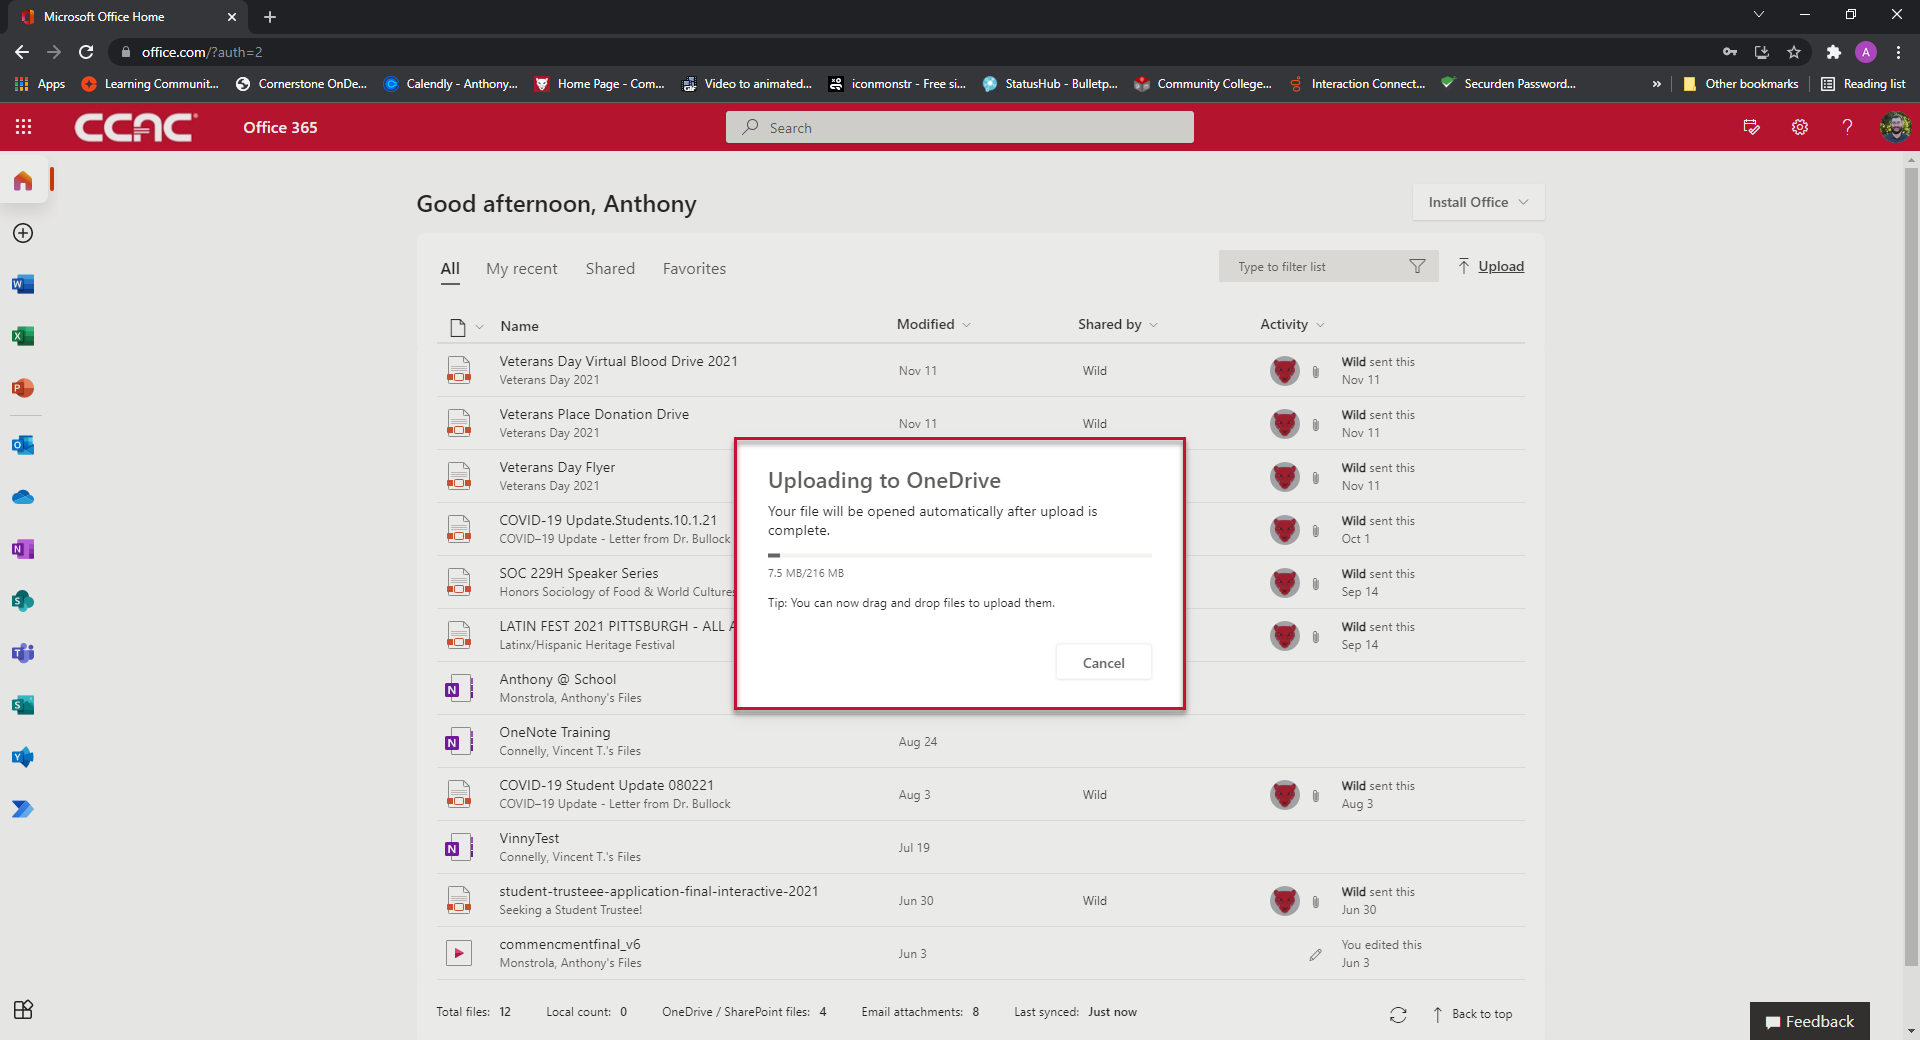
- Once signed-in, click upload
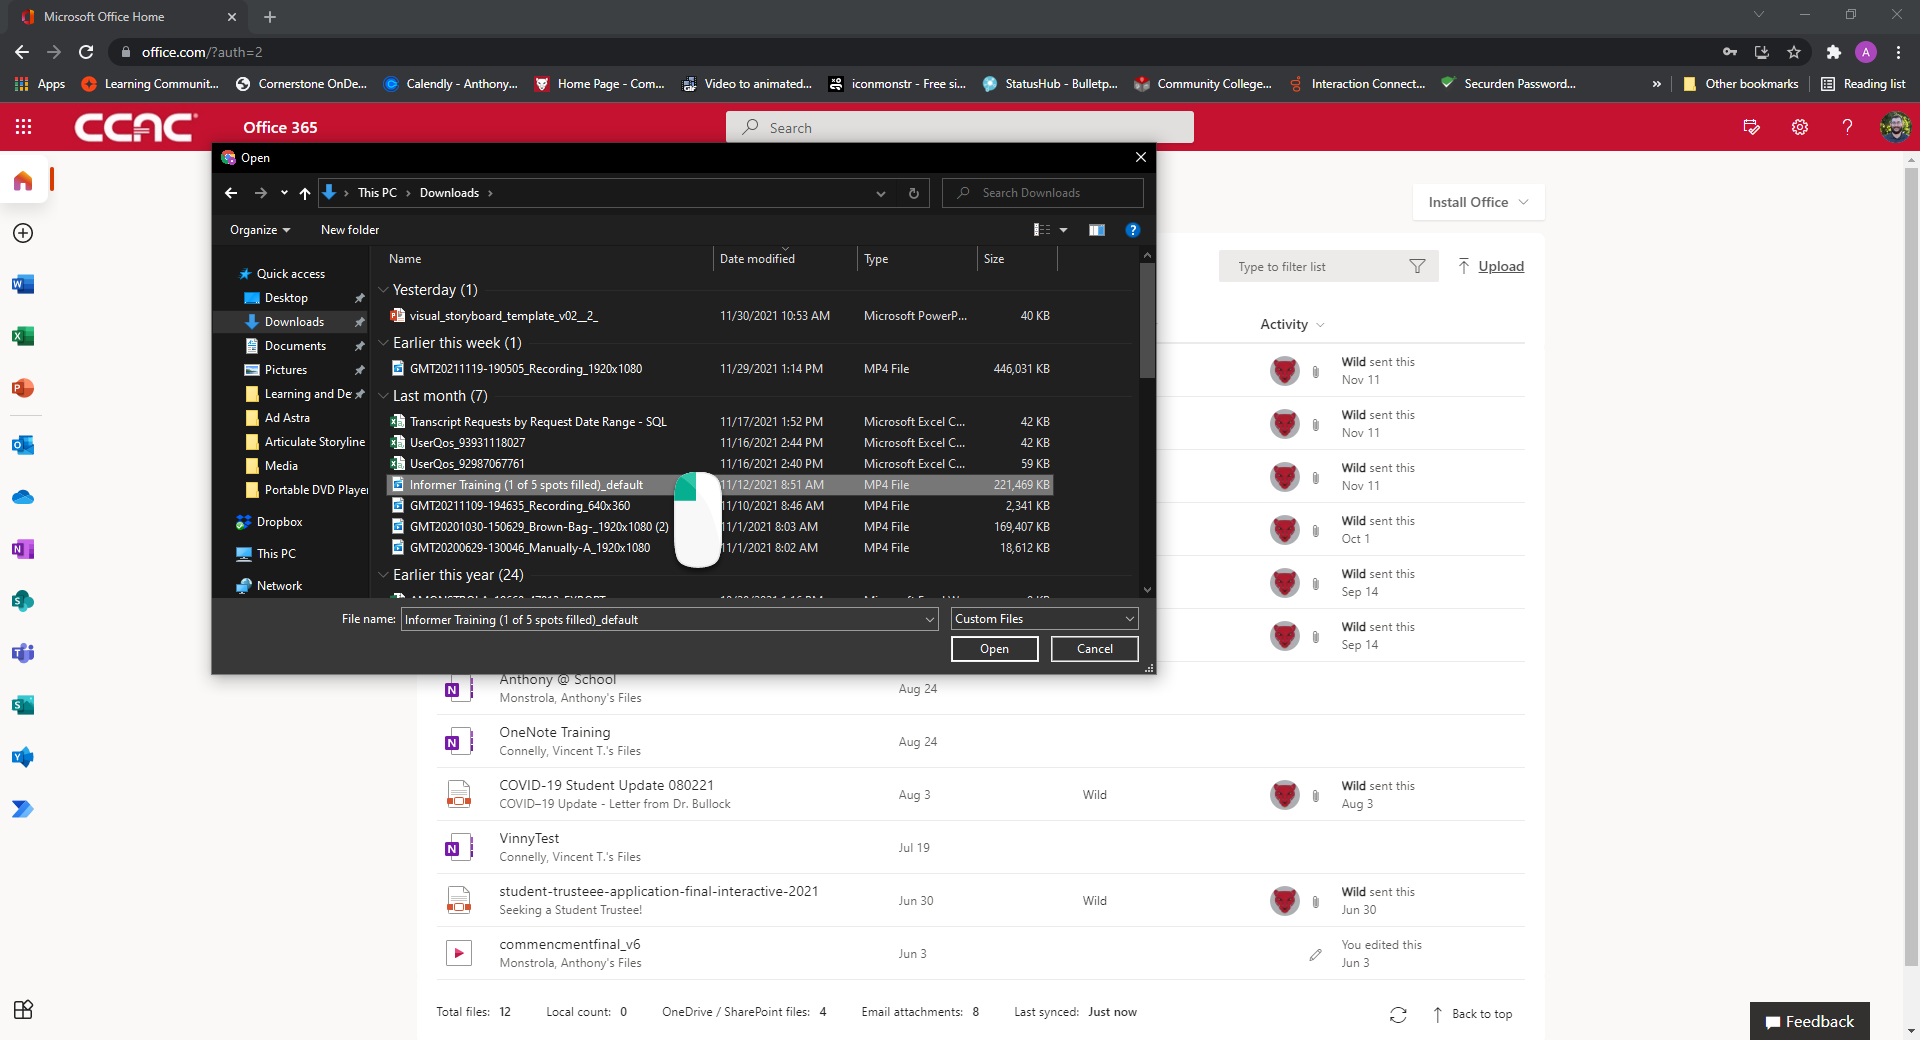
- Locate and click on the file you want to upload
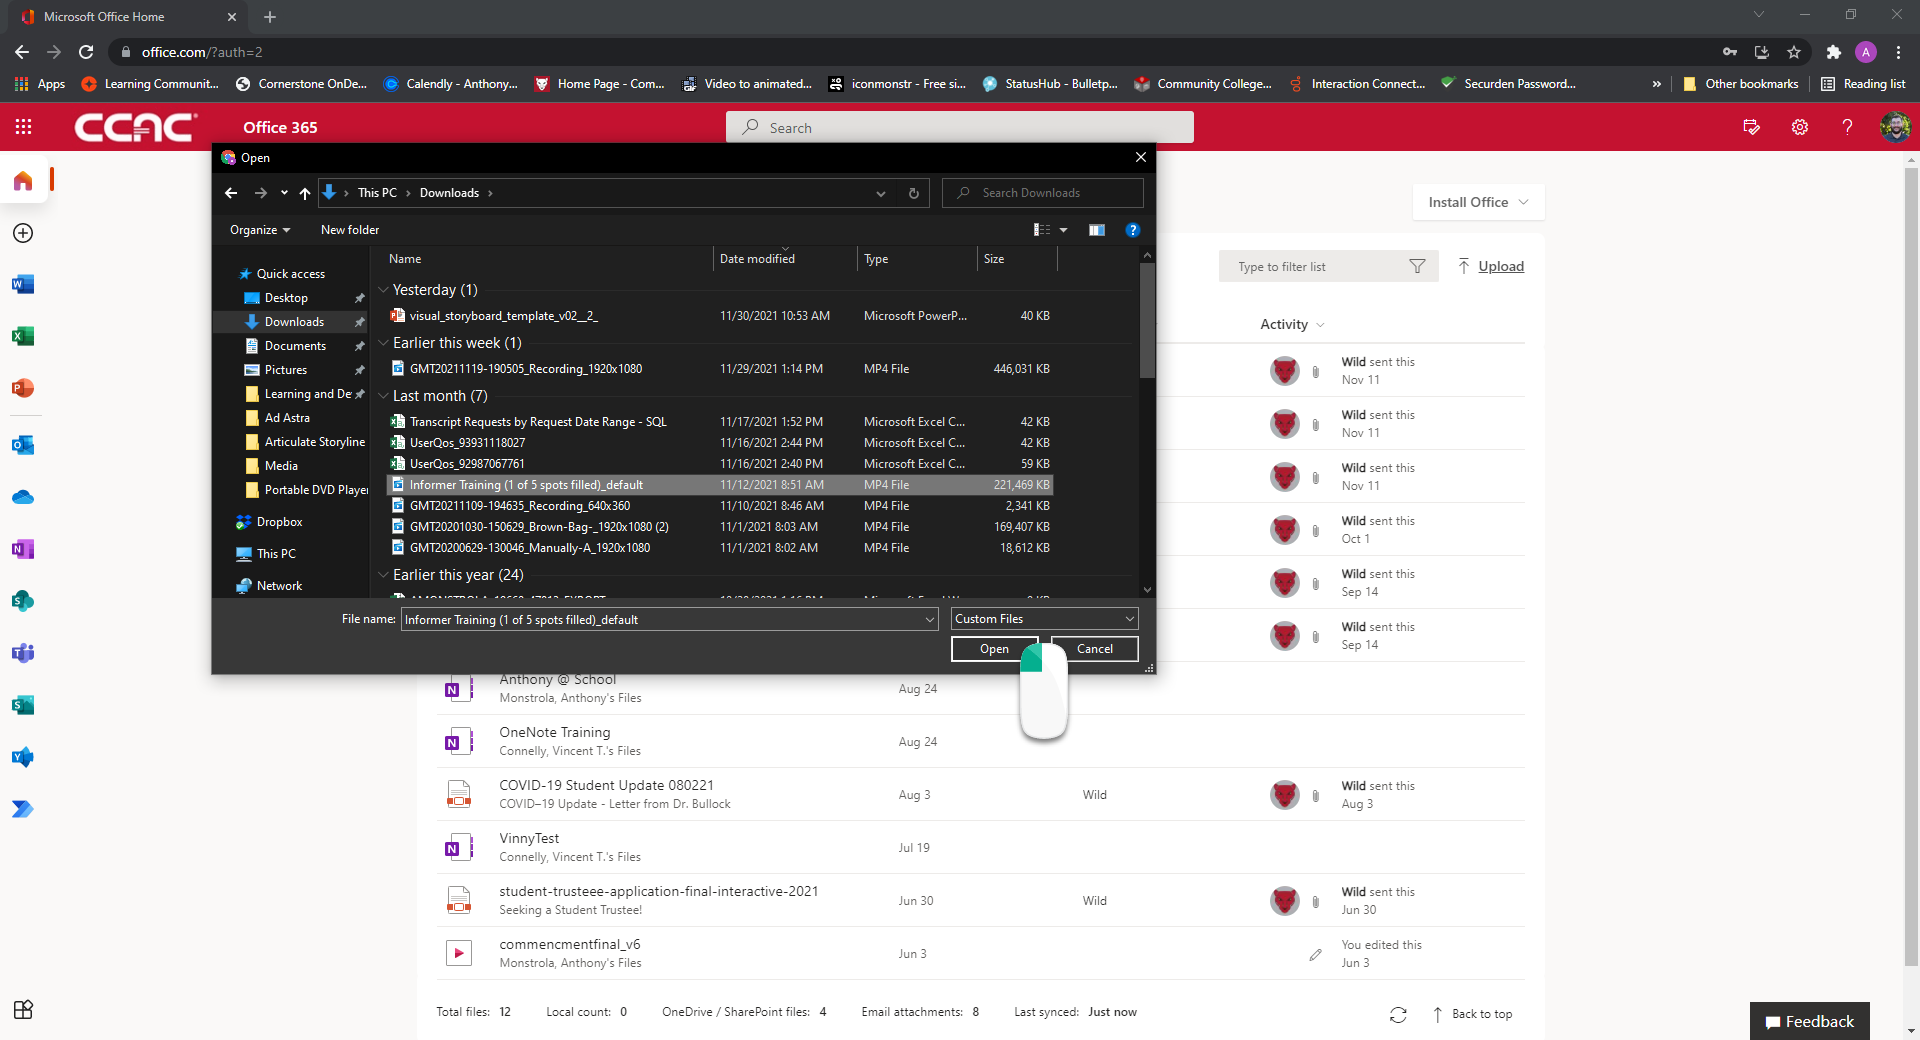
- Click Open
-
 The Uploading to OneDrive dialog will show you the progress
 - Once the dialog box disappears, your file should be successfully uploaded
-
To Learn More Link
Department Files - SharePoint
SharePoint allows you to store your department's files within a secure CCAC cloud service. You can upload, edit, share, and remove files. You can also provide permissions for who has access to specific files. Many frequently asked questions about SharePoint can be found here: SharePoint Team Site Articles
Adding Files to SharePoint Team Site Libraries
Upload Button
1. Upload a file by using the Upload button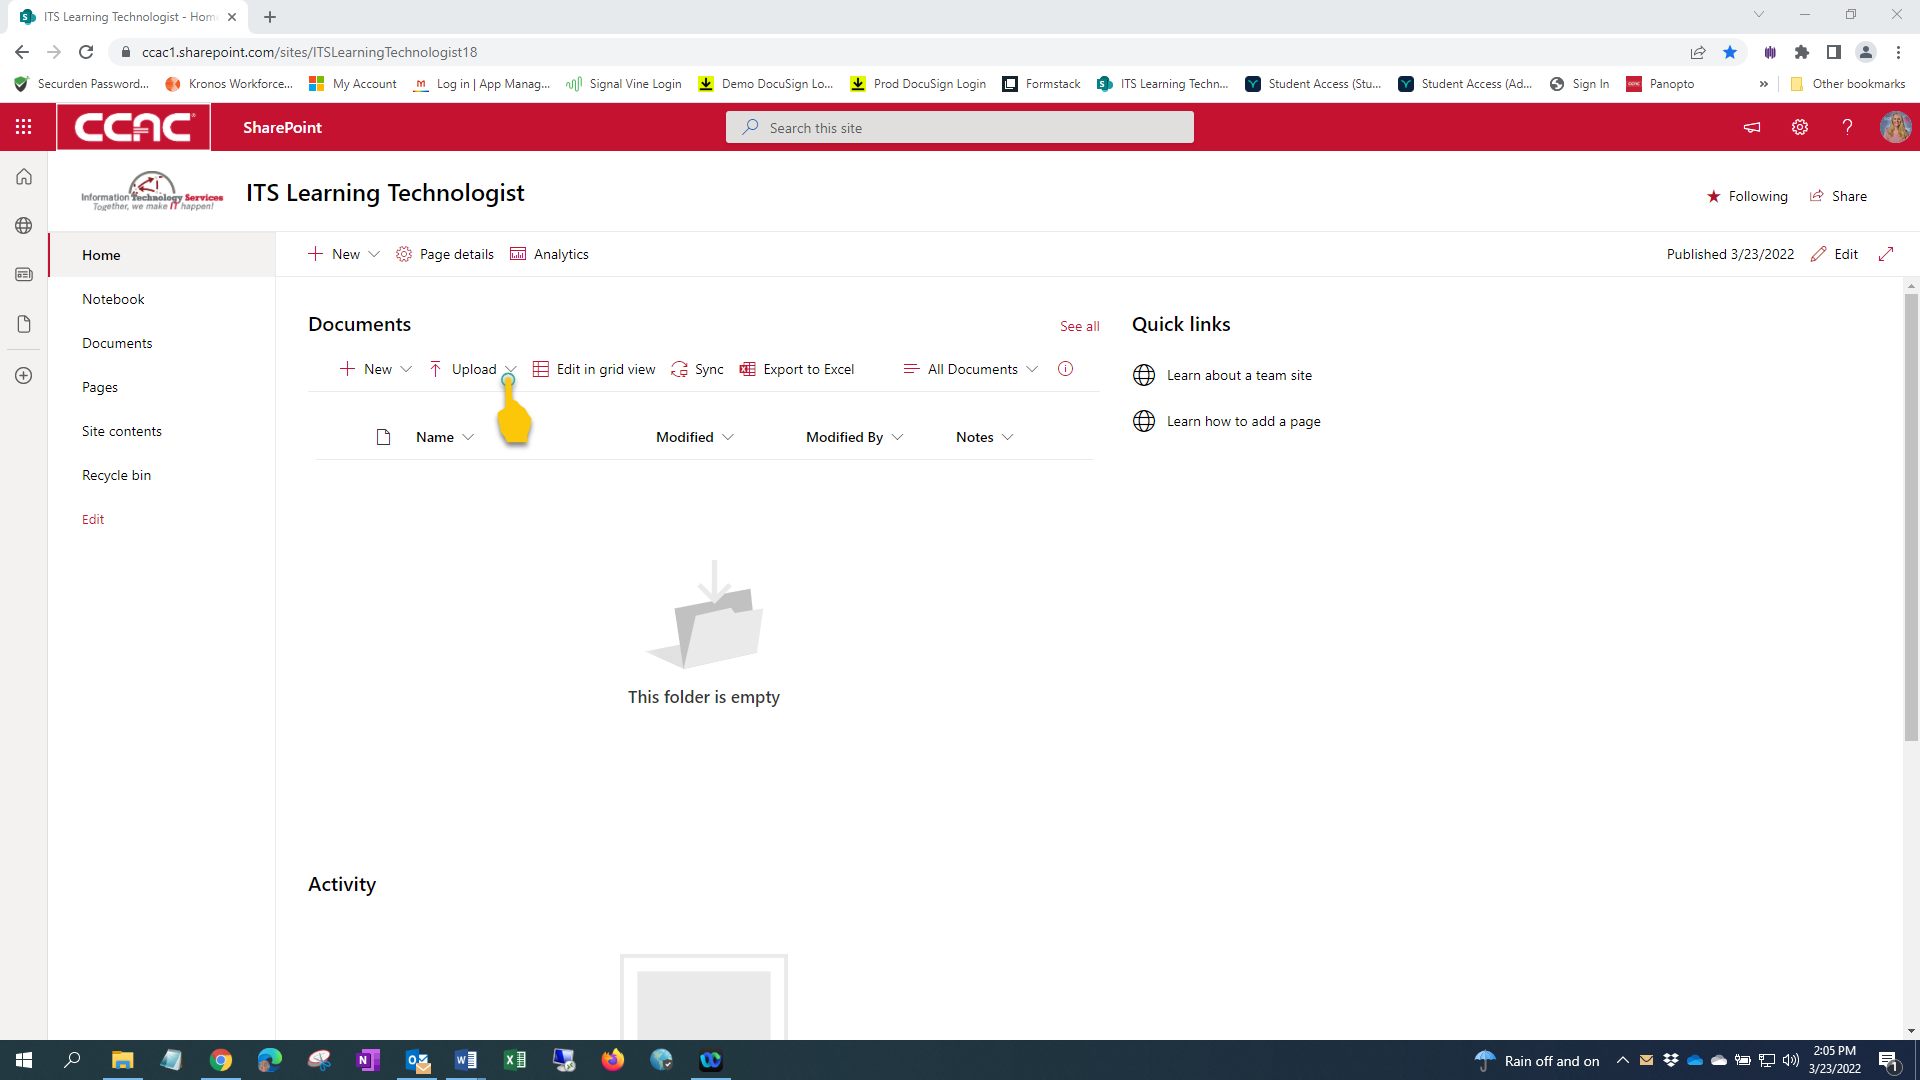
2. Select Files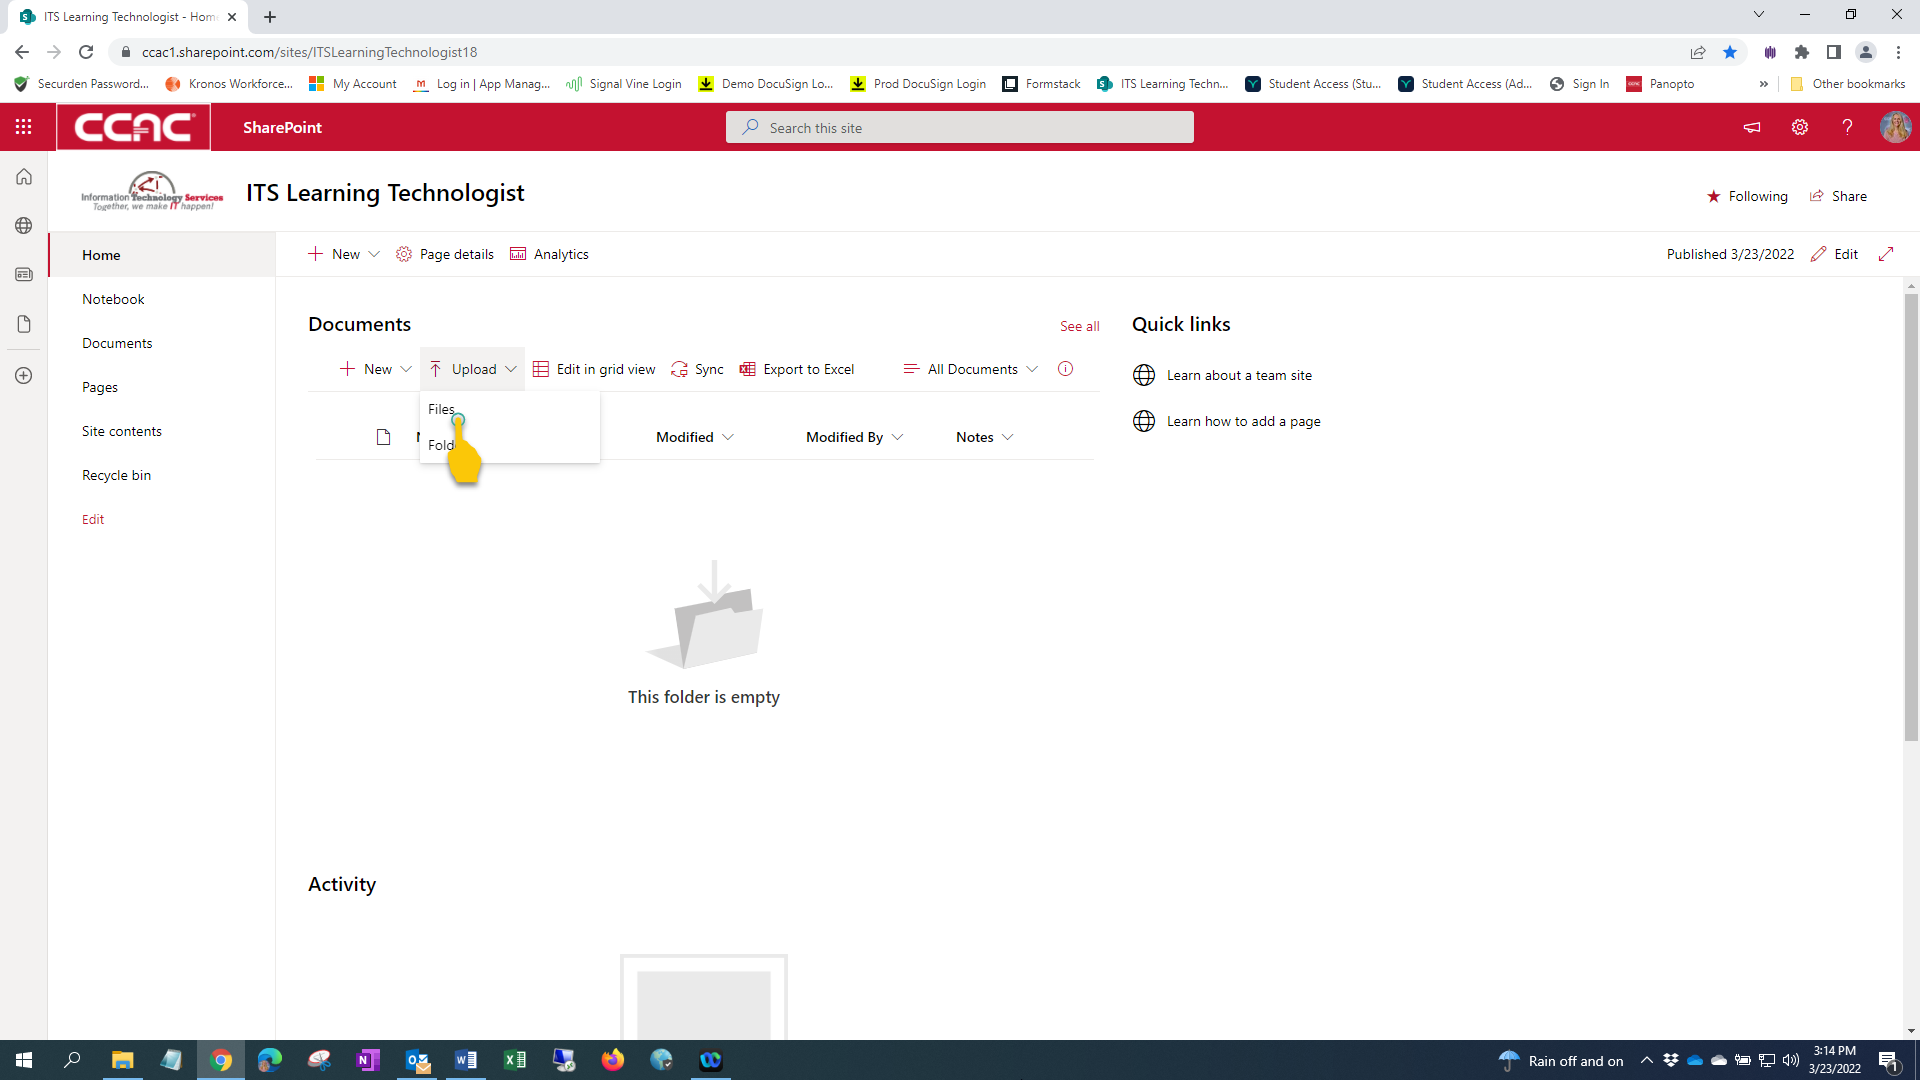
3. Find your file and click on it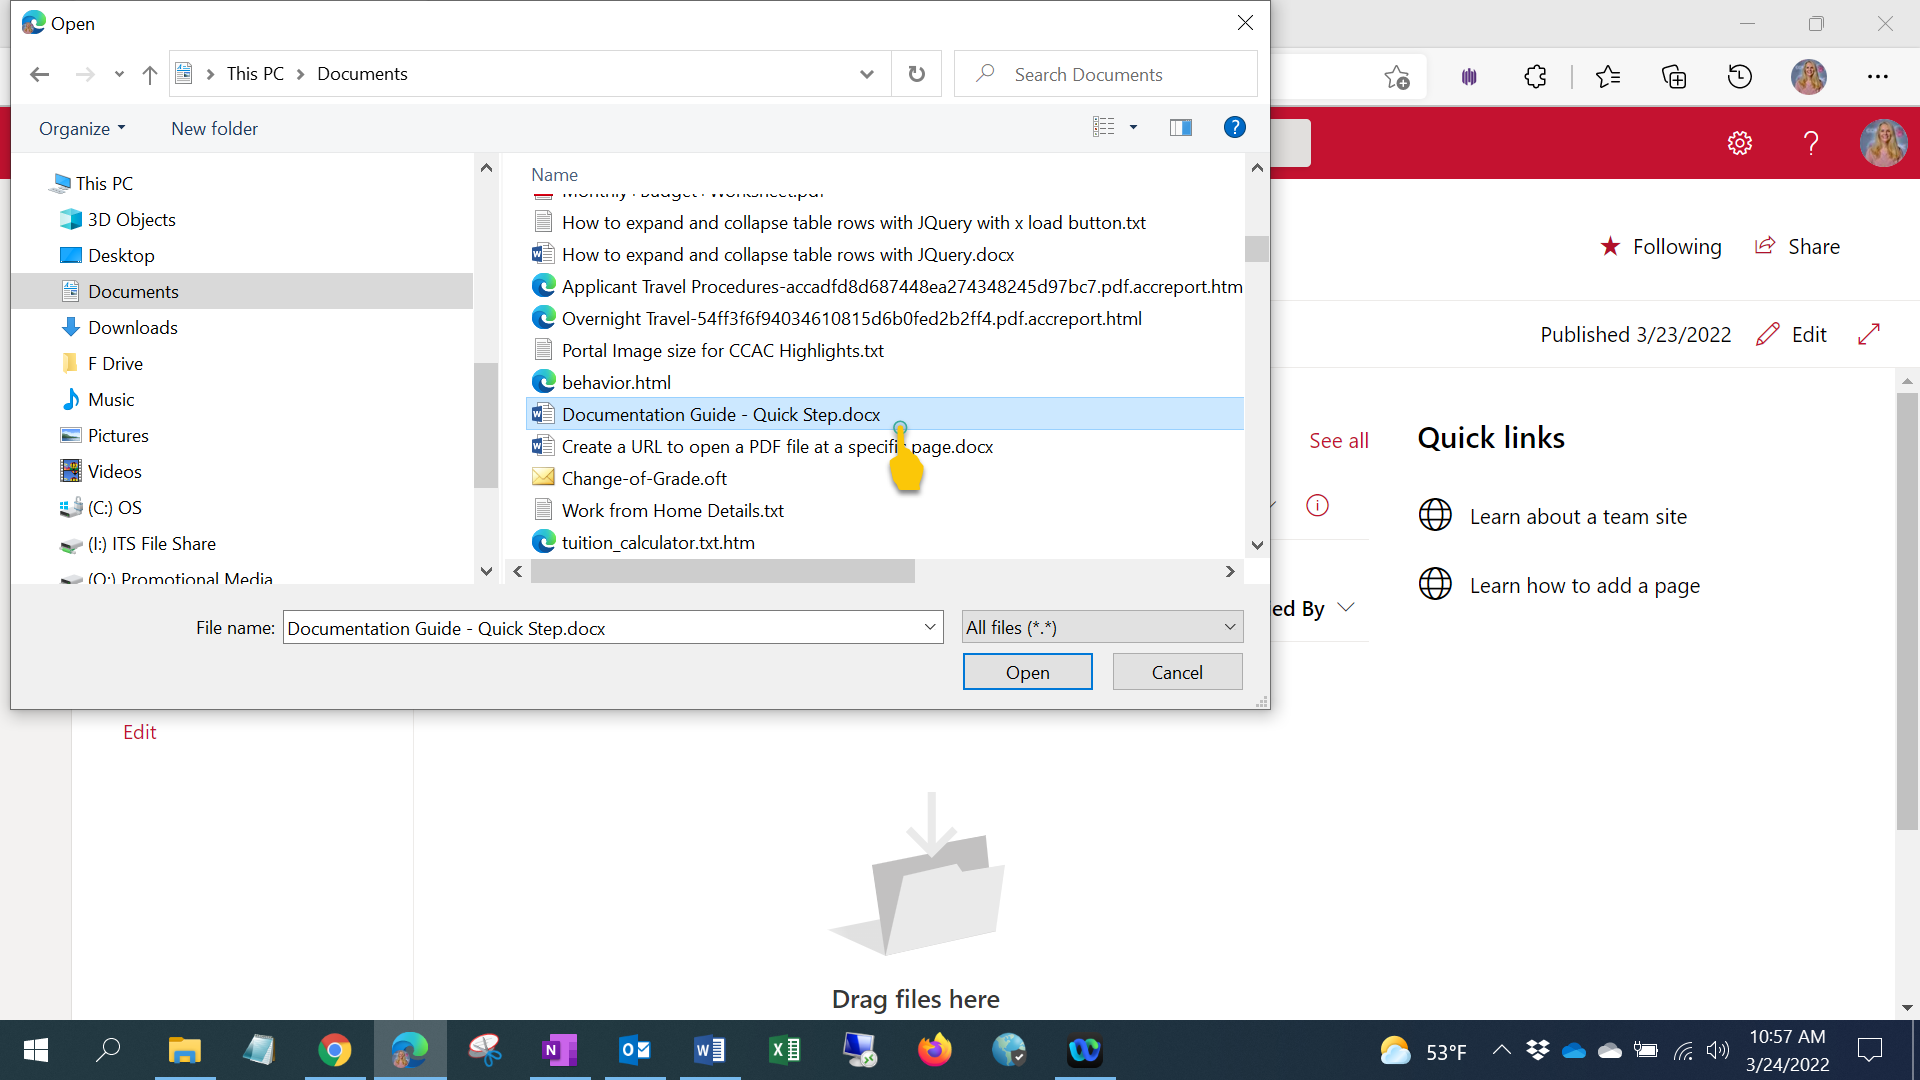
4. The name of the selected file will show in the File name: box and click Open 
5. The file is now in the library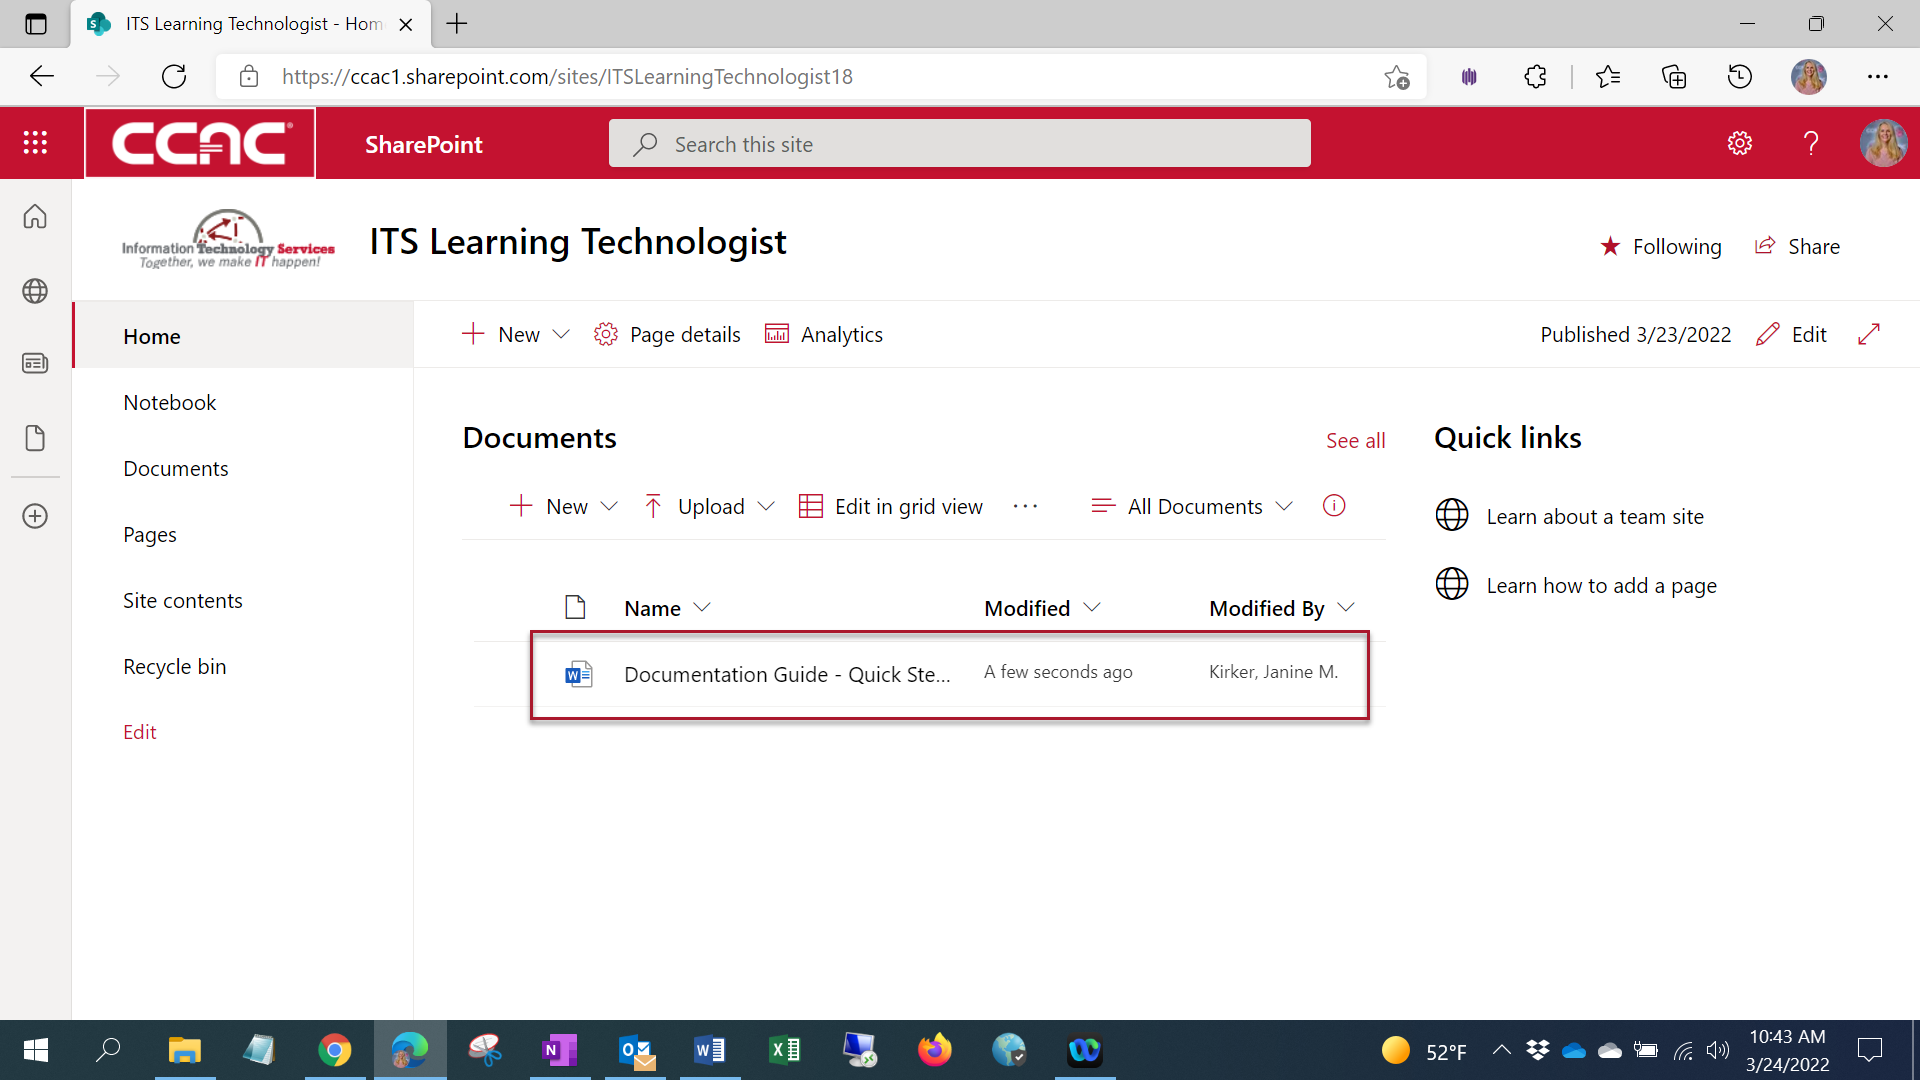
Drag and Drop
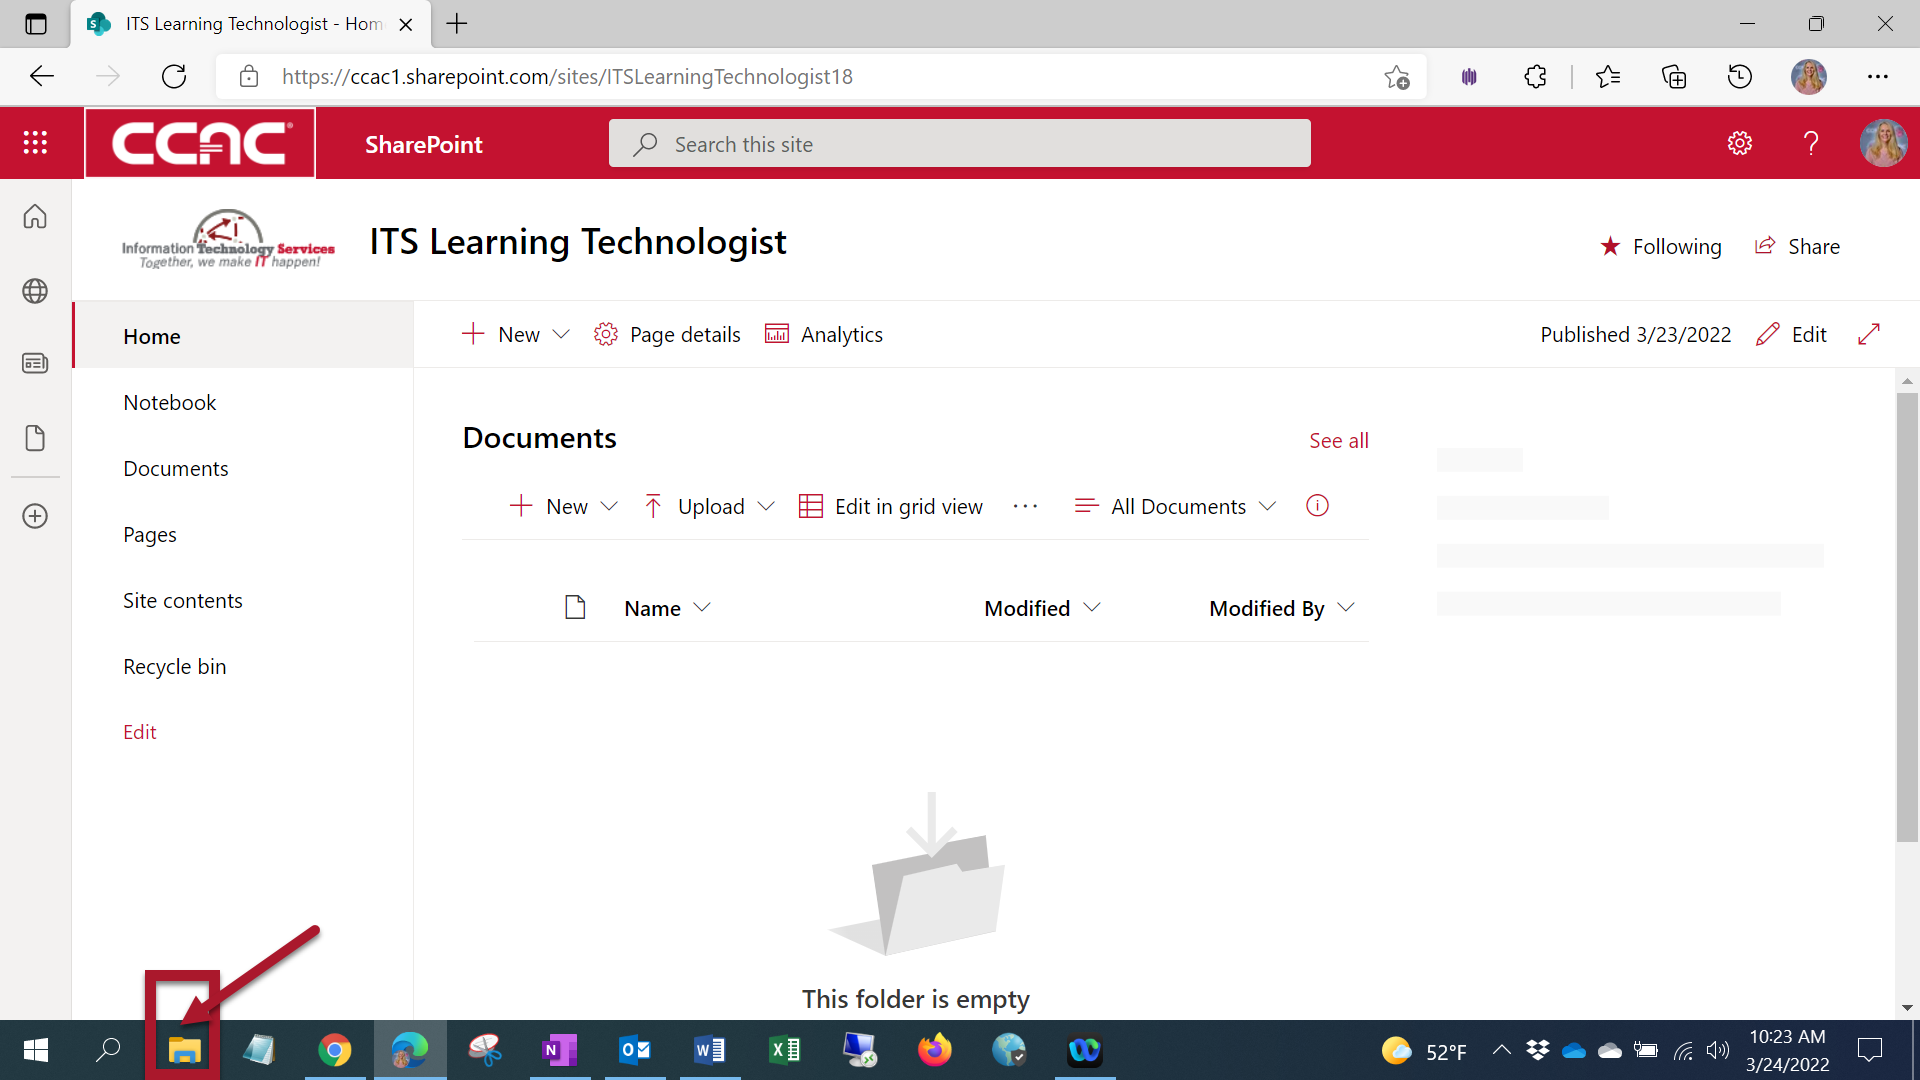
- With the document library open, Open the file explorer
-
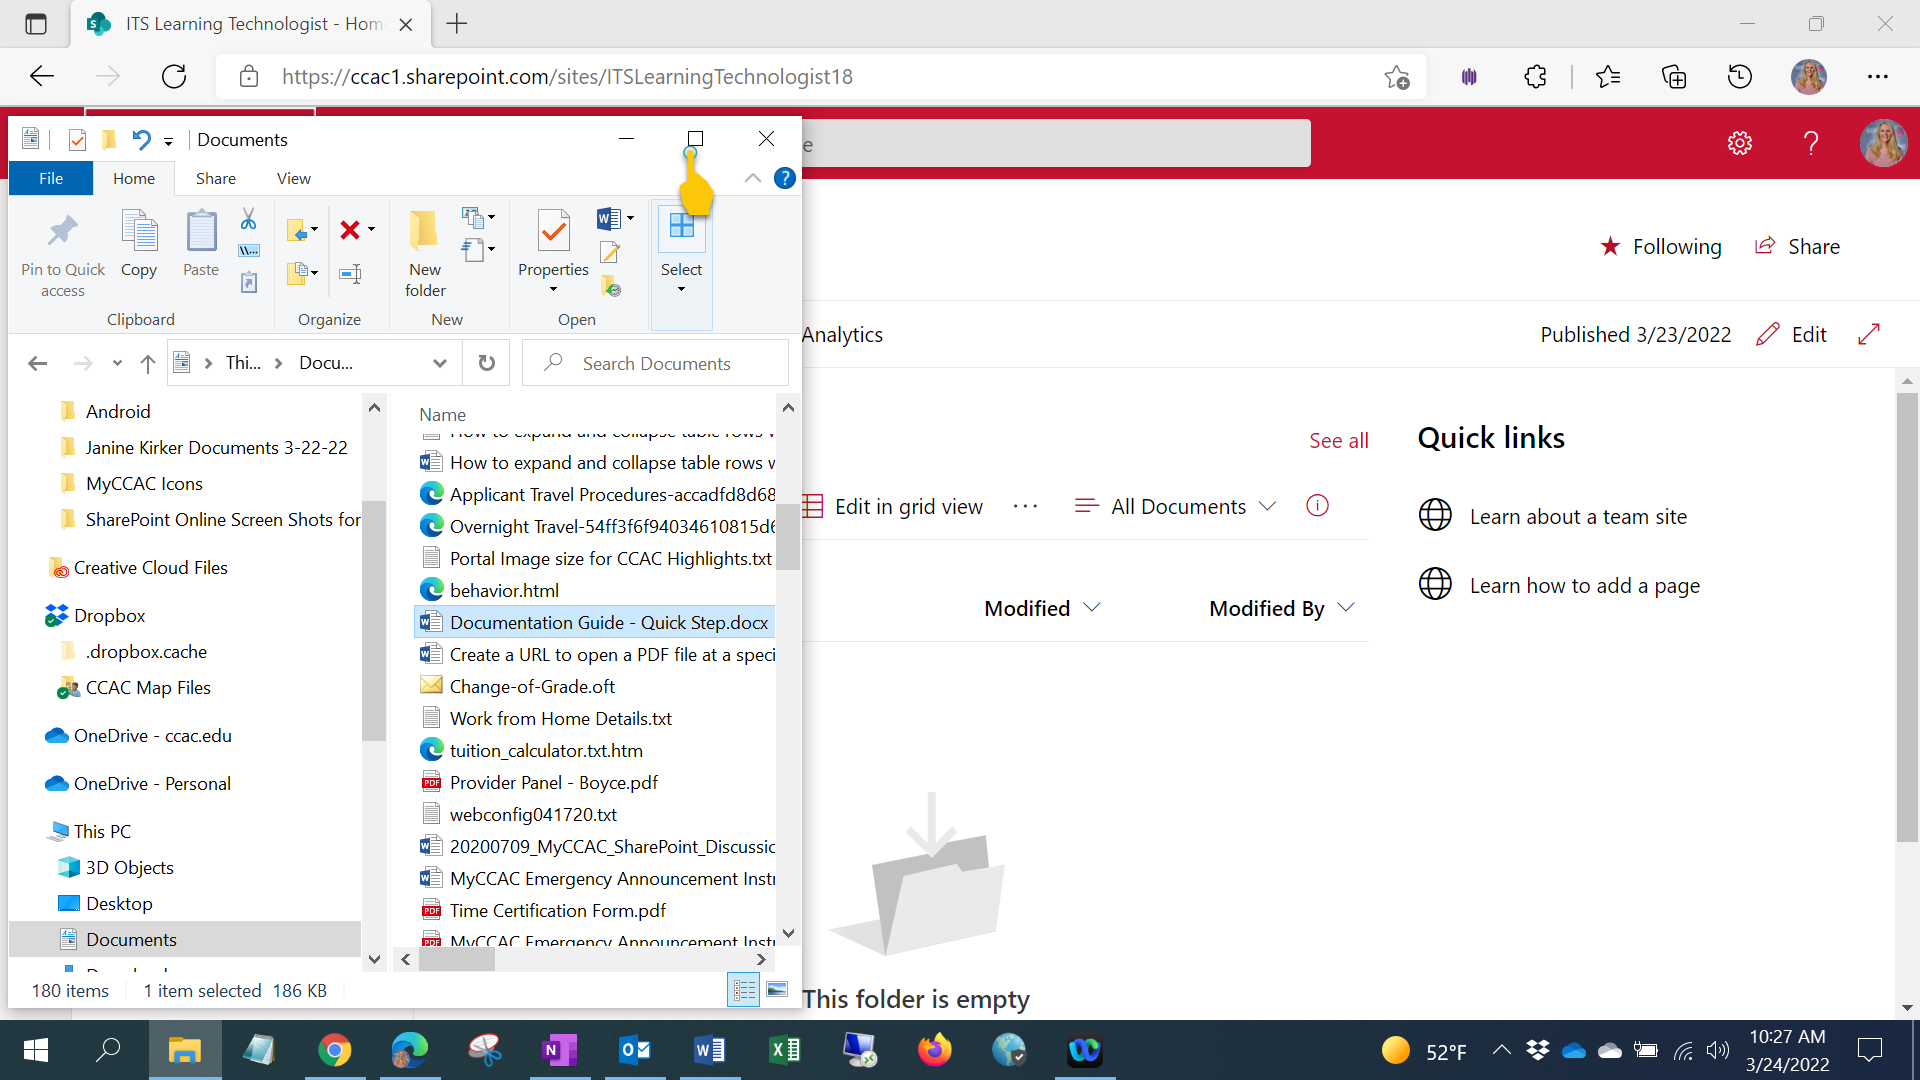
Minimize the file explorer window so that you can see both the file explorer window and the document library at the same time
-
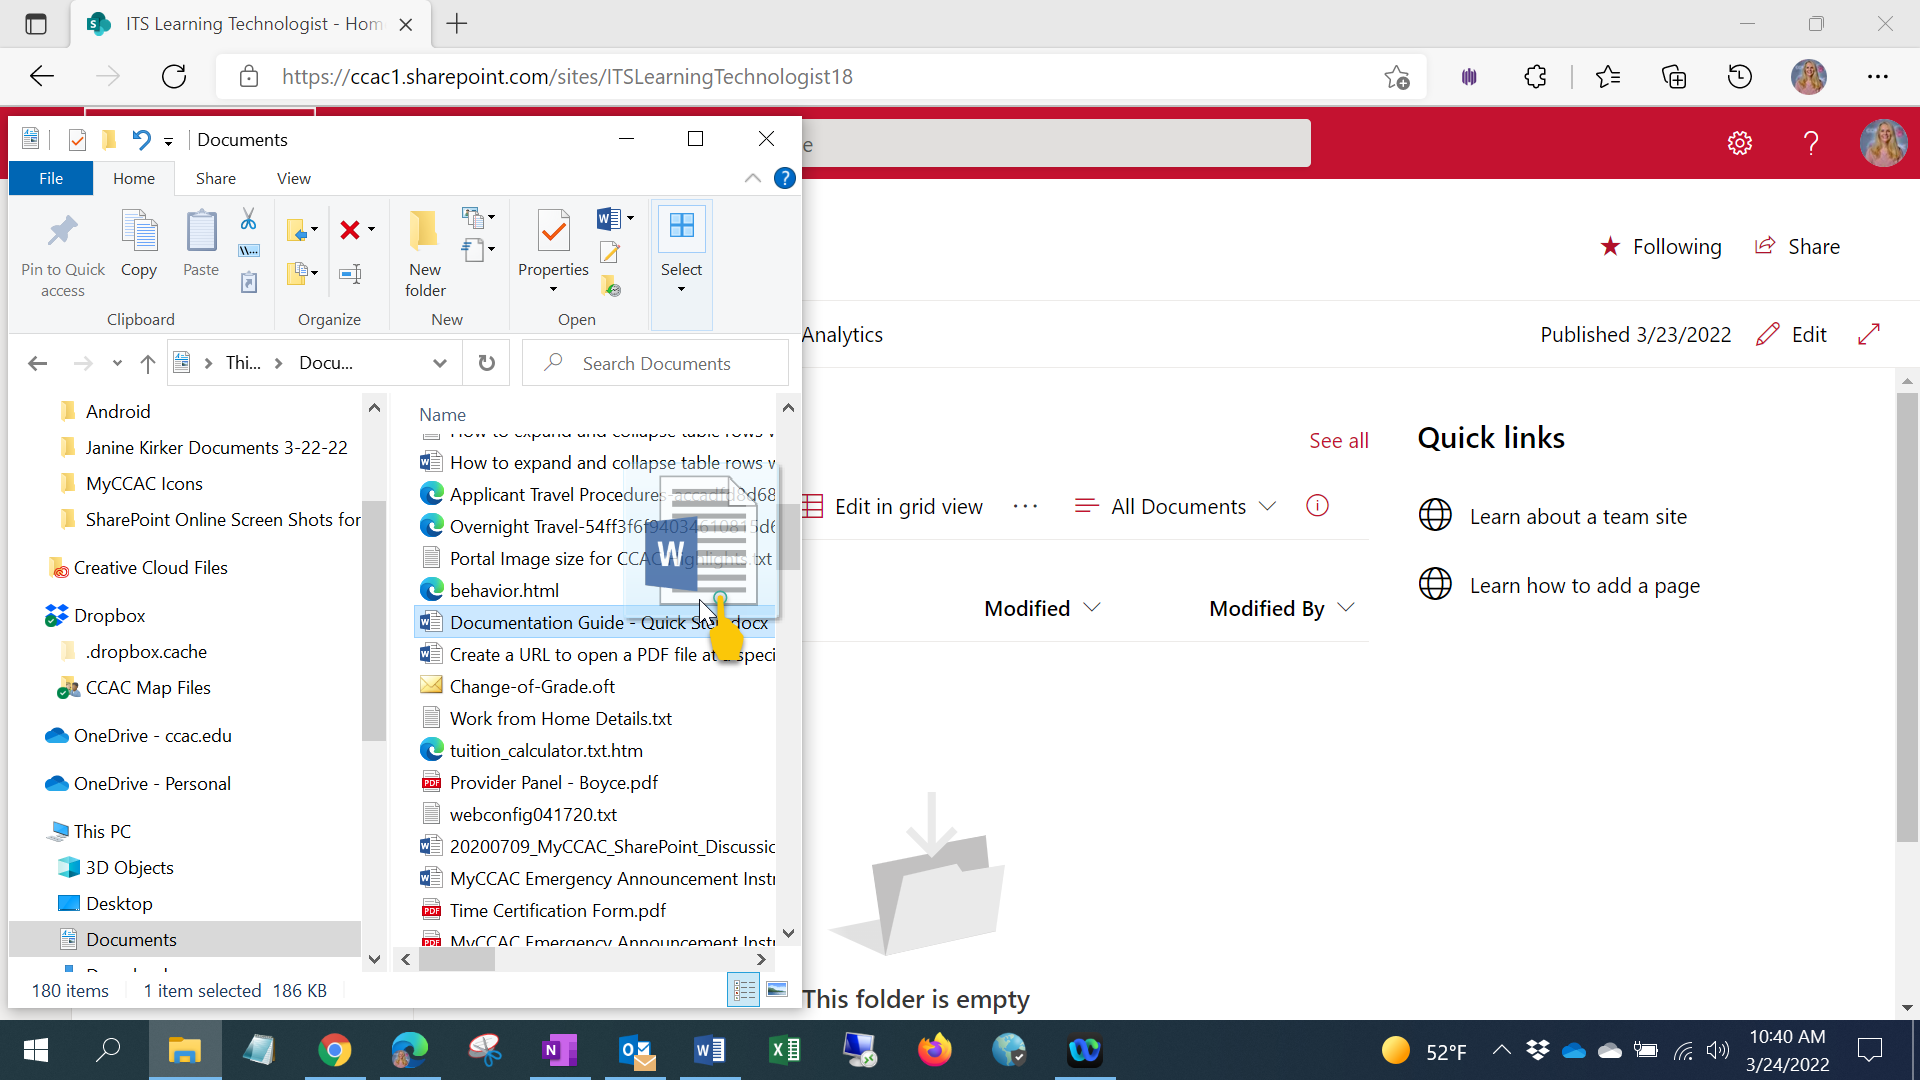
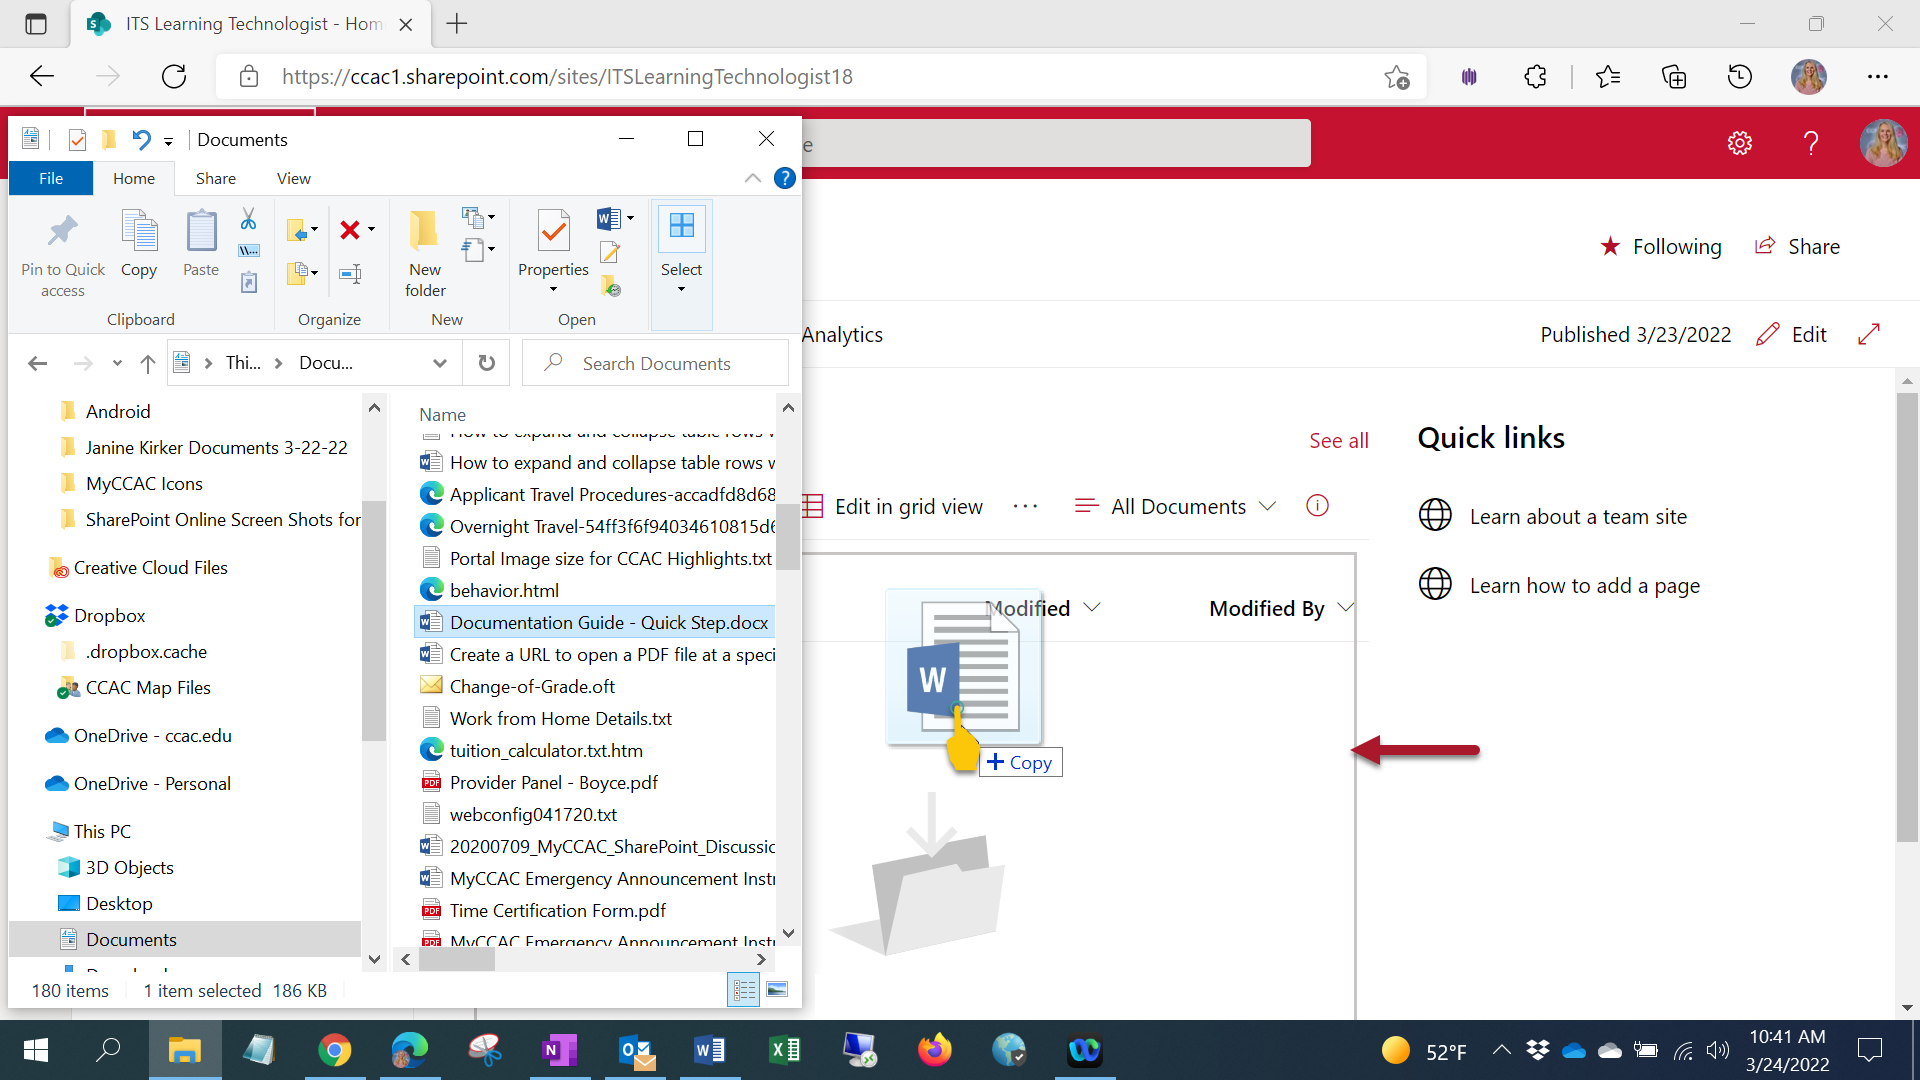
Click and hold down the mouse button on the document you want to move to SharePoint
-
Continue holding down the mouse button as you drag the image to the document library area and it shows a gray line around the edge of the Document library section.
-
Let go of the mouse button and the document will be located in the document library

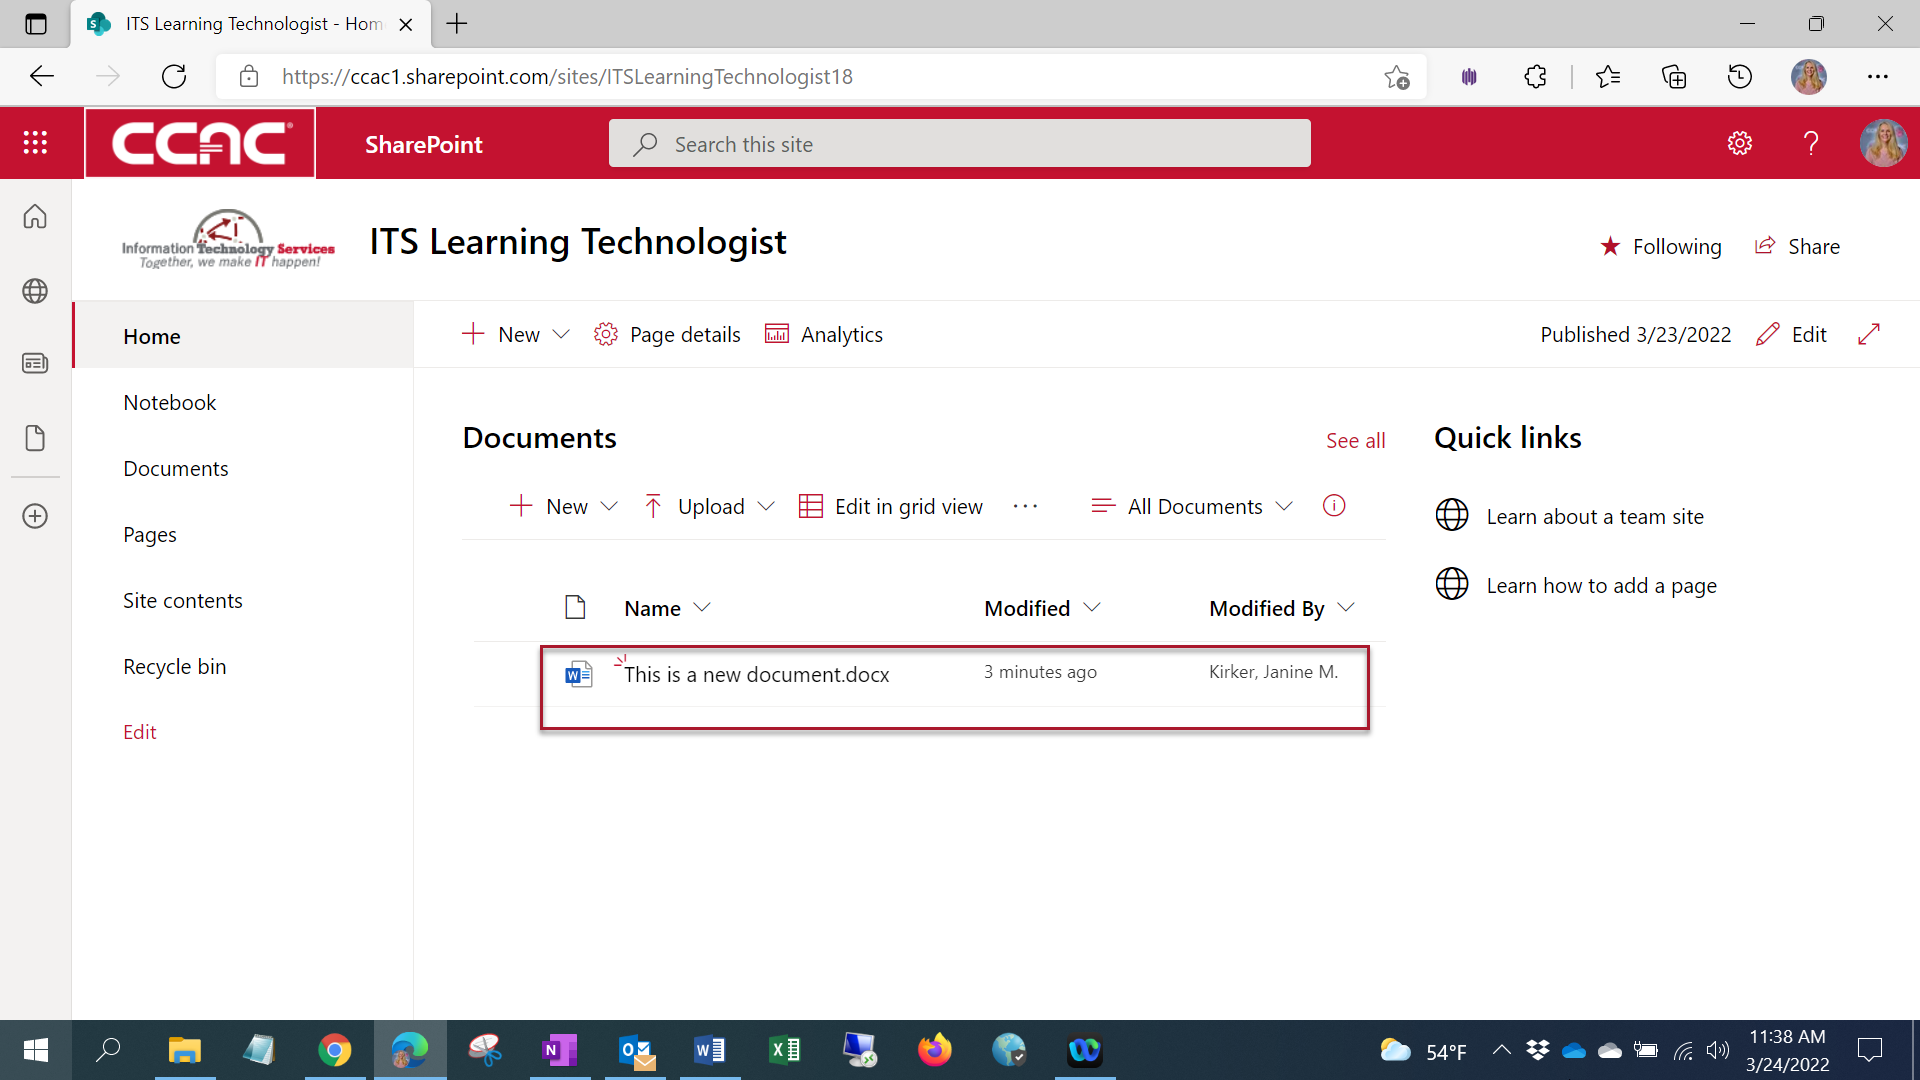
Create a New Document
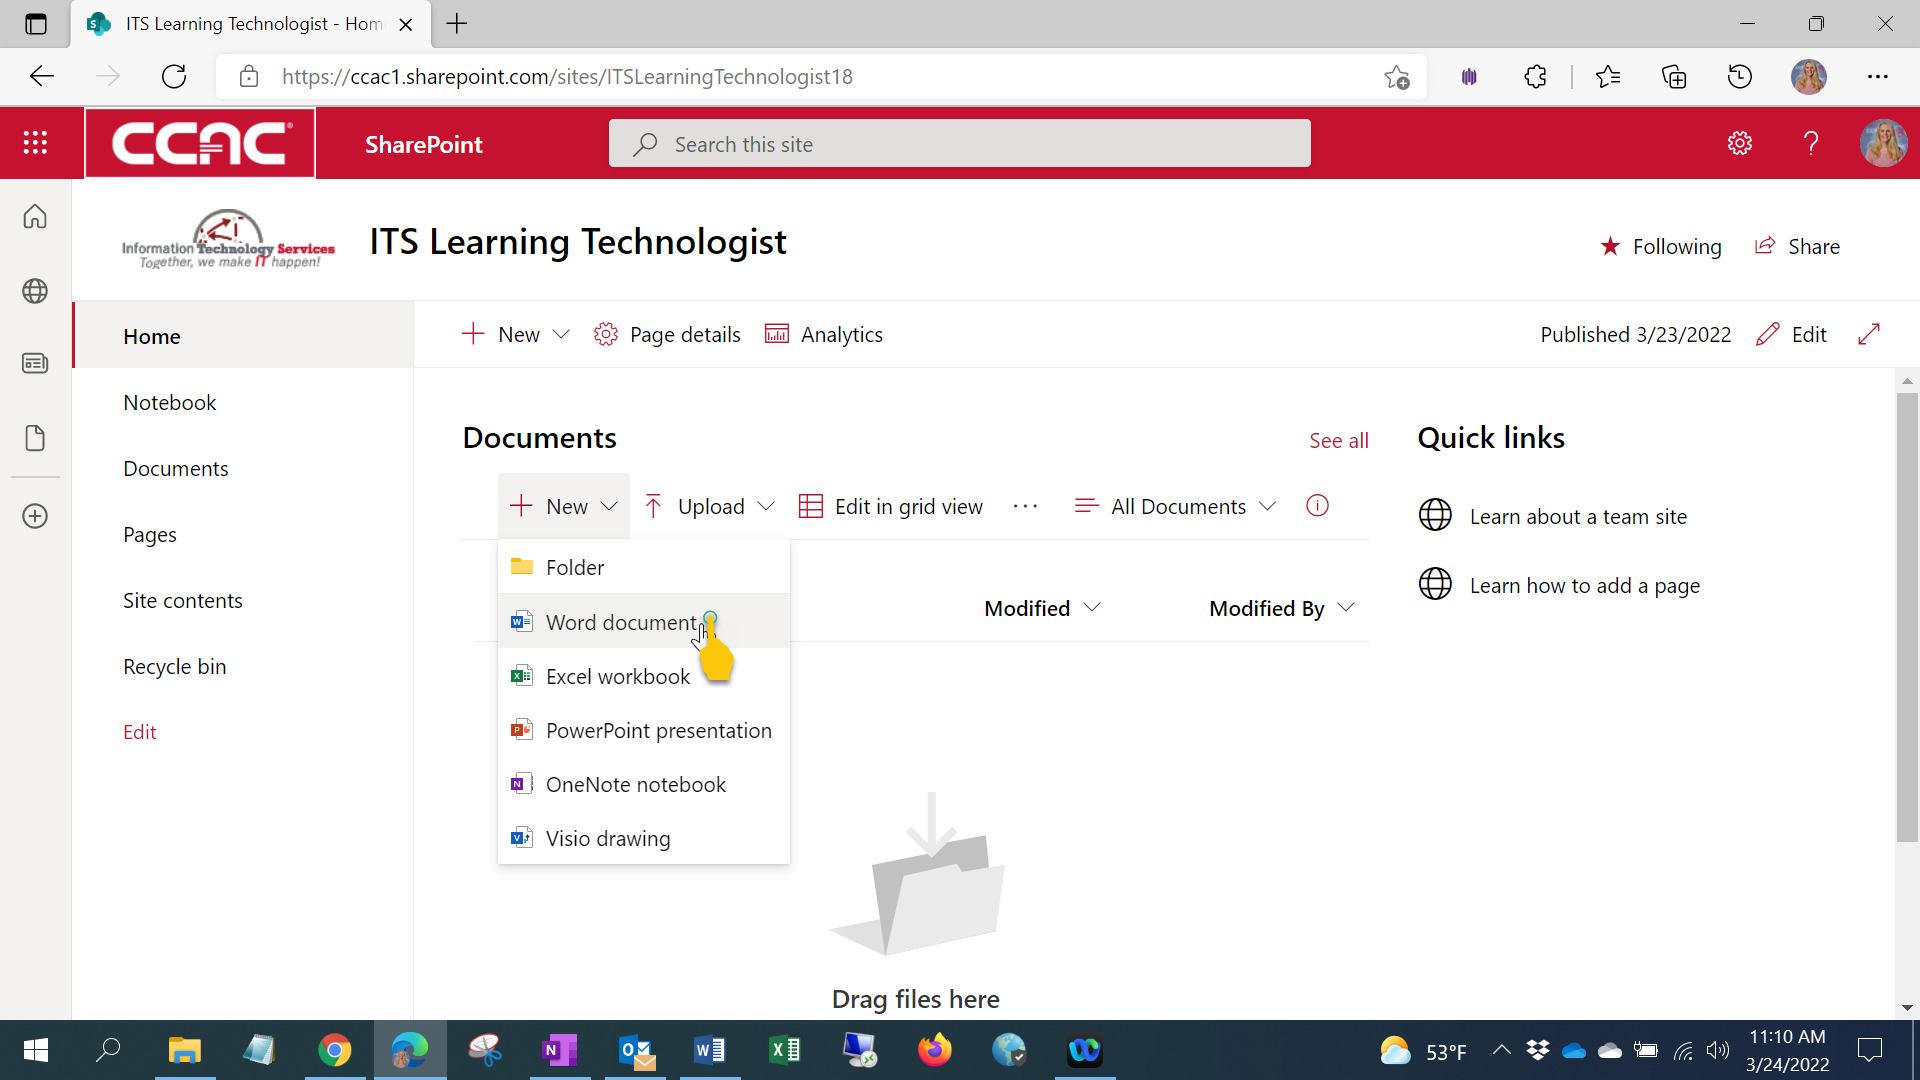
- Click New

- Select the type of file you want to create
-
Create the document
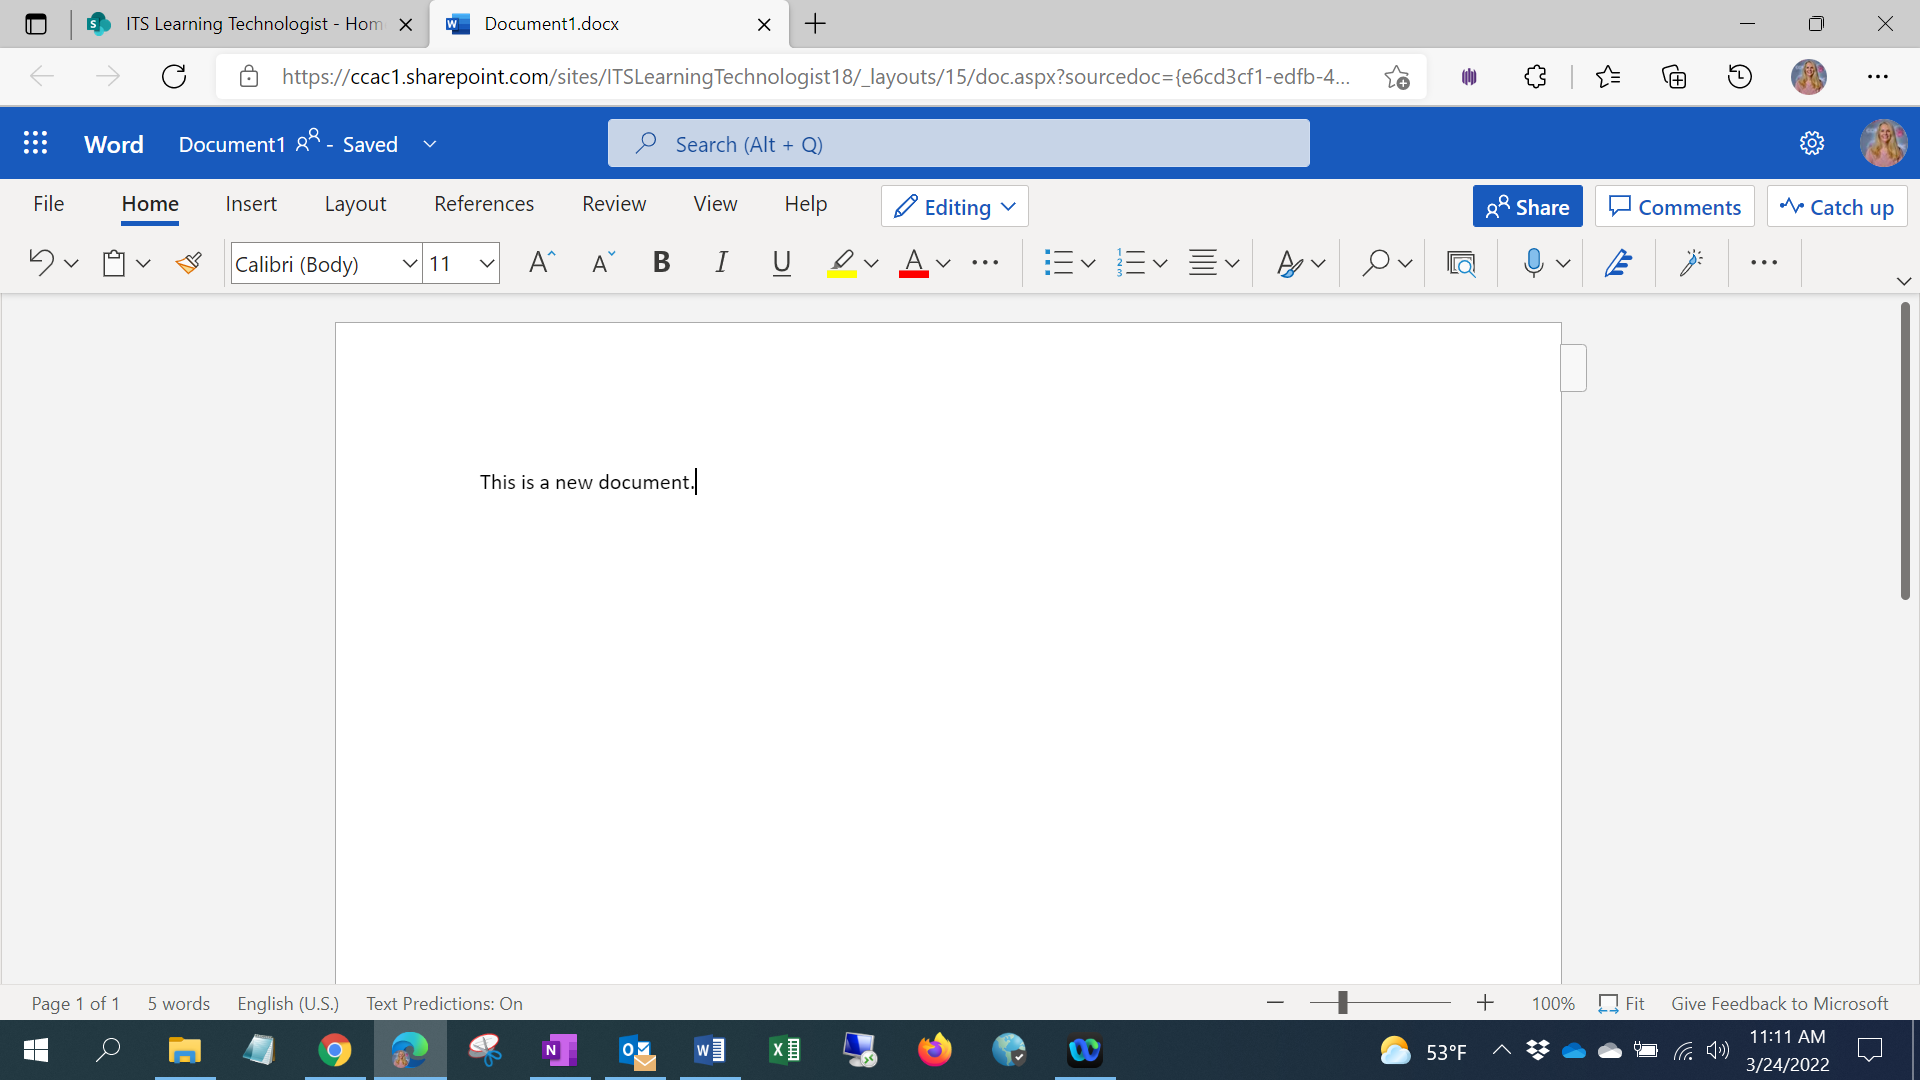
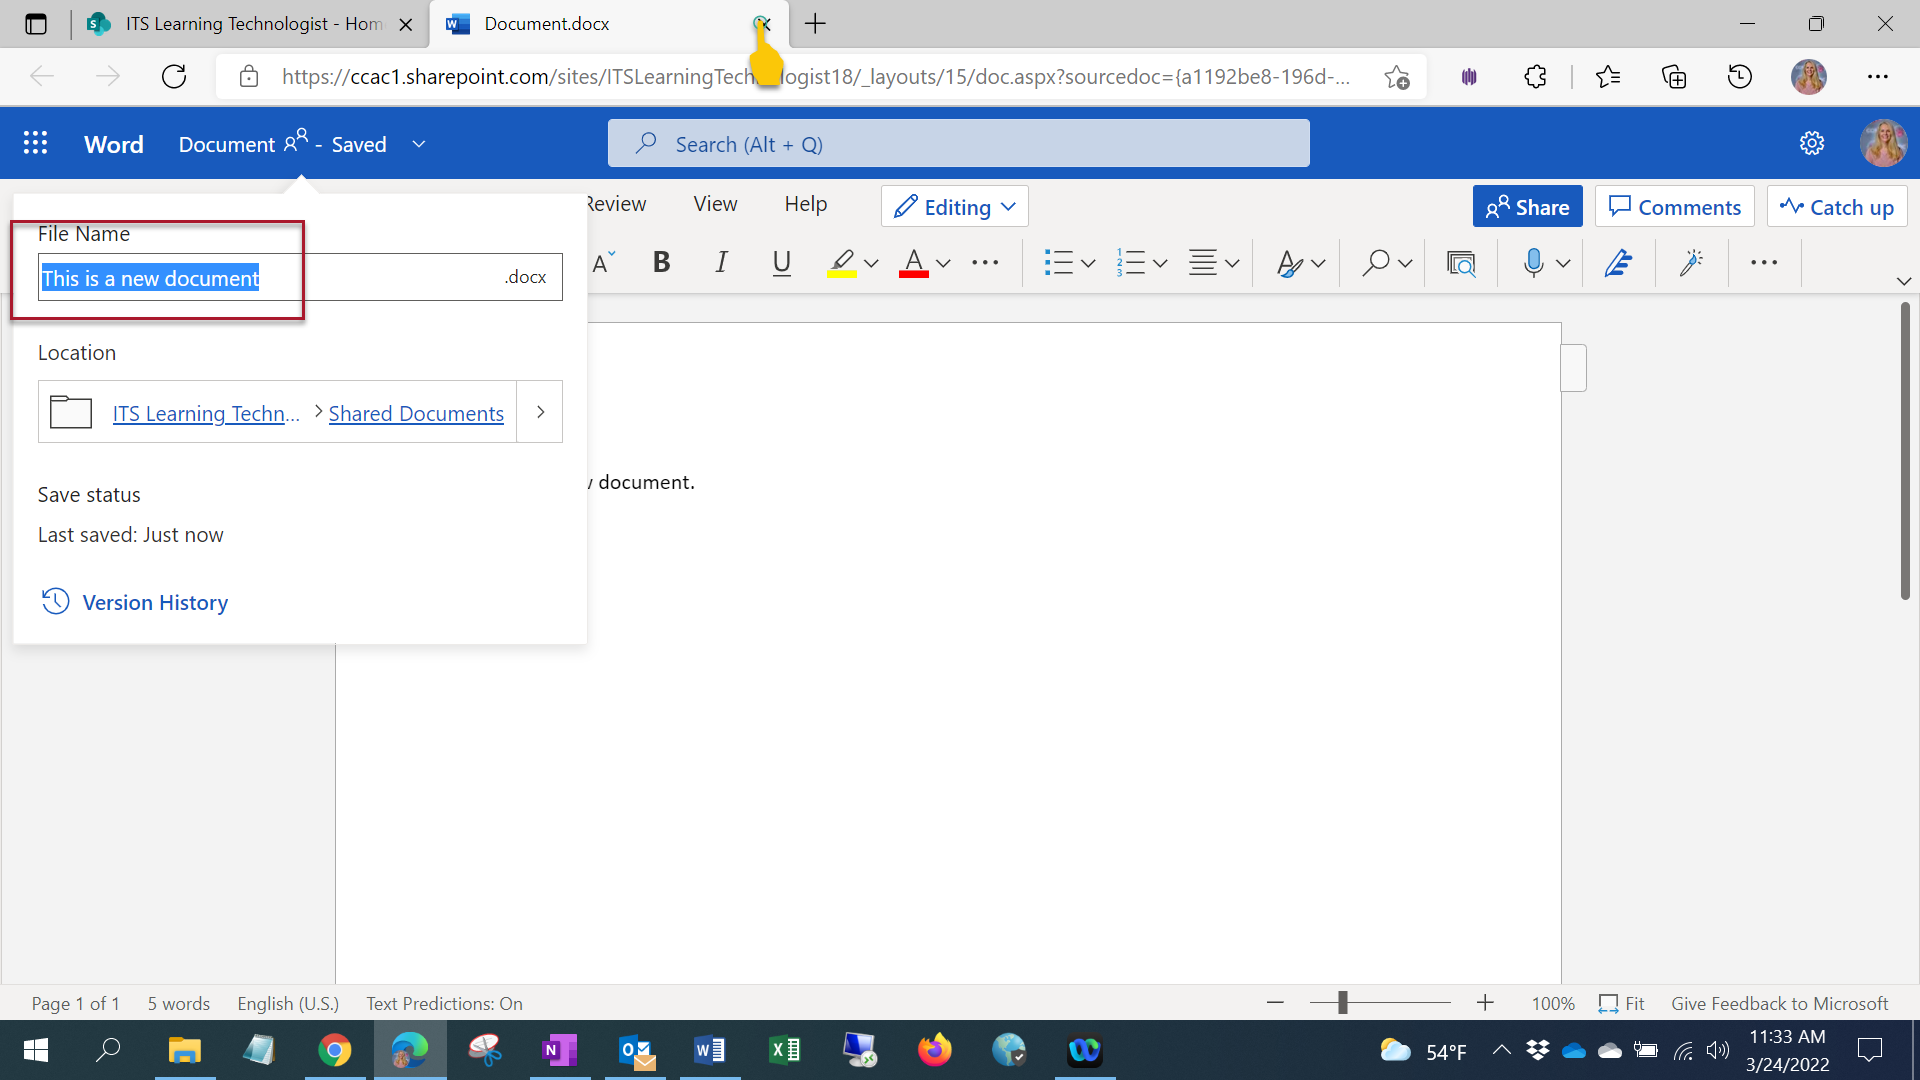
- You can name the document by clicking Document in the upper left corner

-
Where a box pops up for you to enter the File Name and press Enter and Close the tab
-
The document is automatically saved and is now in your document library
Videos
Videos should be stored on CCAC Video account or on CCAC's Panopto Server
Many frequently asked questions about Panopto can be found here: Panopto Articles
Working Remotely from Home
Best Practice
The day before you are going to work from home, connect to the VPN while on campus. This will ensure your software is up to date, and Global Protect has the correct settings and you have access.
Recommended Bandwith for Connecting to VPN
The recommended bandwidth for a VPN connect is 2.0Mbps - 4.0Mbps
How to connect to VPN
Connecting to the VPN using GlobalProtect
CCAC Laptops
Already have GlobalProtect installed.
Non-CCAC Laptops
This article should be used AFTER you have installed and setup the VPN software for the first time. Click here for the Install and Setup article
Windows
- Locate the GlobalProtect icon in the system tray - you may need to fully open the system tray to see the icon using the Show Hidden Icons option ^

- If not in the system tray, look in the program list under “Palo Alto Networks”
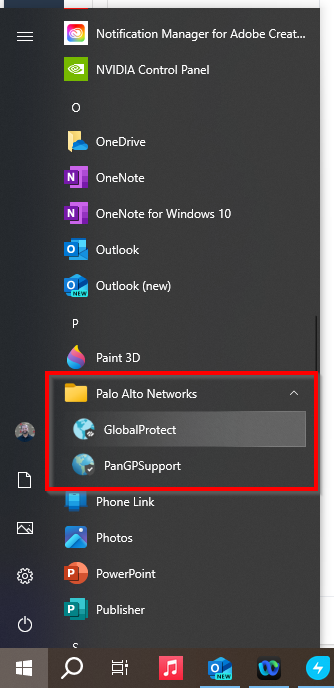
- If not in the system tray, look in the program list under “Palo Alto Networks”
- Click on the globe, and a window will appear

- Click the Connect button
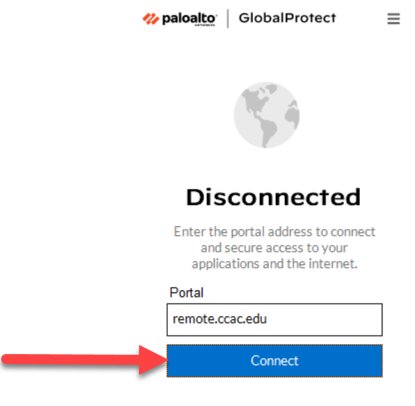
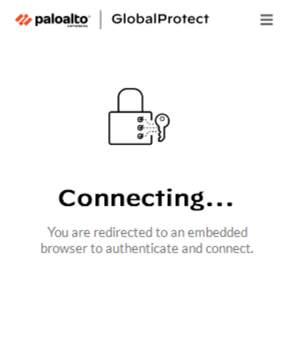
- VPN Connection will initiate
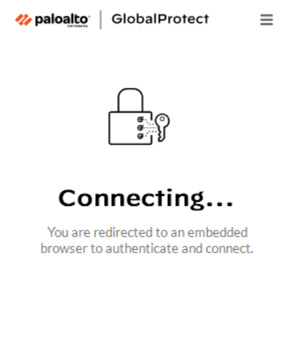
- This should open a new window to the CCAC SSO Login Screen
- VPN Connection will initiate
- Log in using your CCAC Username and Password
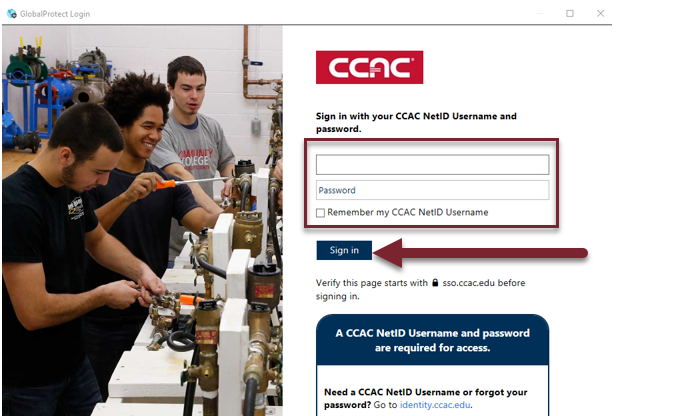
- Authenticate using the Two-Factor Authentication

- GlobalProtect will begin connecting
- You will see “Connected” once GlobalProtect fully connects to the VPN."
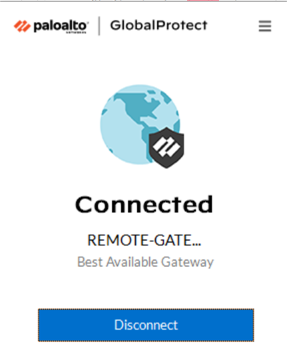
Once Connected
It may take up to a 2 minutes, before your device can reach CCAC systems. You may need to close or refresh your window /application to log in or gain access.
Ensure you are connected
You can always click on the GlobalProtect icon in the System tray to see if you are still connected.
Communications
CCAC will provide you with a CCAC email address. Typically, it will be your NetIDusername@ccac.edu. Your email can be access through Outlook. All communications will be sent and recieved to your CCAC email address.
Don't Forget!
Webex
Webex is our communication for instant messaging and quick chat communications. It is also a “soft phone” or a virtual phone to receive phone calls on your laptop. Webex should already be installed on your PC and you will log in using your CCAC email address.
Zoom
Transition to Teams
CCAC is currently transitioning to Microsoft Teams as our video conferencing communications tool. We encourage you to begin acclimating yourself to using Teams in preparation. Please see the Teams tab for more information on using Teams.
Zoom is our video conferencing communication tool. Your desk monitor should have a webcam built into the top of the monitor.
You will need to create your Zoom account
Creating a CCAC Zoom Account
- Go to https://ccac.zoom.us/
- Click the Create button
- Enter your CCAC NetID Username and Password
- Click the Sign In button
- Your account has now been created!
Then you will need to sign into Zoom with your Account
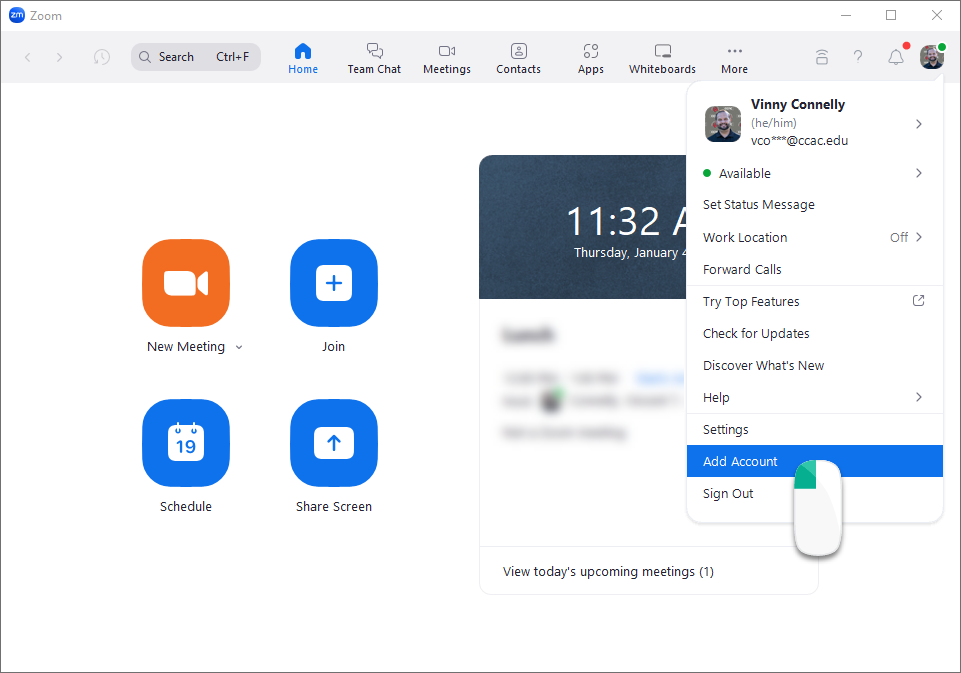
Signing into Zoom with your CCAC Zoom Account
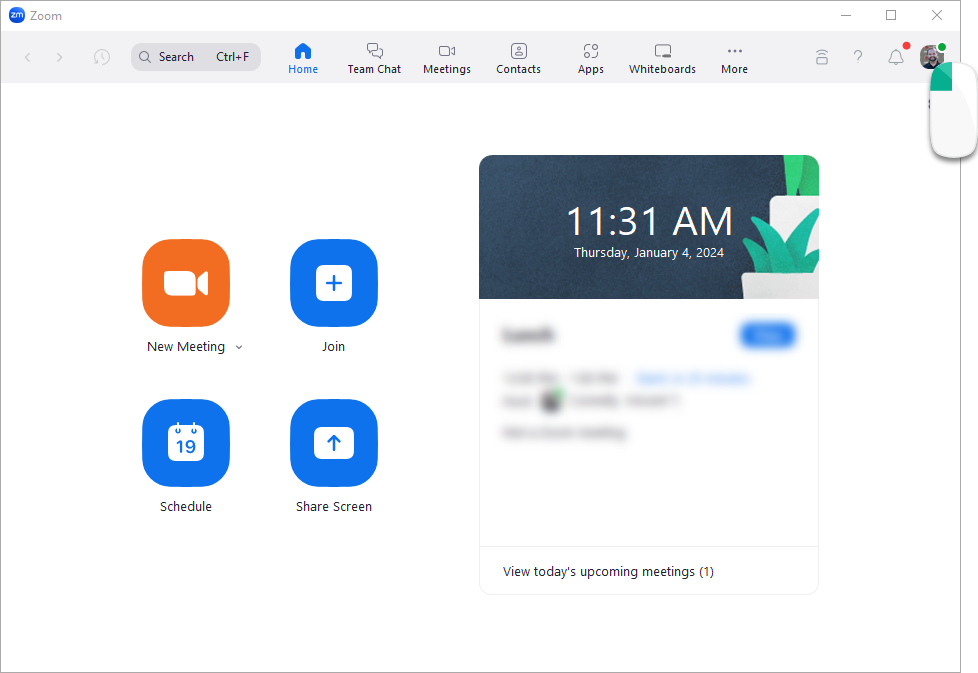
Zoom Application (Computer/Laptop)
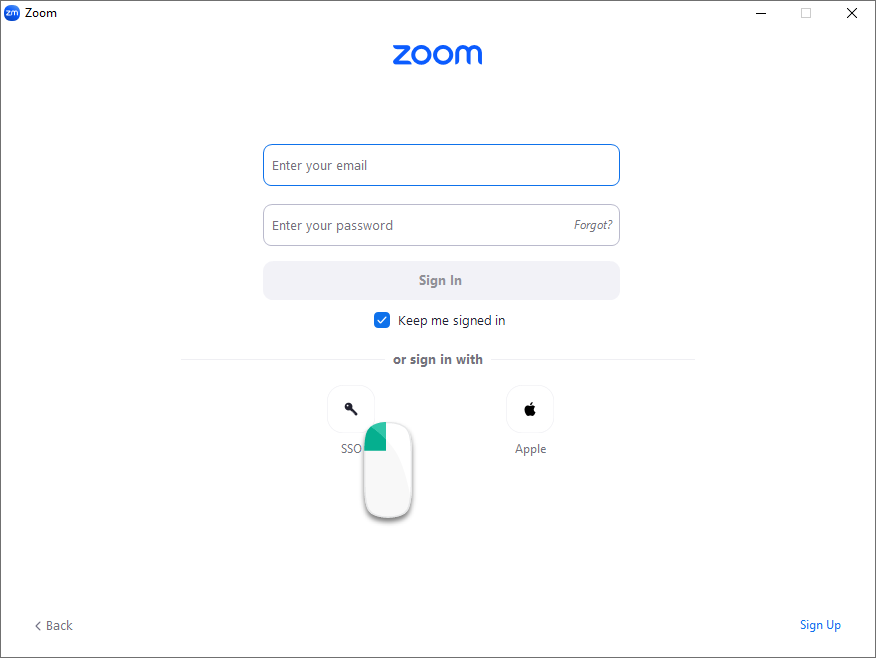
- Open the Zoom Application
- Choose the Sign In with SSO
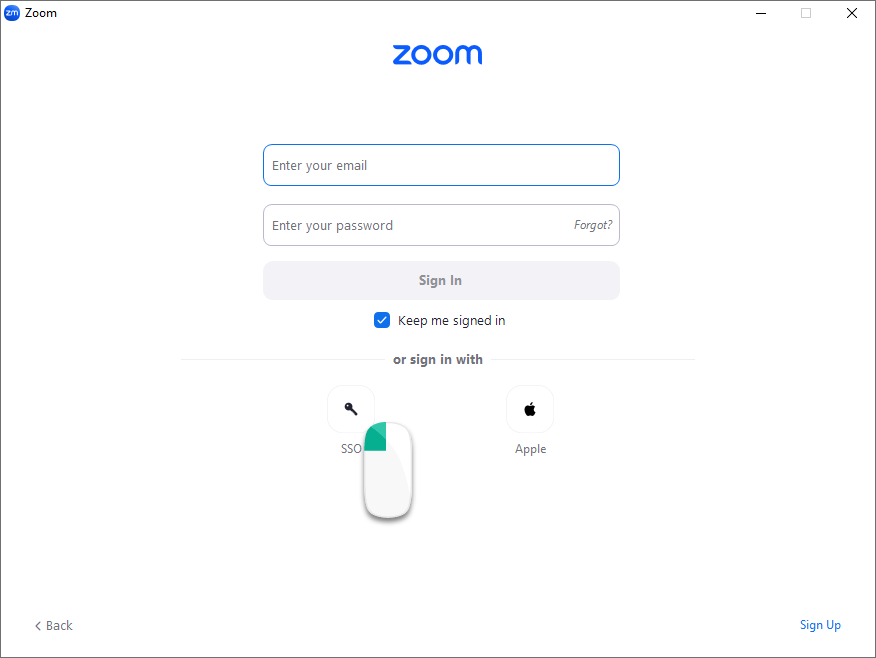
- Type "CCAC" in the company domain field, click the Continue button

- CCAC's SSO screen will appear
- Enter your CCAC Username and Password
- Click the Sign In button
Smartphone App
- Open the Zoom App
- Choose Sign In option

- Choose SSO Option

- Type "CCAC" in the company domain field, click the Go button

- Enter your CCAC Username and Password
- Click the Sign In button

Browser
- Go to https://ccac.zoom.us/
- Choose the Sign in button

- Enter your CCAC Username and Password
- Click the Sign In button

Teams
Transition to Teams
CCAC is currently transitioning to Microsoft Teams as our video conferencing communication tool. You are welcome to start using Teams as your department permits, to acclimate yourself in preparation for the transition. Below is our Microsoft Teams Guide, which provides support resources for Teams.
Microsoft Teams Guide
Please Note
While Microsoft Teams offers many features, this guide will focus on scheduling and running meetings. Teams is being used to replace Zoom, but will not replace Webex as our preferred chat and call application.
You may notice that Microsoft Teams offers a Teams/Channels App. You will not be able to create additional Teams/Channels; however, if you are an owner of a SharePoint site, you will have the option to create a Team for that site.
Training and Resources
- Getting Started with Microsoft Teams
- Microsoft Teams help and learning
- Microsoft Teams video training
- LinkedIn Learning Teams Training Resources
- Tips for setting up large meetings and events in Microsoft Teams
- Troubleshooting
- Installing Microsoft Teams
- CCAC Teams Training - General Meetings Training Recorded on 5.28.26
Scheduling a Teams Meeting
Managing your Teams Meeting
Please Note
Meeting management options are only available to organizers, co-organizers, and some option for presenters. These roles must be selected for meeting participants through the meeting options located in the meeting invite.
- Meeting options in Microsoft Teams
- Hide attendee names in Microsoft Teams meetings and webinars
- Lock a meeting in Microsoft Teams
- End a meeting for everyone in attendance in Microsoft Teams
- Manage attendee audio and video permissions in Microsoft Teams meetings
- Manage what attendees see in Microsoft Teams
- Manage breakout rooms in Microsoft Teams
- View live transcription in Microsoft Teams meetings
- Q&A in Microsoft Teams
- Sensitive content detection in Microsoft Teams meetings
- Manage meeting attendance reports in Microsoft Teams
- Using the lobby in Microsoft Teams meetings
- Present from PowerPoint Live in Microsoft Teams
- Laser point or draw on PowerPoint slides in Microsoft Teams meetings
- Share whiteboards and documents using your camera in Microsoft Teams meetings
- Create a poll in Microsoft Teams
Teams Meeting options as a Participant
- Use meeting controls in Microsoft Teams
- Chat in Microsoft Teams meetings
- Present content in Microsoft Teams meetings
- Mute and unmute your mic in Microsoft Teams
- Raise your hand in Microsoft Teams meetings
- Express yourself in Microsoft Teams meetings with live reactions
- Take meeting notes in Microsoft Teams
- Change your background in Microsoft Teams meetings
- Manage audio settings in Microsoft Teams meetings
- Reduce background noise in Microsoft Teams meetings
- Mute notifications during a meeting in Microsoft Teams
- Use live captions in Microsoft Teams meetings
- Use video in Microsoft Teams
- Spotlight someone's video in Microsoft Teams meetings
- Multitask during a Microsoft Teams meeting
- Express yourself in Microsoft Teams meetings with live reactions
- Join a breakout room in Microsoft Teams
- Customize your meeting view in Microsoft Teams
- Troubleshooting - Issues joining a Teams meeting
Teams Recording Options
- Record a meeting in Microsoft Teams
- Recap in Microsoft Teams
- Customize recap summaries in Microsoft Teams
- Play, share, and download a meeting recording in Microsoft Teams
- Delete a meeting recording in Microsoft Teams
- Edit or delete a meeting transcript in Microsoft Teams
- Customize who can access a recording or transcript in Microsoft Teams
- How to Enable the Microsoft Teams Integration for Panopto
Clipchamp (editing your Teams meeting)
Advanced Meeting Protection
Webinars
- Tips for setting up large meetings and events in Microsoft Teams
- Get started with Microsoft Teams webinars
- Schedule a webinar in Microsoft Teams
- Create a webinar
- Duplicate a webinar
- Add webinar co-organizers
- Add webinar presenters
- Show or hide presenters on the event site
- Change webinar details
- Customize a webinar in Microsoft Teams
- Publicize a webinar in Microsoft Teams
- Manage webinar registration in Microsoft Teams
- Change webinar details in Microsoft Teams
- Manage webinar emails in Microsoft Teams
- Cancel a webinar in Microsoft Teams
- Manage webinar recordings in Microsoft Teams
- View webinar reports in Microsoft Teams
Town Halls
- Tips for setting up large meetings and events in Microsoft Teams
- Get started with town hall in Microsoft Teams
- Schedule a town hall in Microsoft Teams
- Add external presenters
- Duplicate a town hall
- Invite attendees to a town hall
- Embed a town hall in SharePoint
- Town hall live reactions
- Town hall emails
- Publish a town hall
- Manage town hall emails in Microsoft Teams
- Customize a town hall in Microsoft Teams
- Host a town hall in Microsoft Teams
- Control town hall production tools in Microsoft Teams
- Attend a town hall in Microsoft Teams
- Chat in a town hall in Microsoft Teams
- Town hall insights in Microsoft Teams
- Manage town hall recordings in Microsoft Teams
- Cancel a town hall in Microsoft Teams
Requesting Apps in Teams
For information on requesting Apps in Microsoft Teams, please log into the CCAC Supportal and use the Microsoft Teams App Request
Troubleshooting
Please Note
Please try the steps below to remedy your issue, but if you still need assistance, please submit a ticket in the CCAC Supportal or contact the ServiceDesk.
- Can't join a meeting in Microsoft Teams
- Camera isn't working in Microsoft Teams
- Microphone isn't working in Microsoft Teams
- Speaker isn't working in Microsoft Teams
- Can't record a meeting in Microsoft Teams
- Can't transcribe a meeting in Microsoft Teams
- Access meeting chat in Microsoft Teams
- Breakout rooms troubleshooting guide in Microsoft Teams
- My calls or meetings keep dropping in Microsoft Teams
- Monitor call and meeting quality in Microsoft Teams
Microsoft Teams Apps
Shifts
Attention
For Microsoft Shifts, supervisors are responsible for backing up team schedules by using the export feature within the Shifts application. The ITS team does not have the capability to perform these backups. If exports are not completed regularly, there is a risk that shift data could be permanently lost if it is accidentally deleted.
For more information, please visit What is Shifts?
Panopto
For more information, please visit How to Enable the Microsoft Teams Integration for a User or Team
Applications
CCAC has many applications that make the college work as a whole; your department may use a specific application or a specific part of the application. You will need to work with your supervisor to learn specifically how your department uses the application. You can use the Help Center to find a quick how to guide or the Learning Communities to learn about a whole application.
View the list of CCAC supported Software & Applications
Most Used Applications
Colleague |
|
Navigate360 |
|
Formstack |
|
Perceptive Content |
|---|---|---|---|---|---|---|
|
 |
|
|
 |
||
|
|
|
Use of AI
Please note, with the use of AI, CCAC's data and Personal Identifiable Information (PII) could be accidentally exposed. Use the Artificial Intelligence Guide to become familiar with what is and is not supported.
Training and Cyber Security
Locating the New Hire Trainings
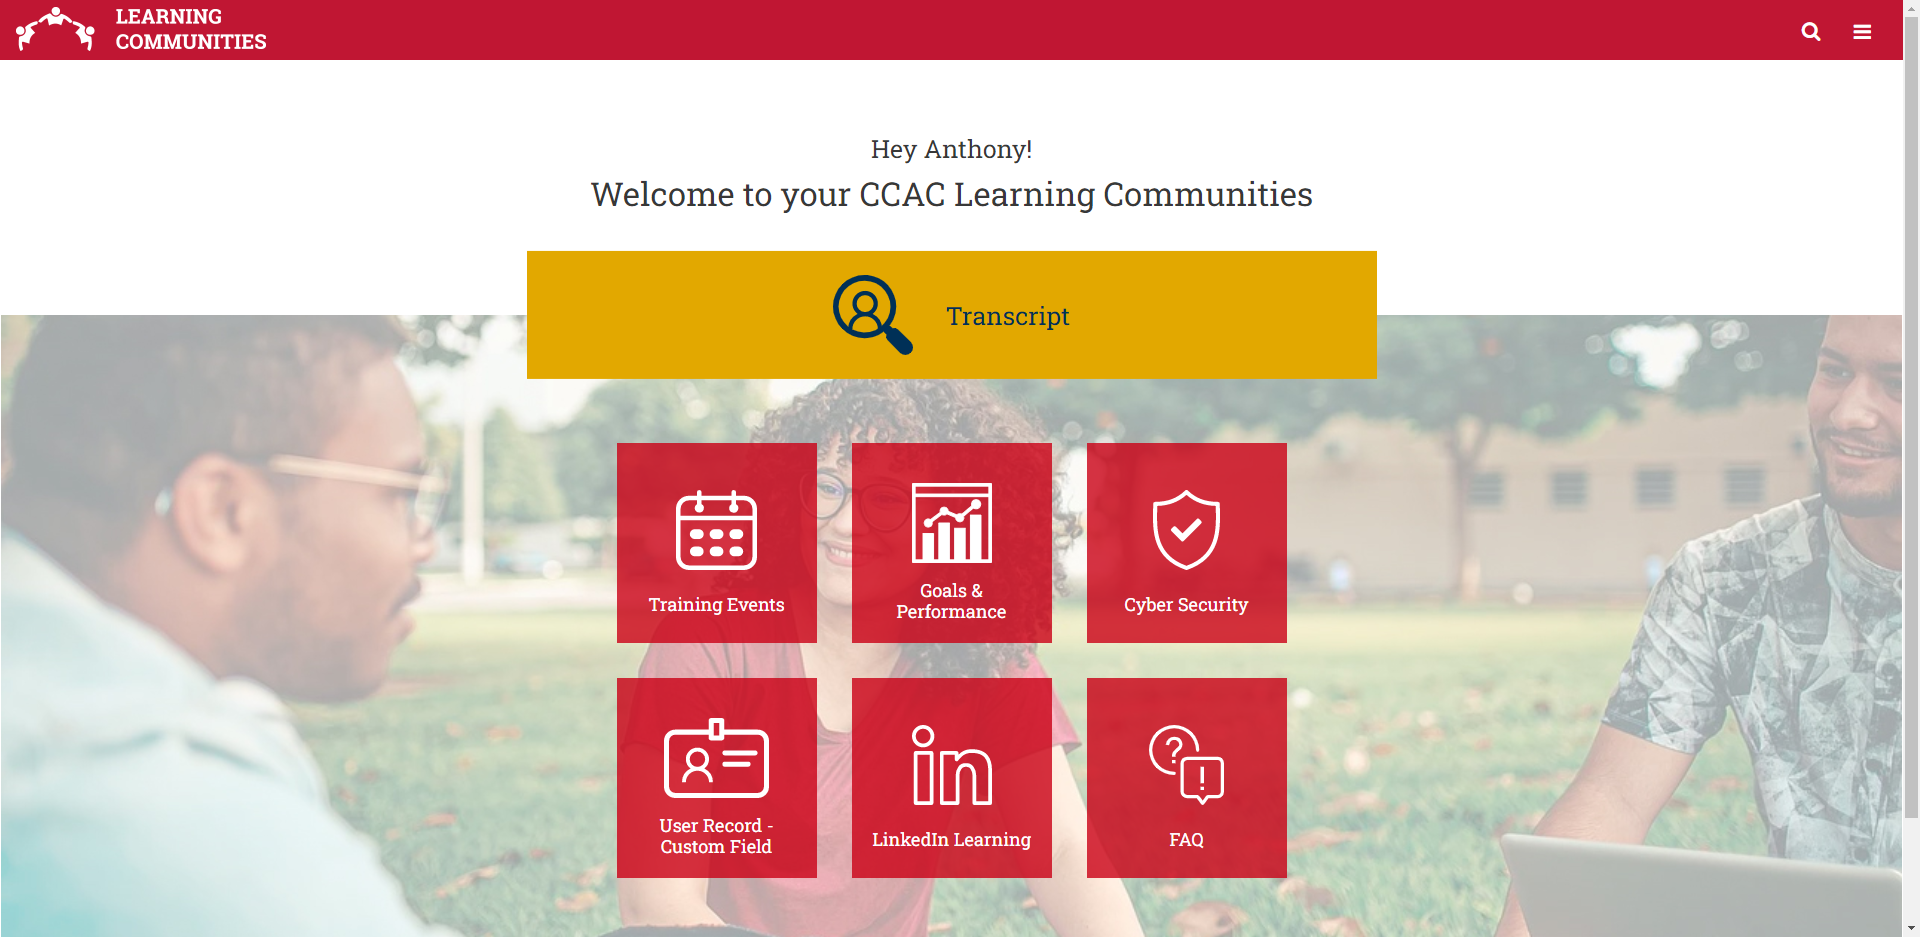
Don't forget to log into the CCAC Learning Communities to see your assigned trainings. Your supervisor or the Office of Human Resources will be able to assist you with what trainings need to be completed. You can access these by going to the “Learner Home” or your “Transcript” and filtering what is due.
Logging into the Learning Communities
CCAC Learning Communities uses SSO for login
You should always access the CCAC Learning Communities through the quick links located in the MyCCAC Hub (left menu or tile). This is because the Learning Communities site uses Single Sign-On (SSO).
Note: You will have access to the Quick Links section particular to your role at CCAC (Administrator, Faculty, or Staff).

- Navigate to the CCAC Learning Communities
- Enter your CCAC NetID and password

- Click the Sign in button

- You will be taken to the Learning Communities home page
Common errors when accessing the CCAC Learning Communities
If you accessed the site directly, you may see a 'Learning Communities' log-in screen. Do not use this sign-in screen. The Learning Communities login uses CCAC's SSO for increased security and the passwords are not stored in the Learning Communities. 
Using Single Sign-On and still getting an error?
- Try clearing your browser cache - Clearing a Browser's Cache / Browsing Data
- Try using the in-private version of the browser
- Try using a completely different browser
- If you've tried those steps and are still having issues, you may want to Contact the Service Desk.
Cyber Security Trainings
Your Cybersecurity Training
Accessing your Training through KnowBe4
- Navigate to https://training.knowbe4.com/ui/login to begin your login process
- Enter your CCAC email address
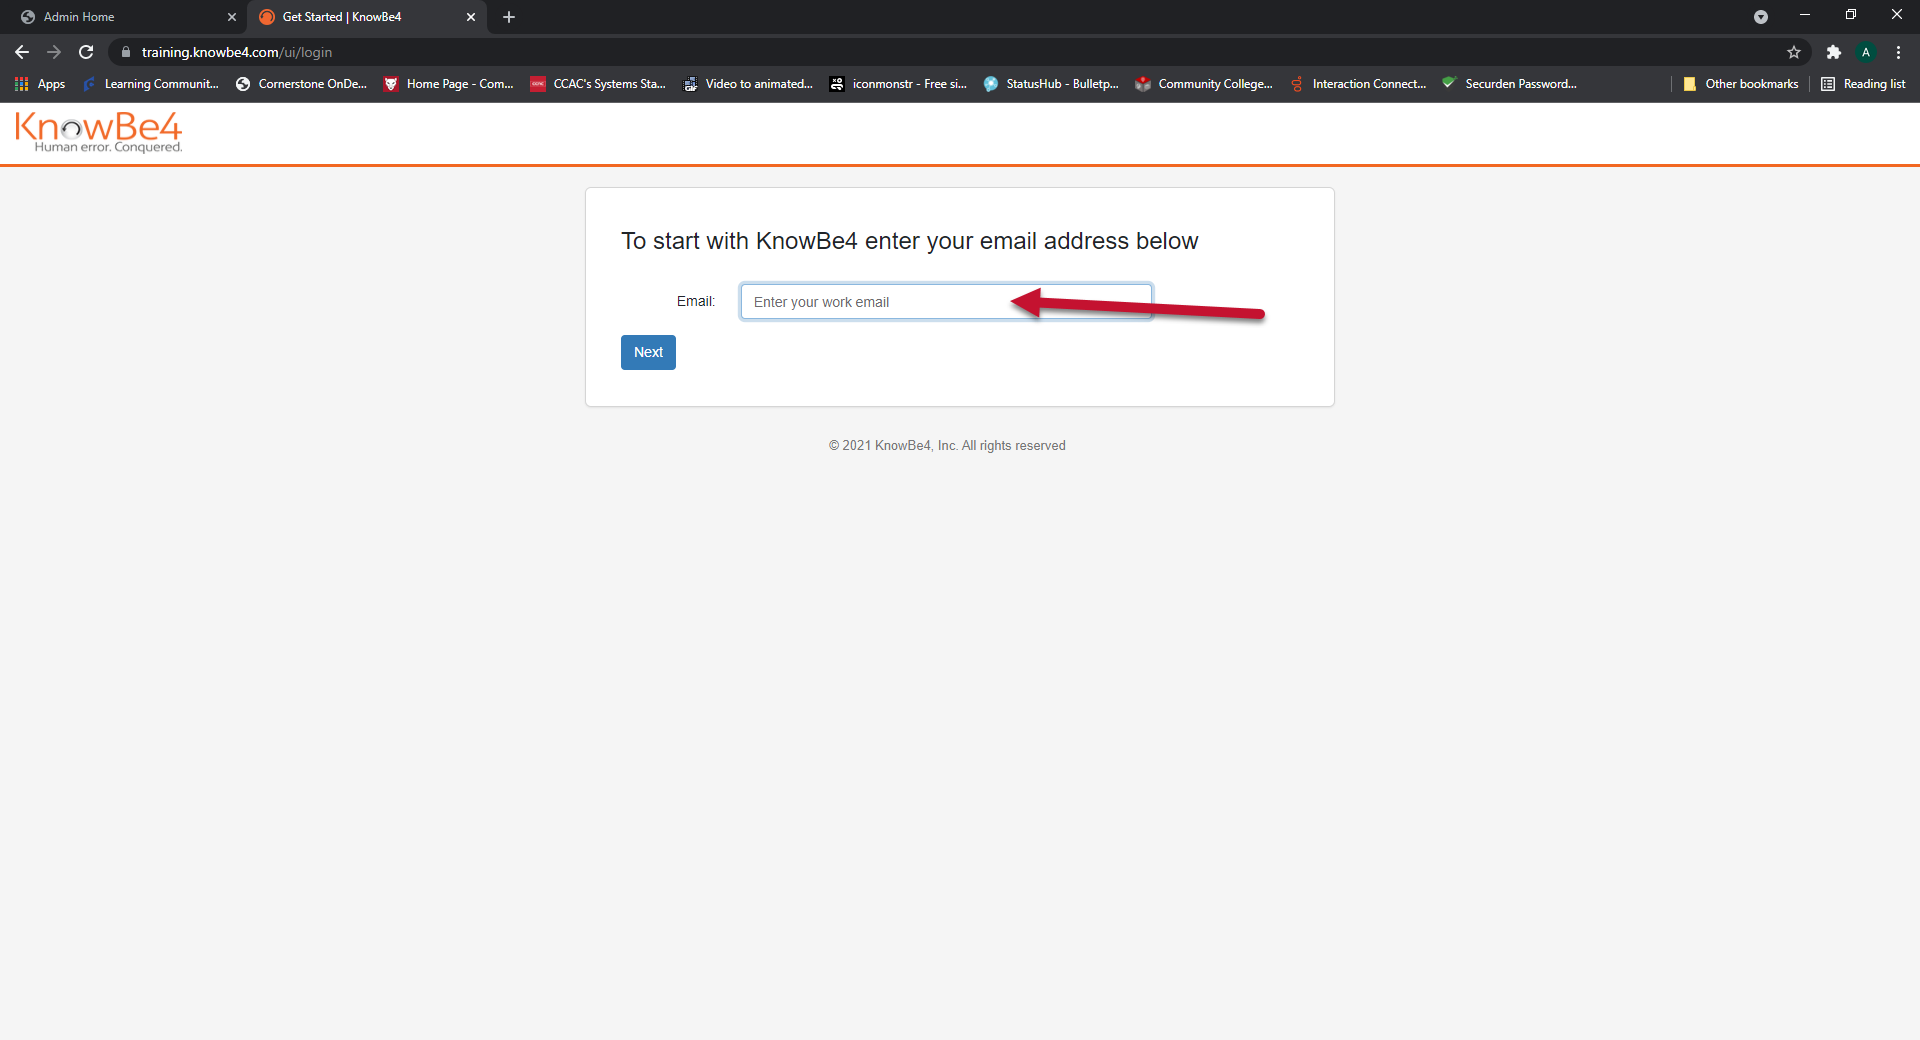
- Click Next
- This will take you to our CCAC Single Sign-On (SSO) page

- This will take you to our CCAC Single Sign-On (SSO) page
- Enter your CCAC NetID and password
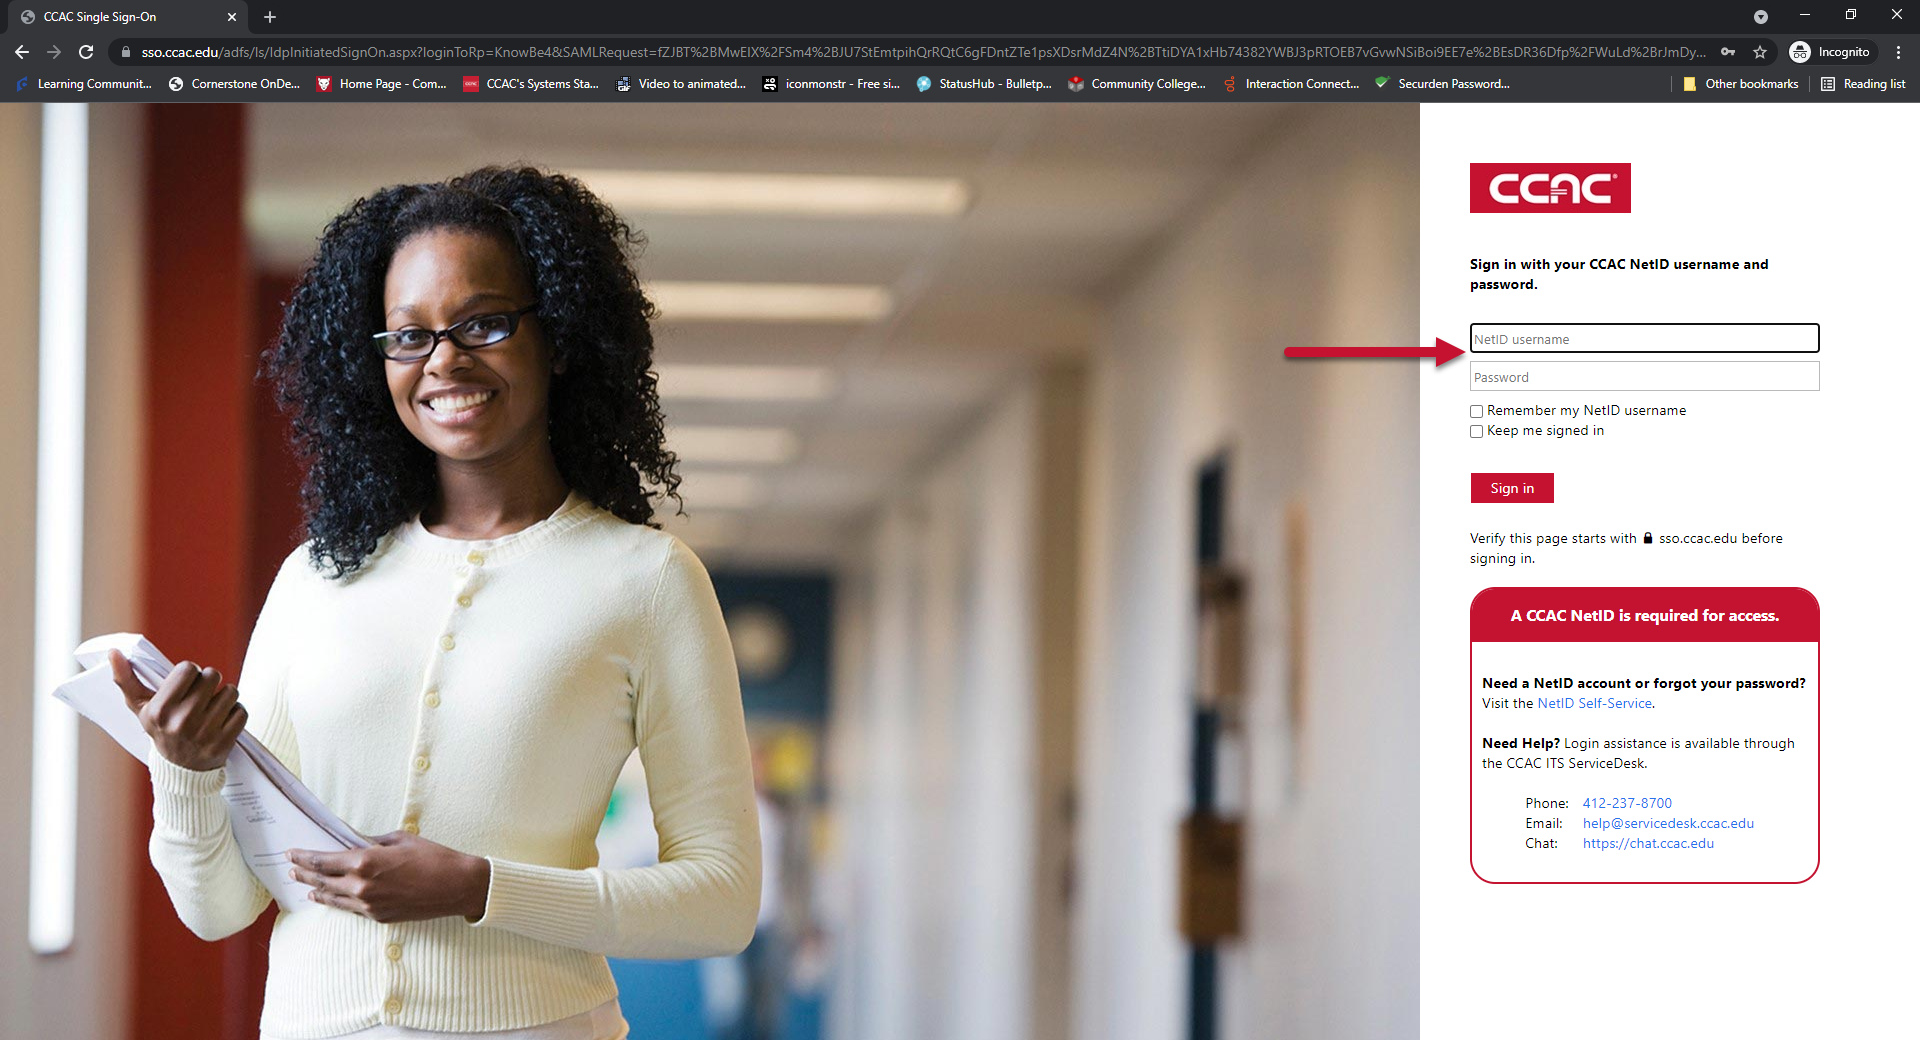
- Click Sign-in

- Follow the prompts to tour the application (Optional)
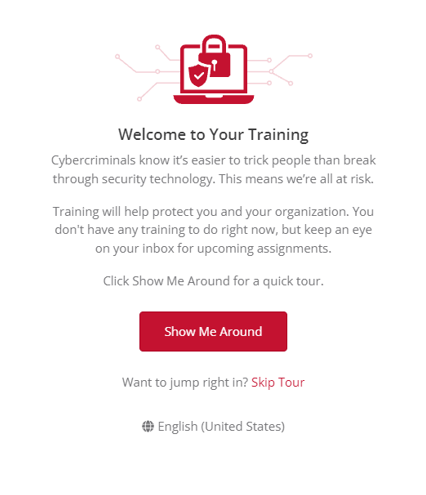
- Once you tour the application or skip the tour, you will see any trainings that have been assigned
- If you don't have any assigned trainings, you will see a message stating that.

- If you don't have any assigned trainings, you will see a message stating that.
Accessing Training through the MyCCAC Hub
- Access the MyCCAC Hub by visiting https://my.ccac.edu and logging in to the appropriate profile

- Additional instructions on how to log in to your profile or use the hub can be found in the MyCCAC Hub Guide
- When logged in to the MyCCAC Hub scroll down to the tile that says 'CYBERSECURITY TRAINING' and then click on the tile.

-
Enter your CCAC email address
- Click Next
- This will take you to our CCAC Single Sign-On (SSO) page
- This will take you to our CCAC Single Sign-On (SSO) page
- Enter your CCAC NetID and password
- Click Sign-in
- Follow the prompts to tour the application (Optional)
- Once you tour the application or skip the tour, you will see any trainings that have been assigned
- If you don't have any assigned trainings, you will see a message stating that.

- If you don't have any assigned trainings, you will see a message stating that.
Need ITS Help or Assistance
Contact the ITS ServiceDesk. We will create a ticket for your request or problem that is then assigned to the correct team to assist you. The ticket is trackable through the supportal and you are also able to leave notes, check the status, close the ticket and see past resolutions.
Call: If there is an emergency and needs immediate assistance
Email: If the situation can wait an hour or two. Provide full screen screenshots if possible.
Help Center: A resource with step-by-step directions, pictures and videos.
Supportal: Is a central hub, to request or submit a ticket. It also allows you to view the ticket's status, owner, etc. It will also allow you to reply and add other users to your ticket.