MyCCAC Hub
This article will help you access and navigate the updated MyCCAC Hub.
Upon clicking the tiles or the menu items, you may be presented with pages of information, SharePoint sites, Help Center articles, or the CCAC website.
Access the MyCCAC Hub
- To access the MyCCAC Hub, visit the following link:
- Click on Student/Faculty/Staff/Admin profile

- At the single sign on screen, enter your NetID username and password, then click sign in.

Example

General Navigation
- Navigation menu that contains the same links as the tiles, along with information for each functional area
- Tiles that contain information for each functional area
- Drop down menu that allows for arranging the tiles, searching, providing feedback, and logging out

Example

Arrange the Tiles
About the Arrange function:
Arrange the tiles by dragging them around on the screen to provide a more personalized experience
- Click on Arrange in the upper left corner

- Using the left mouse button, click and drag the tiles to arrange them to your liking
- After you are finished arranging the tiles, click on Done in the upper right corner
- If you wish to revert back to the original layout, click on Reset

Example

Searching
About the Search function:
Keyword search for information in the MyCCAC HUB
- Click on Search in the upper left corner

- Enter keywords and hit enter on your keyboard
- Click on any of the search results

Example

SharePoint Sites
- Information regarding the site will visible at the top
- There will be a button to return back to the MyCCAC Hub
- Quick links for access to helpful information
- Accordions, when clicked, will display document libraries and resource links. Click on these links within the libraries to open documents and websites
- Contact information


Example

Log Out
- Click on the drop-down arrow in the top right corner
- Click on Log Out

Example

Header Field Too Long Error Accessing MyCCAC
Why this Happens
This issue might occur if you try to access the MyCCAC site many times in a short period before you complete the sign-in. This adds too many cookies to the request, which in turn causes the HTTP request header to become too large.
Resolution
To resolve this issue, delete cookies in the browser. You will need to clear the browser's cookies, which is typically an option when clearing the cache.
Clearing a Browser's Cache / Browsing Data
What is Browser Cache?
Clearing the cache and cookies from a web browser is an important first-step for almost any troubleshooting for internet browsing. The 'cache' is a tool used by your internet browser to speed up the page loading process. However, sometimes it can cause a problem when websites are updated and developed as files saved in the cache may conflict with what's actually coded into the website. Clearing cache and cookies is a way we can be sure that any issues you may come across are actually something wrong with the website, rather than inconsistencies caused by using different browsers.
Keyboard Shortcut Keys
Chrome (for Desktop or Chromebook)
- Click the Tools menu (three dotted lines in the upper-right corner).
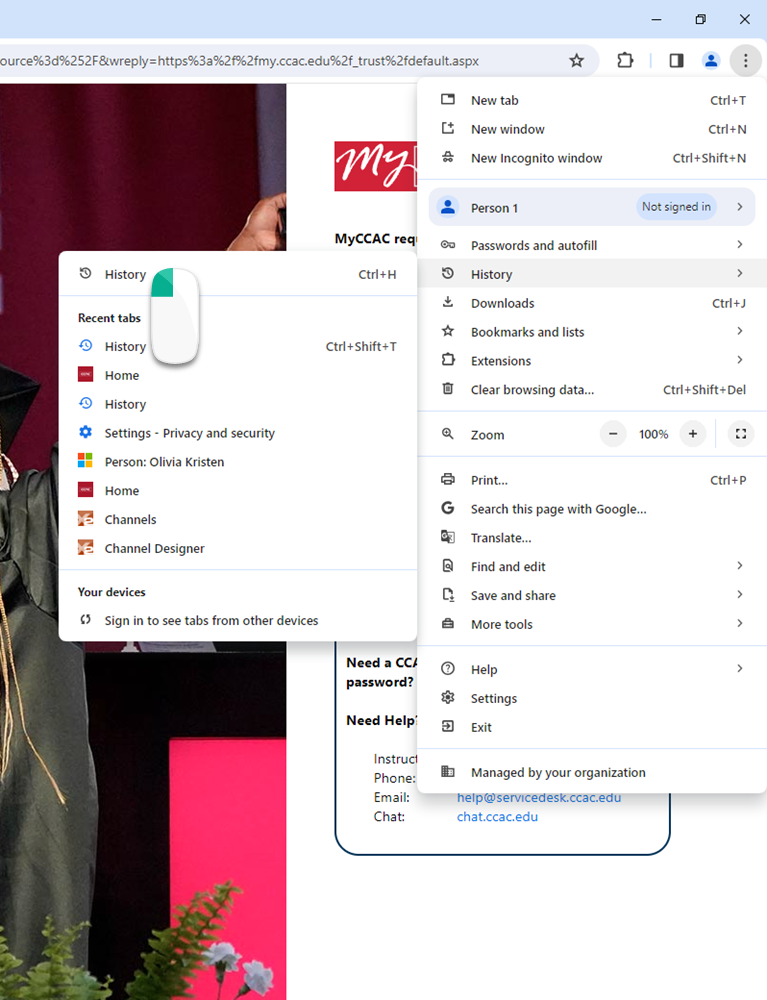
- Click History, a menu will pop out
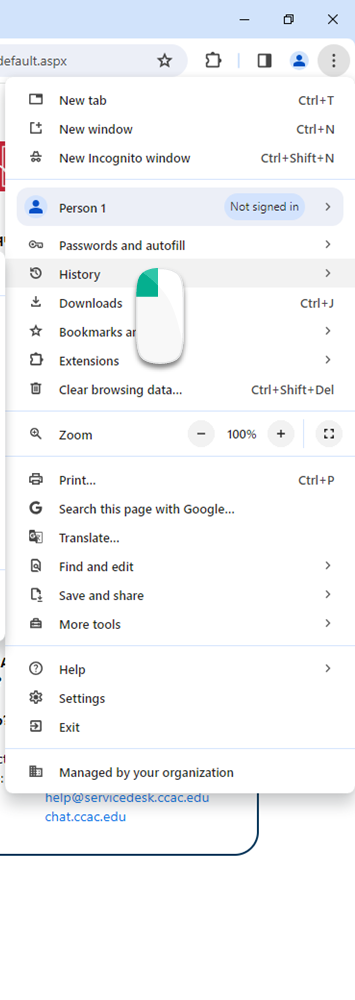
- Click History
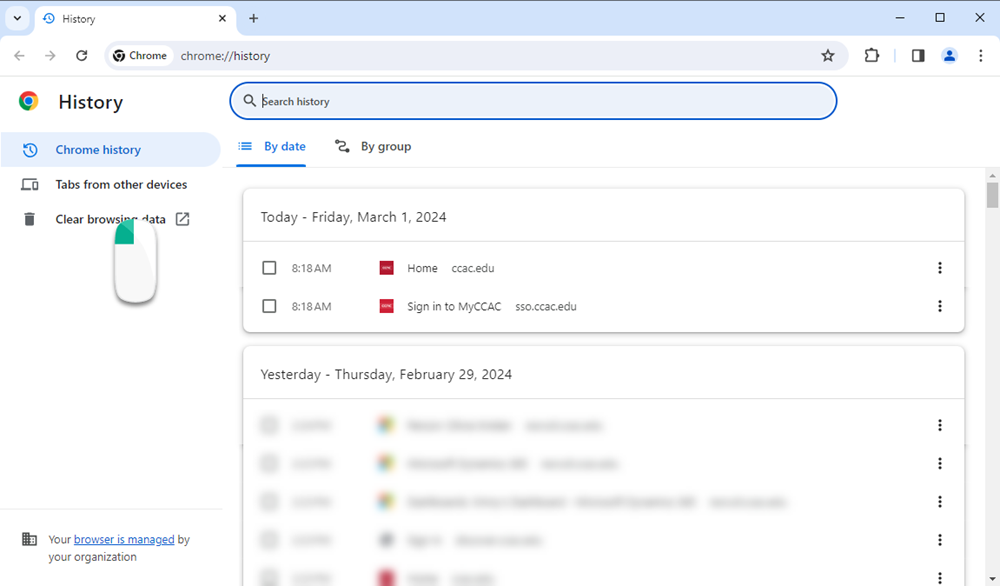
- Select Clear Browsing Data from the left-hand side.
- Set the Time Range set to All Time. Check-mark Cookies and other site data and Cached images and files and select Clear Data.
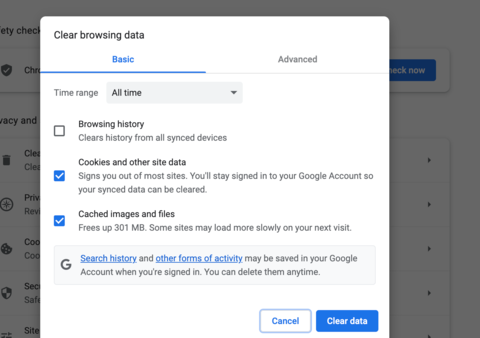
- If on a Windows computer, close and re-open Chrome to save your changes.
If on an Apple computer, go to the Chrome menu on the top menu bar and select Quit for the changes to take effect.
Chrome (for iPhone)
- Open Google Chrome on your iOS device.
- Click on the menu toolbar in the bottom right corner.
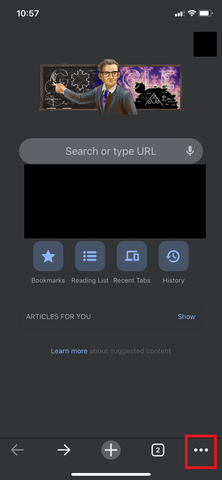
- Select Settings.
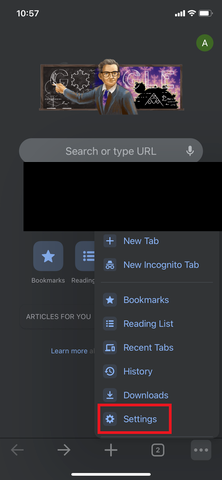
- Select Privacy.
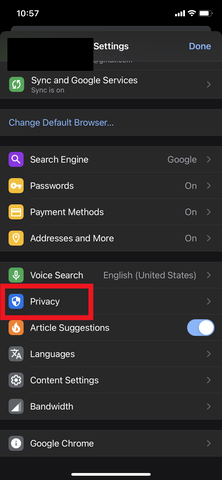
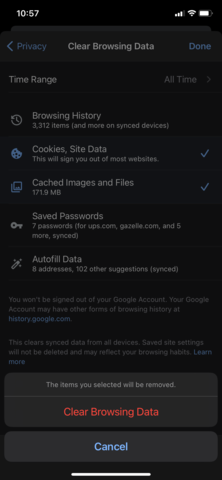
- Select Cookies, Site Data, and Cached Images and Files. At the top, set the Time Range set to All Time.
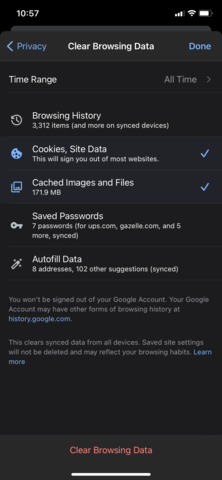
- Click Clear Browsing Data at the bottom of the screen.
- Then confirm by clicking Clear Browsing Data again.
Chrome (on Android)
- On your Android device, open Chrome
 .
. - Tap More

 Clear browsing data.
 - To delete browsing history (including open tabs), select a duration and then tap Clear data. The default duration is 15 minutes.
- To choose more specific types of data you want to delete, tap More options. Select the types of browsing data you want to delete and then tap Clear data.
Firefox
- Click on the Tools bar (three bars in the top-right corner).
- Click History.
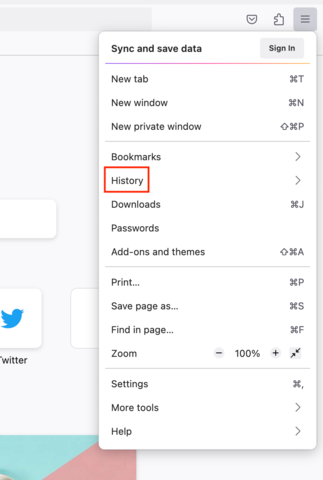
- On the menu to the right, select Clear Recent History.
- In the Clear All History menu, select the time range to Everything.
- Select the options: Cookies, Cache, Active Logins, Site settings, and Offline website data.
- Under data, Site settings and Offline website data are checked.
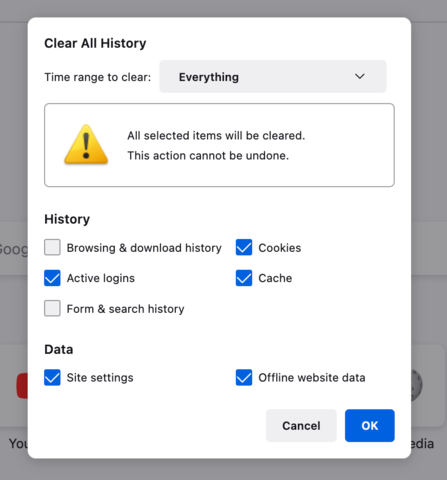
- Click OK.
- If on a Windows computer, close and re-open Firefox to save your changes.
If on an Apple computer, go to the Firefox menu on the top menu bar and select Quit for the changes to take effect.
Microsoft Edge
- On your computer, Open Edge
- At the top right, Click the ...
- Click Setting
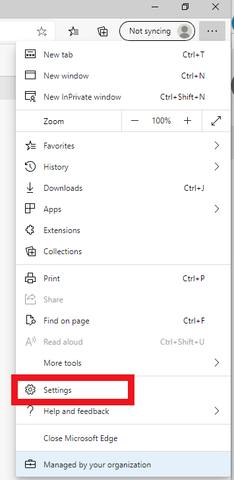
- Click Privacy, search, and services
- Under Clear browsing data
- Click Choose what to clear

- Choose All Time from the Time range drop-down menu
- Choose the following types of data to clear
- Cookies and other site data
- Cached images and files
- Site permissions
- Hosted app data
- Select Clear now
Safari (on Mac)
- Click on Safari on the top menu bar.
- Click Settings.
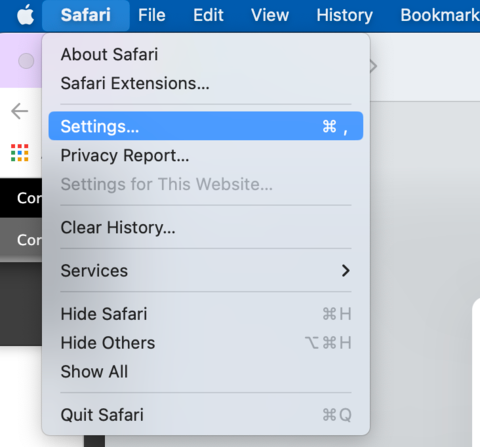
- Click the Privacy tab.
- Click Manage Website Data...
- Click Remove All.
- Click Remove Now.
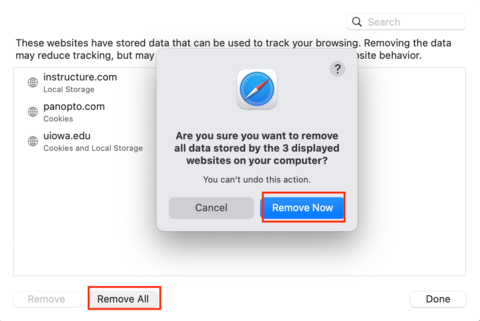
- Go to the Safari menu on the top menu bar.
- Select Quit to close Safari and save your changes.
Safari (on iPhone)
- Go to the Settings app on your device.
- Scroll down to the Safari menu.
- Scroll down and select Clear History and Website Data.
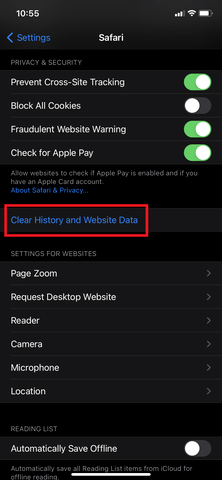
- A pop-up will come up verifying that you want to clear the History and Data. Select Clear History and Data.
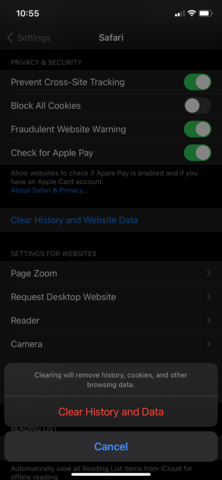
- The button for Clear History and Website Data will turn gray when cache and cookies have been successfully cleared.
Internet Explorer
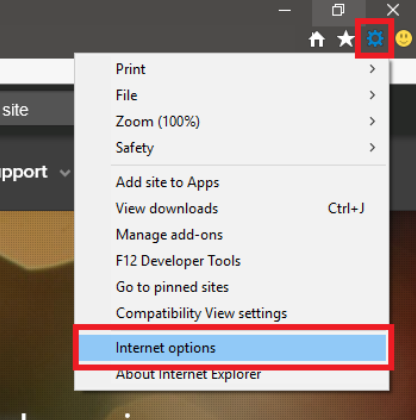
- Click on the Settings menu in the upper-right corner.
- Click Internet options.
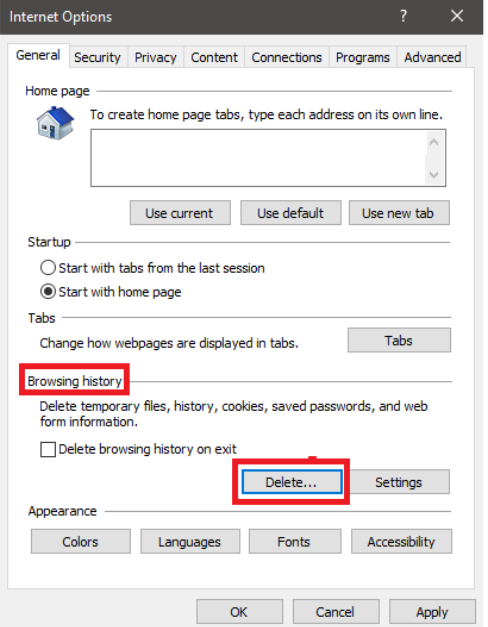
- Under the General tab on the upper-left-hand side, scroll down to Browsing history.
-
Select Delete...
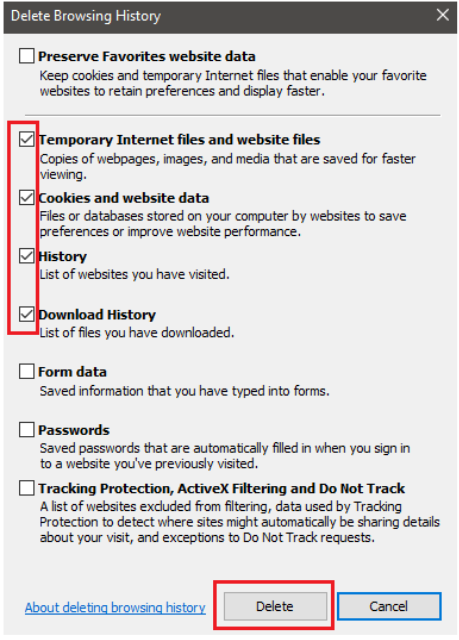
- Check the Temporary Internet files and website files, Cookies and website data, History, and Download History boxes.
- Select Delete.
- Close Internet Explorer and reopen it for changes to take effect.
Alternative Method: Force Reload Single Webpage without Saved Cache
Shift + F5 is used to force reload a webpage, not using the cached files for that page. This will retrieve a completely new page. Note, the page may take longer to load because the data it loads is not from the cache files.

